Playbooks

Quick Reference
In 2 playbooks
Receiver routes
Depth-chart slots are shown as they line up in the base package for this set.
| Player | Side | Route |
|---|---|---|
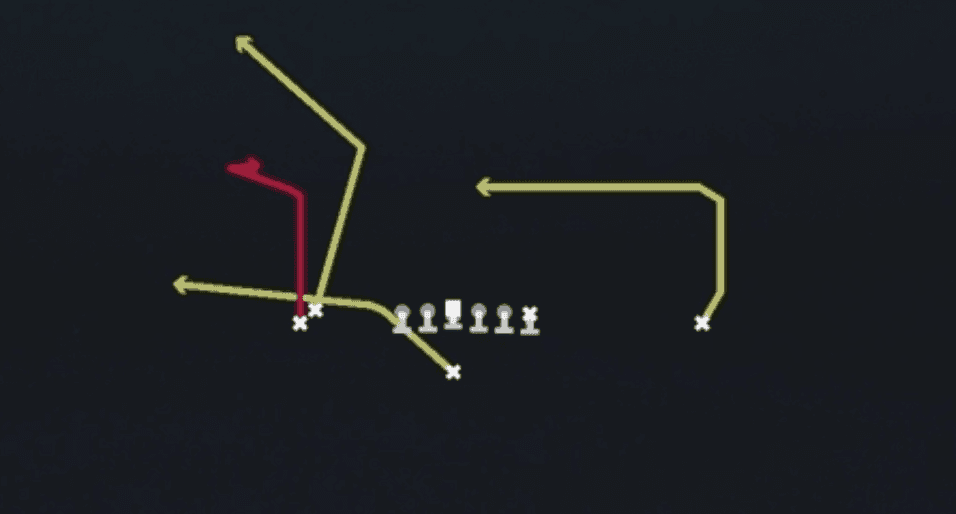
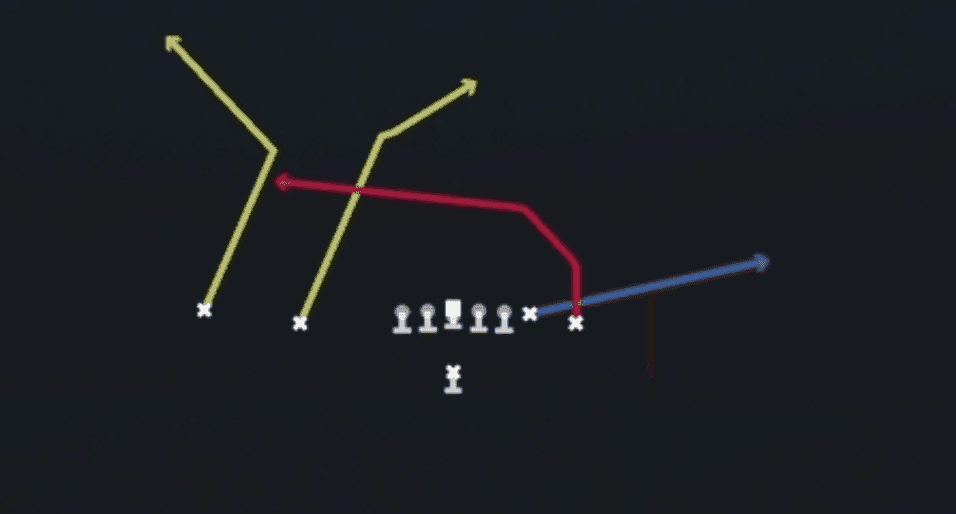
| HB1 | Middle | Block and Release Hook |
| WR3 | Left | Speed Out |
| WR1 | Left | Streak |
| WR2 | Right | Drag |
| TE1 | Right | Pass Block |
Read progression
- WR2 right, Drag
- HB1, Block and Release Hook or WR3 left, Speed Out or WR1 left, Streak
Breakdown
Flanker Drag out of Singleback Doubles sends both outside receivers on deep vertical breaking routes, with the X receiver on a deep post crosser and the Y receiver on a wheel style vertical up the numbers, clearing out the top of the defense. The slot receiver runs the namesake flanker drag underneath, working across the field at a shallow depth to sit in the void behind linebackers, while the HB releases into a flat route out of the backfield as a checkdown or man beater against a linebacker in coverage. This is a man beater concept at its core because the drag creates natural rub traffic and separation against man defenders, and the primary read progression starts with the drag route, then works to the HB flat, and finally looks to the deep shots if the underneath defense sells out on the crosser.
Defensive Reads
Key the middle linebacker depth immediately after the snap, since a shallow drop signals awareness of the drag route and should push your quarterback to the HB flat instead. Watch for user controlled defenders sitting in the drag lane or lurking underneath, which is the most common way this play gets shut down since the crosser has no built in blocker protection. Identify Cover 3 or Cover 4 zone drops by reading the corners, if the outside corners bail deep at the snap the drag route will find soft grass against zone defenders who are focused on the vertical shots. Recognize blitz packages by checking for a defender creeping toward the box pre-snap, since a nano blitz or overload rush can beat the HB's flat route before the quarterback gets through his first read. Against man coverage with a deep safety over the top, trust the natural pick action from the crossing routes to spring the drag route open, but be wary of a rover or robber defender sitting in the shallow middle who can jump the route.
Usage Tips
Use this play on second and medium to third and short since the drag route sits at a depth that consistently converts against linebacker drops and man leverage.
Pre-snap, check for single high safety looks or two high shells with soft corner alignment, since the drag route thrives when the defense is playing off coverage or Cover 3 with linebackers dropping into short zones.
If you see man coverage indicators such as tight press alignment on the outside receivers, trust the drag route first because the crossing action against man defenders almost always creates separation by the time it reaches the middle of the field.
Hot route the HB to a quick out or seam if the defense shows blitz pre-snap, giving your quarterback a faster outlet than the drag if pressure is coming.
Pair this play with Flanker Dig or Flanker Drive in the same set to keep the defense guessing on route depth, since all three plays share similar route stems but attack different levels of the field.
Other Plays in Doubles
 0 1 TrapTrap, Run Play, Power Run
 Bubble ScreenScreen Pass, Bubble Screen, Pass Play +1
 Corner StrikeCorner, Pass Play, Block and Release +1
 Curl FlatsFlat, Curl, Pass Play +1
 DaggerDagger, Pass Play, Cover 2 Beater +7
 Deep AttackPass Play, Go, Post +7
 Double SlantsSlant, Pass Play, Flat
- Fade OutOut, Fade, Pass Play +1
- Fade SmashFade, Smash, Pass Play +5
 Flanker DigDig, Pass Play, Flat +3
 Flanker DriveDrive, Pass Play, Cover 4 Beater +6
 ForkPass Play, Flood, Corner +6
 Four VerticalsFour Verts, Pass Play, Cover 2 Beater +5
 Goalline FadeFade, Pass Play, Block and Release +2
- HB CounterCounter, Run Play, Power Run
 HB CutbackRun Play, Inside Zone, Zone Run +1
 HB DiveDive, Run Play
 HB DrawDraw, Run Play
- HB Mid ZoneRun Play
- HB MisdirectionMisdirection, Run Play
 HB Power OPower, Run Play, Power Run
 HB Power O Alert BubblePower, Run Play, Power Run +2
 HB Pump DrawDraw, Run Play
 HB SlamDive, Run Play
 HB SlashRun Play, Power Run, Power +1
 HB Slip ScreenScreen Pass, Hb Screen, Pass Play +4
 HB StretchOutside Zone, Run Play, Zone Run
 HB Stretch Alert BubbleOutside Zone, Run Play, Zone Run +2
 HB Wide DrawDraw, Run Play
 Inside CrossCrosser, Pass Play, Block and Release +3
 Inside ZoneInside Zone, Run Play, Zone Run
- Jet SweepSweep, Jet Sweep, Motion +1
 Levels DivideLevels, Pass Play, Cover 2 Beater +4
 Mtn Z SpotSpot, Motion, Pass Play +5
 PA BootPlay Action, Pass Play, Block and Release +3
 PA Boot ComebackPlay Action, Comeback, Pass Play +4
- PA Corner PostPlay Action, Post, Corner Post +6
 PA Ctr WagglePlay Action, Pass Play, Block and Release +4
 PA Draw ShotDraw, Play Action, Pass Play +4
 PA HB LookPlay Action, Pass Play, Block and Release +4
- PA Jet SweepSweep, Jet Sweep, Play Action +8
- PA Misdirect ShotPlay Action, Pass Play, Deep Cross +2
 PA Power OPlay Action, Pass Play, Block and Release +5
 PA SD Y-CornerPlay Action, Corner, Pass Play +4
 PA Slot StopPlay Action, Pass Play, Corner +3
 PA StretchPlay Action, Pass Play, Angle +5
- PA TE Screen GtPlay Action, Screen Pass, Te Screen +4
- PA Y-corner ForkPlay Action, Corner, Pass Play +3
 PA Y GlancePlay Action, Pass Play, Stop And Go +2
 PA Y-SailPlay Action, Sail, Pass Play +7
 PA Zone ShotPlay Action, Pass Play, Post +1
- Salem X KittyComeback, Hitch, Post +3
 SlantsSlant, Pass Play, Flat
 Slot SeamSeam, Pass Play, Comeback +4
 Sluggo SeamSeam, Sluggo, Pass Play +3
- SmashSmash, Pass Play, Cover 2 Beater +3
 StreaksStreak, Pass Play, Fade +1
 TE PostPost, Pass Play, Corner +4
 Tight Zone WkInside Zone, Run Play, Zone Run
- Tight Zone WK 2Inside Zone, Run Play, Zone Run
 Whip UndersWhip, Pass Play, Corner +4
 X DaggerDagger, Pass Play, Cover 2 Beater +7
 Y Shallow CrossShallow Cross, Crosser, Pass Play +5
 Z-Close CornerCorner, Pass Play, Block and Release +3
 Z-Close CrossCrosser, Pass Play, Block and Release +3
 Z-Close CurlCurl, Pass Play, Flat +2
- Zone Fake JetMotion, Run Play
 Z Post Y OutOut, Post, Pass Play +3
 Z SpotSpot, Pass Play, Cover 3 Beater +4
 Z UnderPass Play, Go, Out +9