Playbooks

At a Glance
In 17 playbooks
Overview
Spread Y-Flex is a Shotgun 11 personnel set that detaches the tight end from the core and flexes him into a slot alignment, creating a 2x2 spread look with the running back offset next to the quarterback. Standard Shotgun sets keep the Y attached as an extra blocker. Here the TE lines up as a pseudo slot receiver. That forces the defense to declare how it wants to handle him pre-snap: a linebacker in coverage, a safety rolled down, or a nickel corner giving up size. Because the set looks like 10 personnel while still carrying a tight end, defenses running base or nickel personnel often end up with a coverage mismatch somewhere on the field.
The playbook in this set is unusually deep. Quick game staples include Y Stick, Slant Flat, Double Slants, and Stick Double Slant. It has full-field reads like Mesh, Y Cross, Drive, Smash Corners, and Four Verticals, plus a heavy RPO menu with RPO Peek Slant, RPO Zone Peek, RPO Alert Screen, RPO Read Screen, and RPO Alert QB Draw. The Mtn variations (Mtn Shallow HB Angle, Mtn H Stick, Mtn Drive, Mtn Slot Flags, Mtn Sluggo Replace) use built-in motion to shift the strength of the formation or reveal man versus zone before the snap. The Empty Mtn tags (Empty Mtn Drive, Empty Mtn Dagger, Empty Mtn FL Screen) motion the back out and turn the look into a five-wide spread.
The Gadget and SLWR tags reflect the set's personality. Jet Touch Pass, Flex Jets Y-Sail, Fake Jet Mesh Wheel, Fake Jet HB Wheel, and Mtn Fk Screen Wheel give you misdirection that punishes over-pursuing users and aggressive flat defenders. The flexed Y can be a tall, physical target against smaller slot defenders on Y Corner, Angle Y Sail, and Y Shallow Cross. The single-high or two-high read on the outside isolates your X and Z on concepts like Spot N Go and Corner Strike.
Strengths
- The flexed tight end creates a built-in mismatch: Y Stick, Y Corner, and Angle Y Sail isolate him on a linebacker or undersized nickel, and a quick pre-snap read tells you which one you are getting.
- Elite man beaters in one set: Mesh, Double Slants, Inside Cross, and Y Shallow Cross generate natural rubs and crossers that beat Cover 1 and Cover 0 without needing hot routes.
- Strong zone beaters: Smash Corners and Curl Flats high-low Cover 2, Flex Jets Y-Sail and Y Sail flood Cover 3, and Drive and Mtn Drive attack the hook-curl defenders in Cover 4 with shallow and dig combinations.
- The Mtn and Empty Mtn tags act as free coverage indicators, because a defender traveling with the motion signals man coverage, while a rotating shell reveals zone before you snap the ball.
- Deep RPO and screen menu (RPO Peek Slant, RPO Zone Alert Screen, RPO Read Screen, HB Slip Screen, Mtn WR Mid Screen) lets you punish blitz-happy opponents and light boxes without changing personnel.
Weaknesses
- With the TE flexed off the line, pass protection is only five linemen plus the back, so nano blitzes and overload pressures from the boundary can get home before deep concepts like Four Verticals, Deep Attack, or Corner Strike develop.
- The inside run game is limited against heavy boxes: Inside Zone, HB Draw, and QB Zone lose a lead blocker, and opponents who stay in base personnel with a sixth box defender can stuff the run without committing to a blitz.
- Empty Mtn plays remove the back from protection entirely, so a smart opponent who recognizes the motion can bring a Cover 0 blitz and force hot routes under pressure.
- User-controlled linebackers sitting in the middle hook can undercut Mesh, Y Shallow Cross, and the RPO slant reads, especially if you lean on the same crossers every drive.
- Gadget plays like Jet Touch Pass, Fake Jet HB Wheel, and Mtn Fk Swing Wheel are high risk against disciplined contain defenders and flat-zone adjustments, and a stuffed jet on early downs can wreck your down and distance.
Usage Tips
Before the snap, check how the defense aligns to the flexed Y: a linebacker lined up on him is your cue for Y Stick or Y Corner, while a safety rotated down suggests single-high, so audible to Mesh or Double Slants.
Use the Mtn plays on first and second down to diagnose coverage, then keep the same set in your audible slots so you can check to Smash Corners against Cover 2 or Flex Jets Y-Sail against Cover 3 once the motion reveals the shell.
Against blitz-heavy opponents, keep the back in to block, hot route the outside receiver to a slant, or check to HB Slip Screen or RPO Read Screen, and save Empty Mtn Drive and Empty Mtn Dagger for downs when the defense shows a soft zone shell.
On third and short, lean on Slant Flat, Stick Double Slant, or Mtn H Stick for high-percentage throws. On third and long, go to Drive, Cross H Divide, or Four Verticals with a streak-to-drag hot route on the back to beat man help.
Set up the gadget calls by building tendencies first: run Inside Zone and RPO Zone Peek a few times, then hit Fake Jet Mesh Wheel or Mtn Sluggo Replace once the user starts cheating downhill.
Plays (69)
 617Pass Play, Go, Out +6
- All HitchHitch, Pass Play
 Angle Y SailAngle, Sail, Pass Play +6
 Corner StrikeCorner, Pass Play, Block and Release +1
- Cross H DivideCrosser, Deep Cross, Post +4
 Curl FlatsCurl, Pass Play, Flat +1
 Deep AttackPass Play, Go, Out +7
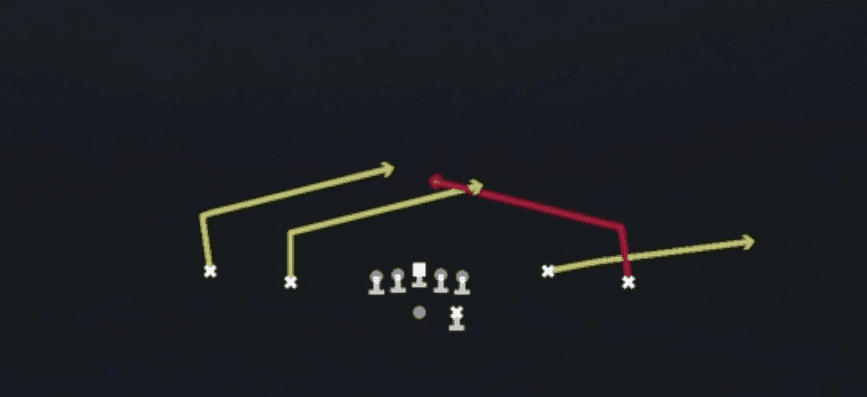 Double SlantsSlant, Pass Play, Flat
 DriveDrive, Pass Play, Cover 4 Beater +6
 Empty Mtn DaggerDagger, Motion, Pass Play +7
 Empty Mtn DriveDrive, Motion, Pass Play +5
 Empty Mtn FL ScreenScreen Pass, Wr Screen, Motion +3
- Fake Jet HB WheelWheel, Post, Hitch +5
- Fake Jet Mesh WheelWheel, Post, Option Route +6
 Flex Jets Y-SailSail, Pass Play, Cover 2 Beater +6
- FL ScreenScreen Pass, Bubble Screen, Post +2
- Four VerticalsOption Route, Streak, Pass Play
 Four VerticalsFour Verts, Pass Play, Cover 2 Beater +5
 HB DrawDraw, Run Play
 HB Quick BaseDive, Run Play
 HB Slip ScreenScreen Pass, Hb Screen, Pass Play +3
 Hitch SeamHitch, Seam, Pass Play +2
 Inside CrossCrosser, Pass Play, Post +4
 Inside ZoneInside Zone, Run Play, Zone Run
 Inverted VeerInverted Veer, Run Play
 Jet Touch PassMotion, Run Play
 MeshMesh, Pass Play, Man Beater +4
 Mtn DriveDrive, Motion, Pass Play +7
 Mtn Fk Screen WheelPlay Action, Screen Pass, Wheel +6
- Mtn Fk Swing WheelWheel, Swing, Deep Cross +6
 Mtn FL ScreenScreen Pass, Wr Screen, Motion +4
 Mtn HB Cross ScreenScreen Pass, Hb Screen, Motion +6
- Mtn HB SwingSwing, Flat, Slant +1
- Mtn HB SwingSwing, Slant, Pass Play
- Mtn H StickStick, Fade, Hitch +4
 Mtn Out H-AngleOut, Angle, Motion +3
 Mtn ReplaceMotion, Hitch, Out +3
 Mtn Shallow HB AngleShallow Cross, Angle, Motion +6
 Mtn Slot FlagsMotion, Corner, Slant +3
 Mtn Sluggo ReplaceSluggo, Motion, Pass Play +4
- Mtn TE Mid ScreenScreen Pass, In, Swing +1
- Mtn WR Mid ScreenScreen Pass, Bubble Screen, Fade +3
 PA CurlsPlay Action, Pass Play, Curl +3
 PA SeamsPlay Action, Pass Play, Seam +1
 QB ZoneDesigned Qb Run, Run Play
 Raider Y-OptionOption Route, Pass Play, Angle +2
 Read OptionRead Option, Run Play
- RPO Alert QB DrawDraw, Qb Draw, Designed Qb Run +5
 RPO Alert ScreenScreen Pass, RPO, Pass Play +1
 RPO Peek SlantRPO, Slant, Pass Play +1
- RPO Read ScreenScreen Pass, Bubble Screen, Pass Play +1
- RPO Zone Alert ScreenScreen Pass, RPO, Pass Play +2
- RPO Zone PeekRPO, Pass Play, Run Play +2
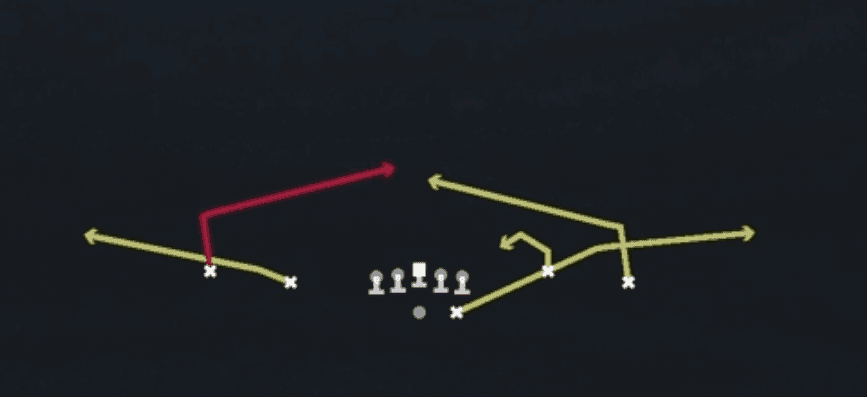 Slant FlatFlat, Slant, Slant Flat +3
 Slot OutsOut, Pass Play, Angle +3
- Smash CornersCorner, Smash, Pass Play +3
 Smash HB CheckSmash, Pass Play, Cover 2 Beater +3
 Spot N GoGo, Spot, Pass Play +5
 Stick Double SlantSlant, Stick, Stick Concept +3
- WR ScreenScreen Pass, Bubble Screen, Post +2
 WR UnderPass Play, Quick Pass, Shallow Cross +8
 X FollowPass Play, Mesh, Go +8
 Y CornerCorner, Pass Play, Flat +1
 Y CrossY Cross, Pass Play, Crosser +5
- Y Cross(1)Crosser, Y Cross, Pass Play +5
- Y SailFlat, In, Out +3
 Y Shallow CrossShallow Cross, Pass Play, Crosser +5
 Y StickStick, Stick Concept, Pass Play +4
 Z SpotSpot, Pass Play, Cover 3 Beater +4









