Playbooks

At a Glance
In 19 playbooks
Overview
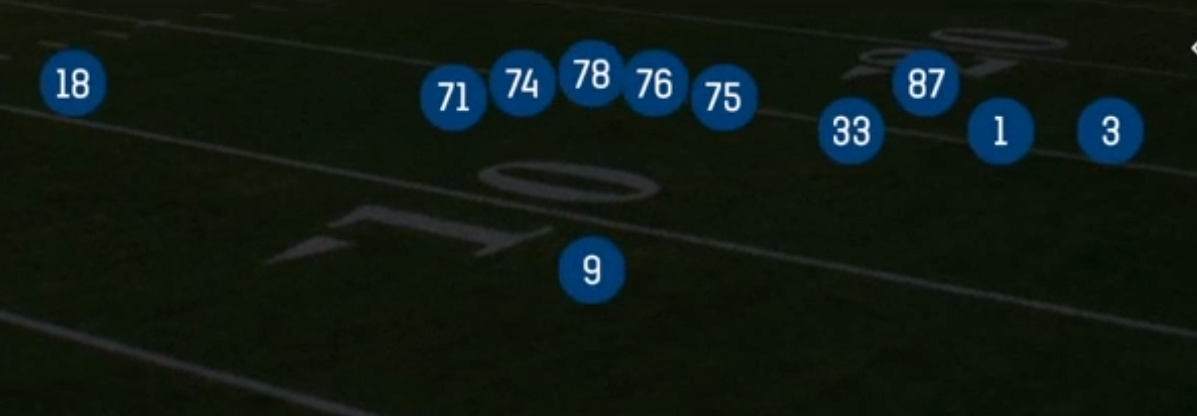
The Bunch set in the Shotgun formation uses 11 personnel (1 RB, 1 TE, 3 WR) to stack a three-man cluster to one side of the formation while isolating a single receiver on the backside. The running back aligns next to the quarterback, which keeps him available as a pass protector, a checkdown, or a screen threat. Spread or Trips sets space receivers out horizontally. Bunch compresses them into a tight triangle near the numbers, so defenders must decide pre-snap who takes the point man and who handles the releases underneath and outside. That compression creates natural rubs, picks, and traffic that punish press man and force zone defenders to pass off routes in tight windows.
The personnel alignment is the real weapon here. With the tight end often working inside the cluster and a slot receiver in the bunch, you can get your SLWR matched on a linebacker or safety while the isolated X receiver draws a one-on-one look with the boundary corner. If the defense rotates coverage toward the bunch, the backside receiver becomes a clean target on concepts like Deep Corner, PA Post, and Philly Post. If it plays the backside heavy, the three-man side overloads the flat and curl zones with Flood, Bunch Sail, and Corner Out Dig.
The play list goes well beyond a pure passing set. It carries true man beaters (Mesh, Mesh Spot, Mesh Post, Inside Cross), zone beaters (Z Spot, Stick, Spacing, Flood, Texans Curl), vertical shots (Verticals, Bunch Verts, Deep Attack, Speed Dig), and a real run and RPO package (Inside Zone, Counter Y, Y Lead Read Option, RPO Zone Alert Cheat, Cheat Inside Zone). Gadget tags like Fake Reverse, End Around, Reverse, and Jet Pull Shallow let you punish over-pursuit, while HB Slip Screen and Bench Pivot lean on a 3DRB who can win in space. That makes Shotgun Bunch one of the most complete sets in the formation.
Strengths
- The bunch alignment creates natural rubs and picks, so Mesh, Mesh Spot, Inside Cross, and Mesh Post shred Cover 1 and Cover 0 press man because trailing defenders get caught in traffic at the mesh point.
- Zone beaters like Z Spot, Flood, Bunch Sail, and Stick create high-low and horizontal stretches on the three-man side, which overload Cover 3 flats and Cover 2 curl-to-flat defenders who cannot cover two levels at once.
- The isolated backside receiver gets one-on-one looks when the defense shades coverage toward the bunch, so Deep Corner, Philly Post, and PA Post become easy shot plays against rolled safeties.
- A legitimate run, RPO, and read option package (Inside Zone, Counter Y, Y Lead Read Option, RPO Zone Alert Cheat) keeps defenders honest and stops opponents from sitting in dime or quarters shells every snap.
- Gadget plays and screens such as Fake Reverse, End Around, Jet Pull Shallow, and HB Slip Screen punish aggressive users and heavy blitz tendencies, turning over-pursuit into chunk plays.
Weaknesses
- Stacking three receivers to one side makes the strength of the formation easy to read, so opponents can shade coverage, bracket the point man, or press the bunch to disrupt timing before routes develop.
- With only 11 personnel and the TE often releasing into the route, protection is thin against a nano blitz or overload pressure off the backside edge, especially on longer-developing concepts like Verticals, Deep Attack, and Bunch Verts.
- A user-controlled linebacker or safety sitting in the middle of the field can erase crossers on Mesh, Inside Cross, and Speed Dig, which removes the primary man beater reads.
- Match coverages and switch calls in the bunch can neutralize the natural rubs, leaving receivers bunched together with no separation and shrinking throwing windows near the sideline.
- The run game from Shotgun Bunch lacks a lead blocker in most calls, so heavy fronts that crash the box and set the edge against the bunch side can stuff Inside Zone and HB Sweep without committing extra coverage defenders.
Usage Tips
Read the backside corner pre-snap: if he is in press with no safety help over the top after the defense rolls toward the bunch, check to a shot play like Deep Corner or Philly Post, or hot route the X to a fade or slant.
On third and medium, use Mesh Spot or Z Spot and keep the RB in to block if you see a blitz look, then read the flat to the spot route to the crosser for a reliable conversion against both man and zone.
Against Cover 3 and Cover 2 zone, call Flood or Bunch Sail and motion the slot to adjust the stretch. The corner and out routes attack soft spots between the flat and deep third defenders.
When opponents consistently blitz or user the flats, dial up HB Slip Screen, Bench Pivot, or Jet Pull Shallow to turn their aggression against them, and mix in Fake Reverse or End Around once they start flowing hard to the ball.
Use RPO Zone Alert Cheat and Y Lead Read Option on early downs to set up play-action, then come back with PA Cheat Divide Wheels or PA Divide Wheels once linebackers start triggering downhill on the run fake.
Plays (54)
 518 HookPass Play, Curl, Flat +6
 Bench PivotPivot, Pass Play, Bench +4
- Bunch SailSail, Pass Play, Cover 2 Beater +6
 Bunch TrailTrail, Pass Play, Comeback +4
- Bunch VertsFour Verts, Pass Play, Cover 2 Beater +7
- Certified GainerCorner, Flat, Streak +2
 Cheat Inside ZoneInside Zone, Motion, Run Play +1
 Corner Out DigOut, Dig, Corner +4
 Corner StrikeCorner, Pass Play, Flat
 Counter YCounter, Run Play, Power Run
- Curls AttackCurl, Pass Play, Flat +1
 Deep AttackPass Play, Dig, Flood +5
 Deep CornerCorner, Pass Play, Block and Release +3
 Dig ReturnDig, Motion, Pass Play +4
 End AroundEnd Around, Trick Play, Run Play
 Fake ReverseReverse, Trick Play, Run Play
 Flanker DriveDrive, Pass Play, Cover 4 Beater +4
 FloodFlood, Pass Play, Cover 3 Beater +5
- For All The DownsDrag, Crosser, Flat +4
 HB BaseDive, Run Play
 HB Mid DrawDraw, Run Play
 HB Slip ScreenScreen Pass, Hb Screen, Pass Play +4
 HB SweepSweep, Run Play
 Inside CrossCrosser, Pass Play, Corner +4
- Inside ZoneInside Zone, Run Play, Zone Run
 Jet Pull ShallowShallow Cross, Motion, Pass Play +5
- Jets DbltrailCorner, Drag, Crosser +3
- Jets DigPass Play, Deep Cross, Crosser +2
- MeshMesh, Pass Play, Man Beater +6
 Mesh PostPost, Mesh, Pass Play +5
 Mesh SpotSpot, Mesh, Pass Play +7
- Mid ZoneRun Play
- More YardsBlock and Release, Corner, Post +4
 PA Cheat Divide WheelsPlay Action, Motion, Pass Play +1
- PA Divide WheelsPlay Action, Wheel, Pass Play +1
 PA PostPlay Action, Post, Pass Play +3
 Philly PostPass Play, Deep Cross, Crosser +3
- Read OptionRead Option, Run Play
 ReverseReverse, Trick Play, Run Play
 RPO Zone Alert CheatRPO, Motion, Pass Play +2
 Smash ReturnSmash, Motion, Pass Play +6
 SpacingSpacing, Pass Play, Cover 3 Beater +5
 Spacing SwitchSpacing, Pass Play, Cover 3 Beater +4
 Speed DigDig, Pass Play, Comeback +4
 StickStick, Stick Concept, Pass Play +3
 Texans CurlPass Play, Flat, Post Corner +1
- Texans HookDrag, Crosser, Flat +2
 VerticalsFour Verts, Pass Play, Cover 2 Beater +7
 Y CurlCurl, Pass Play, Drag +2
 Y Lead Read OptionRead Option, Run Play
- Z CrossCrosser, Pass Play, Block and Release +3
- Zona BunchCorner, Out, In +1
 Z SpotSpot, Pass Play, Cover 3 Beater +4
 Z Spot N GoGo, Spot, Pass Play +4