Playbooks

Box Offset Wk

SpecialistsGadgetSLWR

Overview

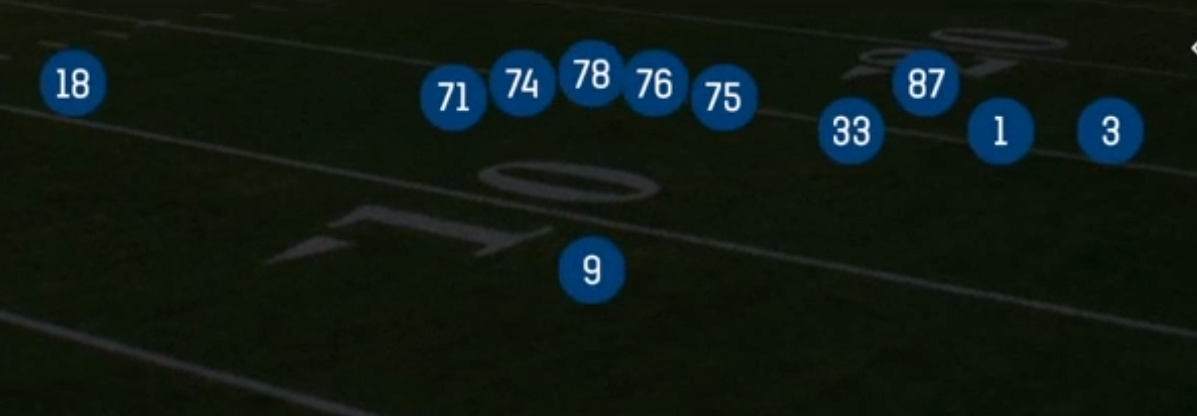
Box Offset Wk is a Shotgun 11 personnel set that stacks a tight box look to the strong side while offsetting the back to the weak side, giving you a condensed formation that still spreads the field on the back end. Unlike standard Shotgun 11 sets that align 2x2 or 3x1 with clean splits, Box Offset Wk clusters receivers tighter to the core, which compresses defender leverage and creates natural rub and pick lanes on crossing concepts. The offset back to the weak side is the key detail: it dictates protection slide direction, tells you which A gap is exposed pre-snap, and gives you a free release into the flat on the side away from the tight end.

Strengths

  • Condensed splits create natural traffic on Mtn Y Cross, Y Cross Post, and Slot Trail, making these some of the better man beaters in the set because defenders in press man get caught in the wash before they can recover leverage.
  • Middle Hi Lo and Curl Flat give you a complete zone attack: the hi lo stresses the hook defender vertically while Curl Flat forces the flat defender into a two way go, both readable off a single user look at the middle of the field safety.
  • HB Angle appears on three separate plays (HB Angle, Mtn Verts HB Angle, Mtn Curls HB Angle), which means you can run the same checkdown answer under three different downfield shells without changing the read for the back.
  • Strong Flood and Verticals attack Cover 3 and single high looks from the same formation, and with the Gadget and SLWR tags you can motion your slot receiver across to change strength and force the defense to check its coverage rotation post snap.
  • The run game is more varied than a typical Shotgun 11 set: HB Draw, Inside Zone, Outside Zone, Wide Trap, and Read Option give you gap, zone, and option answers that punish light boxes when the defense plays two high against the condensed look.

Weaknesses

  • The offset weak back leaves the strong side A gap without an immediate check release blocker, so overload blitzes and nano looks to that side get home fast unless you slide protection or hot route the back into pass block.
  • Condensed splits mean less field to work with on the boundary, and a user-controlled defender playing the middle of the field can cover both hi lo and crossing concepts from one position because everything develops inside the numbers.
  • HB Slip Screen is easy to sniff once you show it, since the tight formation puts more defenders near the screen lane and blitz heavy opponents will run right through the setup before your linemen release.
  • Verticals and PA Verticals struggle against Cover 2 Invert and any coverage that caps the seams, because the compressed alignment does not stretch the safeties horizontally enough to create the vertical windows the concept needs.
  • PA Read and PA Verticals both take too long to develop against edge pressure, and with only one back available there is no second protector to pick up a free rusher off the weak edge.

Usage Tips

On first and ten against a two high shell, run Inside Zone or Wide Trap first to force the defense to load the box, then come back with Verticals or Y Cross Post once the safeties commit down.

Against press man, go straight to Mtn Y Cross or Slot Trail and let the condensed splits do the work, and hot route your outside receiver to a slant to create an extra pick for the crosser.

Motion the slot receiver across before the snap on Curl Flat and Strong Flood to diagnose man versus zone, then throw the flat route immediately if a defender travels with the motion man.

On third and medium, Middle Hi Lo with the back on HB Angle gives you three levels in the middle of the field, and you should read the hook defender first before working down to the angle route.

When you see a blitz look with both inside linebackers creeping, block the back and check to HB Draw or a quick Curl Flat rather than running a five step concept, since the offset weak alignment gives you no built in answer to interior pressure.

Plays (19)

Plays in Box Offset Wk
PlayDiagramOpen
Curl FlatFlat, Curl, Curl Flat +3
HB AngleAngle, Pass Play
HB DrawDraw, Run Play
HB Slip ScreenScreen Pass, Hb Screen, Pass Play
Inside ZoneInside Zone, Run Play, Zone Run
Middle Hi LoPass Play, Play Action, Post +7
Mtn Curls HB AngleAngle, Motion, Pass Play +1
Mtn Verts HB AngleAngle, Four Verts, Motion +3
Mtn Y CrossY Cross, Motion, Pass Play +1
Outside ZoneOutside Zone, Run Play, Zone Run
PA ReadPlay Action, Pass Play
PA VerticalsPlay Action, Four Verts, Pass Play +2
Read OptionRead Option, Run Play
ScatScat, Pass Play
Slot TrailTrail, Pass Play
Strong FloodFlood, Pass Play, Cover 3 Beater
VerticalsFour Verts, Pass Play, Cover 2 Beater +1
Wide TrapTrap, Run Play, Power Run
Y Cross PostPost, Y Cross, Pass Play +1

Other Sets in Shotgun

4wr Pack Trips

18 Plays · 1 RB, 0 TE, 4 WR

4WR Trips Strong

18 Plays · 1 RB, 0 TE, 4 WR

5WR Flex Trey

16 Plays · 0 RB, 1 TE, 4 WR

5WR Tight

12 Plays · 0 RB, 0 TE, 5 WR

5WR Trio

24 Plays · 1 RB, 1 TE, 3 WR

5WR Trips

18 Plays · 0 RB, 0 TE, 5 WR

Ace

28 Plays · 1 RB, 2 TE, 2 WR

Ace Offset

15 Plays · 1 RB, 2 TE, 2 WR

Ace Slot

16 Plays · 1 RB, 2 TE, 2 WR

Ace Slot Offset

19 Plays · 1 RB, 2 TE, 2 WR

Box

18 Plays · 1 RB, 0 TE, 4 WR

Box HB Strong

6 Plays · 1 RB, 1 TE, 3 WR

Box Y Off

6 Plays · 1 RB, 1 TE, 3 WR

Bunch

53 Plays · 1 RB, 1 TE, 3 WR

Bunch HB Str

12 Plays · 1 RB, 1 TE, 3 WR

Bunch Offset

31 Plays · 1 RB, 1 TE, 3 WR

Bunch Offset Close

11 Plays · 1 RB, 1 TE, 3 WR

Bunch Open

9 Plays · 1 RB, 0 TE, 4 WR

Bunch Open Offset

18 Plays · 1 RB, 1 TE, 3 WR

Bunch Open TE

13 Plays · 1 RB, 1 TE, 3 WR

Bunch Quads

9 Plays · 1 RB, 1 TE, 3 WR

Bunch Quads Close

6 Plays · 1 RB, 1 TE, 3 WR

Bunch Spread

24 Plays · 1 RB, 1 TE, 3 WR

Bunch Spread Nasty

35 Plays · 1 RB, 1 TE, 3 WR

Bunch Str Nasty

33 Plays · 1 RB, 1 TE, 3 WR

Bunch Str Offset

45 Plays · 1 RB, 1 TE, 3 WR

Bunch TE

51 Plays · 1 RB, 1 TE, 3 WR

Bunch TE Str

13 Plays · 1 RB, 1 TE, 3 WR

Bunch TE Wk

18 Plays · 1 RB, 1 TE, 3 WR

Bunch Trio Open

12 Plays · 1 RB, 1 TE, 3 WR

Bunch Wide

26 Plays · 1 RB, 1 TE, 3 WR

Bunch Wide Nasty

23 Plays · 1 RB, 1 TE, 3 WR

Bunch X Nasty

61 Plays · 1 RB, 1 TE, 3 WR

Bunch Y-Flex

32 Plays · 1 RB, 1 TE, 3 WR

Bunch Y-Trips

15 Plays · 1 RB, 1 TE, 3 WR

Cluster

14 Plays · 1 RB, 1 TE, 3 WR

Cluster HB Str

18 Plays · 1 RB, 1 TE, 3 WR

Dbls Flex Y Off Close

21 Plays · 1 RB, 1 TE, 3 WR

Deebo Package

6 Plays · Unknown

Deuce

18 Plays · 1 RB, 2 TE, 2 WR

Deuce Close

47 Plays · 1 RB, 2 TE, 2 WR

Doubles

65 Plays · 1 RB, 1 TE, 3 WR

Doubles Flex

27 Plays · 1 RB, 1 TE, 3 WR

Doubles Flex WK Pats

13 Plays · Unknown

Doubles Flex Wk Swap

12 Plays · 1 RB, 1 TE, 3 WR

Doubles Flex Y Off Close

21 Plays · 1 RB, 1 TE, 3 WR

Doubles HB Wk

46 Plays · 1 RB, 1 TE, 3 WR

Doubles Hip

13 Plays · 1 RB, 1 TE, 3 WR

Doubles Off Close

10 Plays · 1 RB, 1 TE, 3 WR

Doubles Off Close Wk

13 Plays · 1 RB, 1 TE, 3 WR

Doubles Offset

43 Plays · 1 RB, 1 TE, 3 WR

Doubles Offset Wk

42 Plays · 1 RB, 1 TE, 3 WR

Double Stack

13 Plays · 1 RB, 1 TE, 3 WR

Doubles Y-Flex

28 Plays · 1 RB, 1 TE, 3 WR

Doubles Y-Flex Offset

15 Plays · 1 RB, 1 TE, 3 WR

Doubles Y Off

42 Plays · 1 RB, 1 TE, 3 WR

Doubles Y Off Nasty

20 Plays · 1 RB, 1 TE, 3 WR

Doubles Y Off WK

2 Plays · 1 RB, 1 TE, 3 WR

Doubles Z Close

14 Plays · 1 RB, 1 TE, 3 WR

Doubles Z Close Wk

17 Plays · 1 RB, 1 TE, 3 WR

Double Wing

9 Plays · 2 RB, 3 TE, 0 WR

Duo Slot Open

10 Plays · 2 RB, 0 TE, 3 WR

Duo Twins Flex

9 Plays · 2 RB, 1 TE, 2 WR

Empty Ace

12 Plays · 1 RB, 2 TE, 2 WR

Empty Base

33 Plays · 1 RB, 1 TE, 3 WR

Empty Base Flex

35 Plays · 1 RB, 1 TE, 3 WR

Empty Base Trio

17 Plays · 1 RB, 1 TE, 3 WR

Empty Bunch

9 Plays · 1 RB, 1 TE, 3 WR

Empty Bunch Open

17 Plays · 1 RB, 1 TE, 3 WR

Empty Bunch Tight

12 Plays · 1 RB, 1 TE, 3 WR

Empty Bunch Wide

13 Plays · 1 RB, 1 TE, 3 WR

Empty Bunch Y Flex

9 Plays · 1 RB, 1 TE, 3 WR

Empty Chips

9 Plays · 1 RB, 1 TE, 3 WR

Empty Chips Nasty

10 Plays · 1 RB, 1 TE, 3 WR

Empty Chips Quads

9 Plays · 1 RB, 1 TE, 3 WR

Empty Chips Tight

11 Plays · 1 RB, 1 TE, 3 WR

Empty HB Wide

13 Plays · 1 RB, 1 TE, 3 WR

Empty Quads

9 Plays · 0 RB, 1 TE, 4 WR

Empty Sketch Stack

10 Plays · 1 RB, 1 TE, 3 WR

Empty Steeler

12 Plays · 1 RB, 1 TE, 3 WR

Empty Strong Slots

9 Plays · 1 RB, 1 TE, 3 WR

Empty Trey

21 Plays · 1 RB, 1 TE, 3 WR

Empty Trey Flex

12 Plays · Unknown

Empty Trey Stack

15 Plays · 1 RB, 1 TE, 3 WR

Empty Triple Stack

3 Plays · 1 RB, 1 TE, 3 WR

Empty Trips Speed

15 Plays · 1 RB, 1 TE, 3 WR

Empty Y Slot

15 Plays · 1 RB, 1 TE, 3 WR

Flanker Close

14 Plays · 1 RB, 0 TE, 4 WR

Flex Y Off

20 Plays · 1 RB, 1 TE, 3 WR

Flex Y Off Close

16 Plays · 1 RB, 1 TE, 3 WR

Flex Y Off Wk

27 Plays · 1 RB, 1 TE, 3 WR

Gadget Backfield

6 Plays · 3 RB, 1 TE, 1 WR

Gadget Package

6 Plays · 3 RB, 1 TE, 1 WR

Go Go Twins Flex

9 Plays · 2 RB, 1 TE, 2 WR

Heavy Panther

9 Plays · 2 RB, 3 TE, 0 WR

Monster

3 Plays · 1 RB, 1 TE, 3 WR

Normal Flex Snug

17 Plays · 1 RB, 1 TE, 3 WR

Normal Flex Wing

12 Plays · 1 RB, 1 TE, 3 WR

Normal Off Close Wk

21 Plays · 1 RB, 1 TE, 3 WR

Normal Y Off

50 Plays · 1 RB, 1 TE, 3 WR

Normal Y Off Close

49 Plays · 1 RB, 1 TE, 3 WR

Normal Y Off Wk

34 Plays · 1 RB, 1 TE, 3 WR

Open Flex

10 Plays · 1 RB, 1 TE, 3 WR

Slot Left

9 Plays · 1 RB, 1 TE, 3 WR

Slot Right

22 Plays · 1 RB, 1 TE, 3 WR

Slot WR Backfield

7 Plays · Unknown

Split Close

30 Plays · 2 RB, 0 TE, 3 WR

Split Close Pro

15 Plays · 2 RB, 1 TE, 2 WR

Split Cowboy

17 Plays · 1 RB, 1 TE, 3 WR

Split Flanker Close

9 Plays · 2 RB, 0 TE, 3 WR

Split Offset

34 Plays · 2 RB, 0 TE, 3 WR

Split Pro Offset Wk

6 Plays · 2 RB, 1 TE, 2 WR

Split Slot Offset

41 Plays · 2 RB, 0 TE, 3 WR

Split Slot Open

33 Plays · 2 RB, 0 TE, 3 WR

Split Twins

6 Plays · 2 RB, 1 TE, 2 WR

Split Twins Offset

13 Plays · 2 RB, 1 TE, 2 WR

Split Twins Stack

6 Plays · 2 RB, 1 TE, 2 WR

Split Wing Nasty

6 Plays · 2 RB, 2 TE, 1 WR

Split WR Backfield

9 Plays · 1 RB, 1 TE, 3 WR

Split Y-Flex

15 Plays · 2 RB, 1 TE, 2 WR

Split Y Off

19 Plays · 2 RB, 1 TE, 2 WR

Split Y Off Close

10 Plays · 1 RB, 1 TE, 3 WR

Spread

69 Plays · 1 RB, 0 TE, 4 WR

Spread 4wr

1 Play · 1 RB, 1 TE, 3 WR

Spread Dbl Flex

40 Plays · 1 RB, 1 TE, 3 WR

Spread Dbl Flex Wk

22 Plays · 1 RB, 1 TE, 3 WR

Spread Flex

15 Plays · 1 RB, 1 TE, 3 WR

Spread Slots Close

22 Plays · 1 RB, 0 TE, 4 WR

Spread Y-Flex

54 Plays · 1 RB, 1 TE, 3 WR

Spread Y-Flex Wk

40 Plays · 1 RB, 1 TE, 3 WR

Spread Y-Slot

61 Plays · 1 RB, 1 TE, 3 WR

Spread Y-Slot Wk

49 Plays · 1 RB, 1 TE, 3 WR

Stack HB WK

9 Plays · 1 RB, 1 TE, 3 WR

Stack Y-Flex

15 Plays · 1 RB, 1 TE, 3 WR

Stack Y Off

14 Plays · 1 RB, 1 TE, 3 WR

Tackle Over

9 Plays · 1 RB, 1 TE, 3 WR

Tackle Over Trips

10 Plays · 1 RB, 1 TE, 3 WR

Tight

31 Plays · 1 RB, 1 TE, 3 WR

Tight Base Flex

9 Plays · 2 RB, 1 TE, 2 WR

Tight Doubles

18 Plays · 1 RB, 1 TE, 3 WR

Tight Flex

25 Plays · 1 RB, 1 TE, 3 WR

Tight Flex Wk

18 Plays · 1 RB, 1 TE, 3 WR

Tight Offset TE

18 Plays · 1 RB, 1 TE, 3 WR

Tight Open

52 Plays · 1 RB, 1 TE, 3 WR

Tight Slot Flip

9 Plays · 1 RB, 1 TE, 3 WR

Tight Slot Open

10 Plays · 1 RB, 1 TE, 3 WR

Tight Slots

36 Plays · 1 RB, 1 TE, 3 WR

Tight Slots HB Wk

19 Plays · 1 RB, 1 TE, 3 WR

Tight Y Off

42 Plays · 1 RB, 1 TE, 3 WR

Tight Y Off Wk

47 Plays · 1 RB, 1 TE, 3 WR

Trey

12 Plays · 1 RB, 1 TE, 3 WR

Trey 4WR

21 Plays · 1 RB, 0 TE, 4 WR

Trey Offset

24 Plays · 1 RB, 1 TE, 3 WR

Trey Open

68 Plays · 1 RB, 1 TE, 3 WR

Trey Open HB Str

22 Plays · 1 RB, 1 TE, 3 WR

Trey Open Offset

37 Plays · 1 RB, 1 TE, 3 WR

Trey Y-Flex

38 Plays · 1 RB, 1 TE, 3 WR

Trey Y-Flex Str

21 Plays · 1 RB, 1 TE, 3 WR

Trey Y Iso

15 Plays · 1 RB, 1 TE, 3 WR

Trio

30 Plays · 1 RB, 1 TE, 3 WR

Trio HB Wk

30 Plays · 1 RB, 1 TE, 3 WR

Trio Offset

18 Plays · 1 RB, 1 TE, 3 WR

Trio Offset Wk

12 Plays · 1 RB, 1 TE, 3 WR

Trio Rt Open

1 Play · 1 RB, 1 TE, 3 WR

Trio Y-Flex

30 Plays · 1 RB, 1 TE, 3 WR

Trips

39 Plays · 1 RB, 0 TE, 4 WR

Trips HB Wk

53 Plays · 1 RB, 0 TE, 4 WR

Trips Slots Close

27 Plays · 1 RB, 0 TE, 4 WR

Trips TE

59 Plays · 1 RB, 1 TE, 3 WR

Trips TE Flex

23 Plays · 1 RB, 1 TE, 3 WR

Trips TE Offset

22 Plays · 1 RB, 1 TE, 3 WR

Trips TE Offset Wk

14 Plays · 1 RB, 1 TE, 3 WR

Trips X Nasty

22 Plays · 1 RB, 1 TE, 3 WR

Trips X Nasty Offset WK

12 Plays · 1 RB, 1 TE, 3 WR

Trips X Nasty Off Wk

12 Plays · 1 RB, 1 TE, 3 WR

Trips Y-Flex

21 Plays · 1 RB, 1 TE, 3 WR

Trips Y Slot Str

6 Plays · 1 RB, 1 TE, 3 WR

U Off Stack

13 Plays · 1 RB, 2 TE, 2 WR

U Off Trips

22 Plays · 1 RB, 2 TE, 2 WR

U Off Trips Flex

15 Plays · 1 RB, 2 TE, 2 WR

U Off Trips Wk

17 Plays · 1 RB, 2 TE, 2 WR

Wide 5wr

24 Plays · Unknown

Wide Slot Left

16 Plays · Unknown

Wide Slot Right WK

15 Plays · 1 RB, 1 TE, 3 WR

Wide Trips

15 Plays · 1 RB, 0 TE, 4 WR

Wide Y Trips WK

16 Plays · Unknown

Wing

15 Plays · 1 RB, 2 TE, 2 WR

Wing Flex Offset

22 Plays · 1 RB, 2 TE, 2 WR

Wing Flex Offset Wk

24 Plays · 1 RB, 2 TE, 2 WR

Wing HB Wk Close

9 Plays · 1 RB, 2 TE, 2 WR

Wing Pair

16 Plays · 1 RB, 3 TE, 1 WR

Wing Slot Offset

68 Plays · 1 RB, 2 TE, 2 WR

Wing Slot Wk

47 Plays · 1 RB, 2 TE, 2 WR

Wing Stack

21 Plays · 1 RB, 2 TE, 2 WR

Wing Stack Wk

13 Plays · 1 RB, 2 TE, 2 WR

Wing Tight

9 Plays · 1 RB, 3 TE, 1 WR

Wing Tight Flip

12 Plays · 1 RB, 3 TE, 1 WR

Wing Tight Nasty

6 Plays · 1 RB, 3 TE, 1 WR

Wing Tight Z

10 Plays · 1 RB, 3 TE, 1 WR

Wing Trio

15 Plays · 1 RB, 1 TE, 3 WR

Wing Trips Wk Nasty

15 Plays · 1 RB, 1 TE, 3 WR

Y Off Trio Close

25 Plays · 1 RB, 1 TE, 3 WR

Y Off Trio Wk

55 Plays · 1 RB, 1 TE, 3 WR

Y Off Trips

54 Plays · 1 RB, 1 TE, 3 WR

Y Off Trips Close

31 Plays · 1 RB, 1 TE, 3 WR

Y Off Trips Nasty

15 Plays · 1 RB, 1 TE, 3 WR

Y Off Trips Pats

32 Plays · Unknown

Y Off Trips Stack

3 Plays · Unknown

Y Off Trips Wk

60 Plays · 1 RB, 1 TE, 3 WR

Y Trio Offset Wk

23 Plays · 1 RB, 1 TE, 3 WR

Y Trips 1 Slot

1 Play · 1 RB, 1 TE, 3 WR

Y Trips Offset

25 Plays · 1 RB, 1 TE, 3 WR

Y Trips Offset Wk

15 Plays · 1 RB, 1 TE, 3 WR

Y Trips Wk

92 Plays · 1 RB, 1 TE, 3 WR