Playbooks

Quick Reference
Receiver routes
Depth-chart slots are shown as they line up in the base package for this set.
| Player | Side | Route |
|---|---|---|
| HB1 | Middle | Pass Block |
| TE2 | Right | Flat |
| WR1 | Left | Hitch |
| WR2 | Right | Hitch |
| TE1 | Right | Smash |
Read progression
- WR2 right, Hitch
- WR1 left, Hitch
- TE2 right, Flat
- TE1 right, Smash
Breakdown
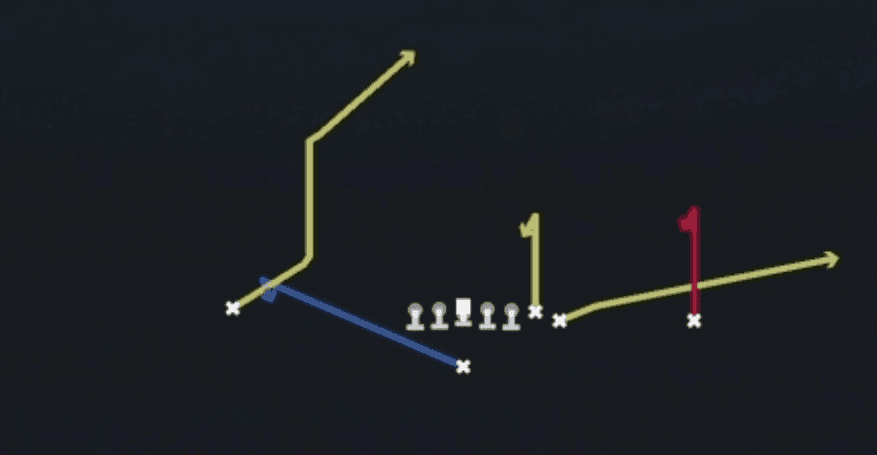
Spacing out of Singleback Wing 12 personnel spreads a horizontal stretch across the formation to attack zone coverage. The backside receiver runs a quick out breaking away from the line, the TE at the line runs a short in cut over the middle, and on the strong side the wing TE runs a vertical seam read while the flanker runs a shallow flat route underneath. This is a classic Cover 3 and Cover 4 beater built on horizontal spacing, with the primary read progressing from the flat route to the seam read and then working back to the backside out route based on how the zone defenders flow.
Defensive Reads
Check for zone drop depth from the linebackers immediately after the snap, since Spacing exploits shallow linebacker drops with the seam read. Watch the flat defender, whether it is a corner or linebacker, because if they widen too quickly the shallow flat route sits open underneath. If the defense shows Cover 2 with hard corners jumping the flat, expect the seam read to be the primary answer against that void. Beware user controlled lurk defenders sitting in the shallow middle zone, since they can jump the TE in route if the quarterback throws late. Man coverage with press corners shuts this down quickly, so look for blitz packages or man match shells and be ready to check into a different concept.
Usage Tips
Use this on third and short to medium distance where defenses are likely sitting in zone shells like Cover 3 or Cover 4.
Pre-snap, identify if the safeties are showing two high or single high, since this concept thrives against three deep zone drops that leave underneath voids.
Hot route the backside out into a curl if you diagnose man coverage, since spacing concepts naturally lose value against tight man to man unless you adjust.
Combine this with Curl Combo or TE Stick from the same set to keep defenses guessing between horizontal spacing and vertical route combos.
Use play action shots like Close PA Sail or PA TE Flood on early downs to set up defenders biting on the quick flat and seam reads from Spacing.
Other Plays in Wing
 26 DuoDuo, Run Play, Power Run
 26 Duo Alert X SmokeDuo, Run Play, Power Run +2
 Close PA CrossPlay Action, Crosser, Pass Play +4
 Close PA PostPlay Action, Post, Pass Play +2
 Close PA SailPlay Action, Sail, Pass Play +7
 Close Zone StrgRun Play, Inside Zone, Zone Run +2
 Counter UCounter, Run Play, Power Run
 Curl ComboCurl, Pass Play, Flat +1
 DriveDrive, Pass Play, Cover 4 Beater +6
 End Around LeadEnd Around, Trick Play, Run Play
 HB Blunt DiveDive, Run Play
- HB Counter WKCounter, Run Play, Power Run
 HB DelayRun Play
 HB DiveDive, Run Play
- HB Mid ZoneRun Play
 HB MisdirectionMisdirection, Run Play
- HB Power OPower, Run Play, Power Run
 HB Slant 18Run Play
- HB Slash Fk End ArdRun Play
 HB Slash Fk End ArndEnd Around, Trick Play, Run Play
 HB SmashRun Play
 HB Stretch Alert LookieOutside Zone, Run Play, Zone Run +2
 HB Stretch Alert SmokeOutside Zone, Run Play, Zone Run +2
 HB Toss CrackToss, Run Play
 HB Zone TossInside Zone, Toss, Run Play +1
- H Zone WKInside Zone, Run Play, Zone Run
 Mtn HB CounterCounter, Motion, Run Play +1
 Mtn HB DiveDive, Motion, Run Play
 Mtn HB SlamDive, Motion, Run Play
 Mtn H Zone WkInside Zone, Motion, Run Play +1
 Mtn PA BootPlay Action, Motion, Pass Play +5
- Mtn PA Copo SlidePlay Action, Slide, Corner Post +8
 Mtn PA CrossPlay Action, Crosser, Motion +5
 Mtn PA Fk SlidePlay Action, Slide, Motion +6
 Mtn PA PoCo SlidePlay Action, Slide, Post Corner +4
 PA Boot LtPlay Action, Pass Play, Comeback +4
 PA Comebacks Y DigPlay Action, Dig, Comeback +3
 PA End AroundEnd Around, Play Action, Trick Play +4
- PA MiddlePlay Action, Pass Play, Post +2
 PA Misdirection ShotPlay Action, Pass Play, Deep Cross +2
- PA Power OPlay Action, Pass Play, Corner +5
 PA TE FloodPlay Action, Flood, Pass Play +6
 PA Verts Y DigPlay Action, Dig, Four Verts +7
 PA Y-Drag WheelPlay Action, Wheel, Drag +5
 RZ Mtn PA CrossersPlay Action, Crosser, Motion +2
- Scene 44-4Run Play
- Sluggo SeamSeam, Sluggo, Pass Play +3
 Steeler CurlsCurl, Pass Play, Post +1
 TE AttackPass Play, Four Verts, Seam +5
 TE StickStick, Stick Concept, Pass Play +3
 TE Stick FadeFade, Stick, Stick Concept +4
 WR DriveDrive, Pass Play, Cover 4 Beater +6
 Zone Split Alert LookieInside Zone, Run Play, Zone Run +2
- Zone Split Alert SmokeInside Zone, Run Play, Zone Run +2
 Z SpotSpot, Pass Play, Cover 3 Beater +4