Playbooks

At a Glance
Overview
Bunch X Nasty is an 11 personnel Shotgun set that stacks a three man bunch (typically the TE and two receivers) to the field side while the X receiver aligns in a reduced, nasty split on the backside, only a few yards outside the tackle. The single back sits offset next to the QB, giving you a legitimate run threat and a checkdown option. Unlike Bunch or Trips sets that put the backside receiver wide, the nasty split compresses the formation. That creates crossing room across the entire field and makes the X a natural driver on in breaking routes like drags, digs, and shallows.
The tight bunch creates natural rubs and picks against man coverage, while the reduced X gives you a clean inside release that off coverage and outside leverage defenders struggle to stay attached to. That combination is why this set carries so much of the Mesh and Drive family (Mesh Spot, Mesh Traffic, Mtn Mesh Cross, Drive Y Corner, Mtn Drive, Flanker Drive) along with Mtn Dagger, Speed Dig, and Mtn China Cross. Mesh and cross concepts need receivers who can get across the formation fast, and the nasty split shortens that distance.
The set also works on the ground and in gadget territory. Inside Zone, Mtn Outside Zone, Counter Y, and HB Base give a Power HB real downhill looks. Mtn HB Shovel, QB Sweep, SFT Bounce PA Double Post, and the Mesh HB Sneak variations reward a 3DRB who can catch in space. RPO Zone Alert and Mtn RPO Zone Alert let you punish defenders who overplay the bunch, and SLWR friendly concepts like Slot Middle and Mtn Slot Middle isolate your best slot on a linebacker or nickel in the middle of the field.
Strengths
- Built in rubs from the bunch make Mesh Spot, Mesh Traffic, and Mtn Mesh Cross elite man beaters, since trailing defenders get picked off on the crossing mesh point without any hot route needed
- The nasty split X gets a free inside release on Speed Dig, Mtn Dagger, and X Cross, attacking the void between hook defenders and deep safeties in Cover 3 and Cover 4
- Drive concepts (Drive Y Corner, Mtn Drive, Flanker Drive) give you a shallow, dig, and corner triangle that high/lows the underneath zone defender and stresses Cover 2 and Cover 3 match rules
- Strong run and RPO package (Inside Zone, Counter Y, RPO Zone Alert, Mtn Outside Zone) keeps light boxes honest when defenses spin extra DBs to cover the bunch
- Deep gadget and back involvement (Mtn HB Shovel, Mesh HB Sneak Dig, Mtn Clear HB Seam, DBL Post HB Corner) lets a 3DRB exploit linebackers who get caught flowing with crossers
Weaknesses
- The compressed alignment puts only one receiver near the backside sideline, so defenses can press the X and roll a safety to the bunch, taking away the field side and forcing tight window throws
- Pressure off the bunch side (nickel or slot blitzes) is hard to pick up because the TE is often releasing into routes, and the offset back can get stuck on the wrong side of the protection
- A user controlled Mike or Hole defender sitting in the middle of the field can undercut Mesh, Drive, and Dig concepts since nearly every pass concept funnels through the same short middle zone
- Cover 2 Man and 2 Man Under with good trail technique limit rub effectiveness, and Cover 4 Palms can bracket the bunch while robbing the nasty X on crossers
- Predictable tendencies emerge quickly: repeating crossers lets opponents set zone drops to shade underneath, and there are limited true vertical outside threats to punish a crowded middle
Usage Tips
Read the bunch defender alignment pre snap: if you see three defenders stacked or pressed over the bunch, it signals man, so audible to Mesh Spot, Mtn Mesh Cross, or Smash Return to exploit the rubs
When the defense shows a single high safety and soft corners, work Speed Dig, Mtn Dagger, or Mtn Speed Dig Under and throw the dig behind the dropping hook defender
On 3rd and short to medium, Stick Spacing Switch, Y Option Pivot, and Y Corner Pivot give quick option routes that beat both man and zone; slide protection toward the bunch if you expect nickel pressure
Keep defenses honest with Inside Zone and RPO Zone Alert against light boxes, then hit SFT Bounce PA Double Post or DBL Post HB Corner once the linebackers start triggering downhill
Inside the red zone, use Z Mesh Goalline, Z Spot Goalline, Y Flat Goalline, and RZ PA X Whip, and hot route the RB to a flat or wheel to widen the defense and open the spot and whip routes
Plays (61)
 Choice Shallow DigDig, Shallow Cross, Option Route +3
 Corner Out DigOut, Dig, Corner +4
 Counter YCounter, Run Play, Power Run
 DBL Post HB CornerCorner, Post, Double Posts +5
 Deep FloodFlood, Pass Play, Cover 3 Beater +5
 Dig ReturnDig, Motion, Pass Play +4
 Double OutsOut, Pass Play, Block and Release +3
 Drive HB UnderDrive, Pass Play, Cover 4 Beater +4
 Drive Y CornerCorner, Drive, Pass Play +6
 Empty Spot WheelWheel, Spot, Pass Play +3
 Empty Stick Spacing SwitchStick, Spacing, Stick Concept +6
 Flanker DriveDrive, Pass Play, Cover 4 Beater +6
 HB BaseDive, Run Play
 Inside ZoneInside Zone, Run Play, Zone Run
 Mesh CornerCorner, Mesh, Pass Play +4
 Mesh HB SneakMesh, Pass Play, Man Beater +4
 Mesh HB Sneak DigDig, Mesh, Pass Play +5
 Mesh SpotSpot, Mesh, Pass Play +7
 Mesh TrafficMesh, Pass Play, Man Beater +5
 Mtn China CrossMotion, Crosser, Pass Play +5
 Mtn Clear HB SeamSeam, Motion, Pass Play +5
 Mtn Corner UnderCorner, Motion, Pass Play +4
 Mtn Cross PostPost, Motion, Pass Play +5
 Mtn DaggerDagger, Motion, Pass Play +8
 Mtn DriveDrive, Motion, Pass Play +6
 Mtn HB ChoiceOption Route, Motion, Pass Play +4
 Mtn HB ShovelMotion, Drag, Crosser +4
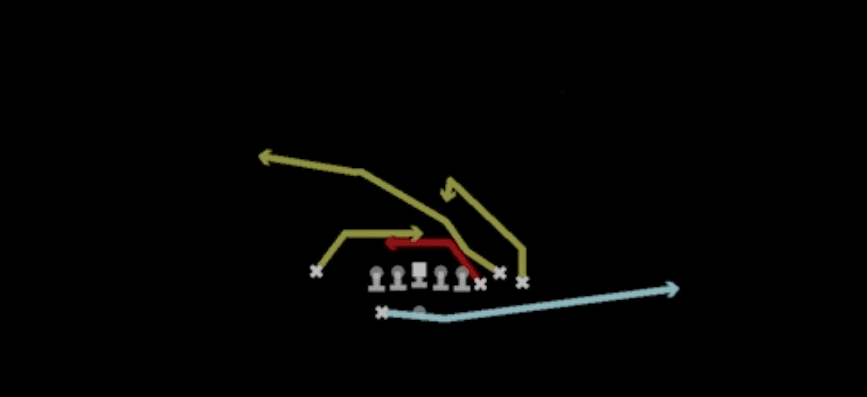 Mtn Mesh CrossMesh, Motion, Pass Play +6
 Mtn Mesh HB SneakMesh, Motion, Pass Play +5
 Mtn Outside ZoneOutside Zone, Motion, Run Play +1
 Mtn RPO Zone AlertRPO, Motion, Pass Play +4
 Mtn Slot MiddleMotion, Dig, Out +4
 Mtn Smash SluggoSluggo, Smash, Motion +7
 Mtn Speed Dig UnderDig, Motion, Pass Play +5
 Mtn Spot HB UnderSpot, Motion, Pass Play +4
 Mtn Y Corner UnderCorner, Motion, Pass Play +4
 Post Wheel ShallowPost, Wheel, Shallow Cross +4
 QB SweepSweep, Qb Sweep, Designed Qb Run +1
 Quick Empty Flats StickQuick Pass, Stick, Stick Concept +6
 Return Mesh SpotSpot, Mesh, Motion +6
 Return SpotSpot, Motion, Pass Play +5
 Return Whip SwitchWhip, Motion, Pass Play +6
 Return Whip TrailWhip, Motion, Pass Play +6
 Return Whip Trail CornerCorner, Whip, Motion +6
 RPO Zone AlertRPO, Pass Play, Run Play +2
 RZ PA X WhipPlay Action, Whip, Pass Play +4
 SFT Bounce Mesh DriveMesh, Drive, Motion +9
 SFT Bounce PA Double PostPlay Action, Post, Double Posts +7
 SFT Bounce Zone WkMotion, Inside Zone, Run Play +1
 Slot MiddlePass Play, Quick Pass, Out +9
 Smash ReturnSmash, Motion, Pass Play +6
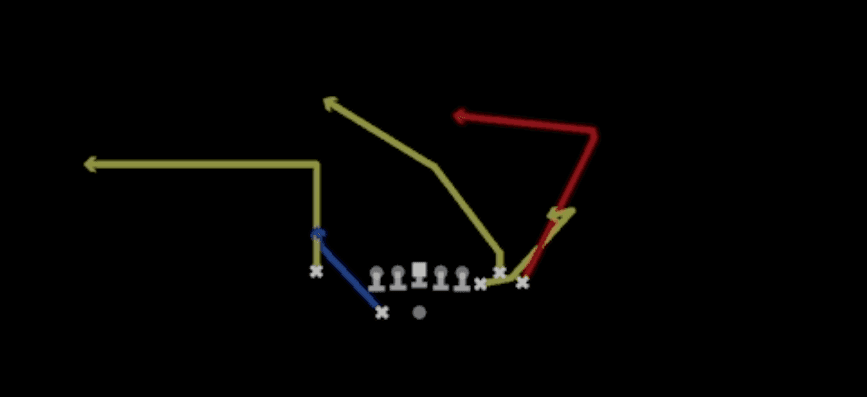 Speed DigDig, Pass Play, Curl +4
 Stick Spacing SwitchStick, Spacing, Stick Concept +6
 Whip Double SpotWhip, Spot, Pass Play +4
 X CrossCrosser, Pass Play, Deep Cross +3
 Y Corner PivotCorner, Pivot, Pass Play +3
 Y Flat GoallineFlat, Pass Play, Corner +2
 Y Option PivotOption Route, Pivot, Pass Play +3
 Z Mesh GoallineMesh, Pass Play, Man Beater +3
 Z SpotSpot, Pass Play, Cover 3 Beater +4
 Z Spot GoallineSpot, Pass Play, Cover 3 Beater +2









