Playbooks
Mtn Mesh Spot

Quick Reference
Receiver routes
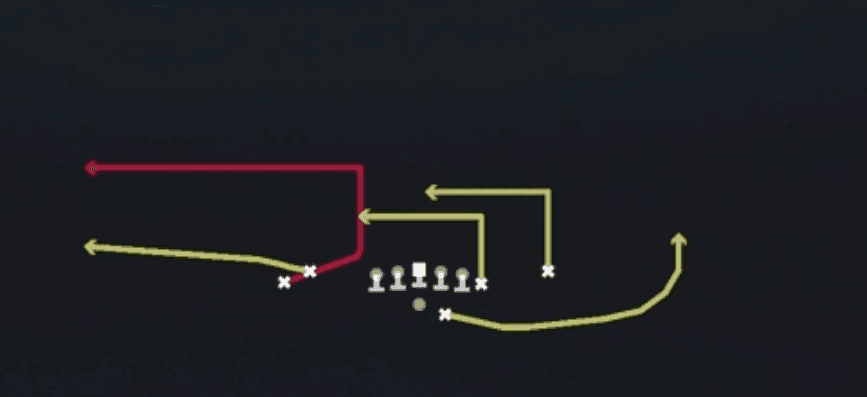
Depth-chart slots are shown as they line up in the base package for this set.
| Player | Side | Route |
|---|---|---|
| 3DRB | Right | Wheel |
| SLWR | Left | Drag |
| WR1 | Left | Streak |
| WR2 | Right | Curl |
| TE1 | Right | Drag |
Read progression
- 3DRB right, Wheel
- SLWR left, Drag
- TE1 right, Drag
- WR2 right, Curl
- WR1 left, Streak
Breakdown
Mtn Mesh Spot is a classic Spot concept married to a mesh cross underneath, run out of Shotgun Tight Y Off with 11 personnel. The diagram shows one receiver pushing vertical up the seam on a deep clear-out route while two underneath receivers cross paths in a mesh at the line to rub off man defenders, with a corner route breaking outside off the mesh and a flat route sitting underneath as the spot piece. This is primarily a man beater thanks to the mesh traffic, though the spot concept underneath also gives you answers versus sink zone coverage like Cover 3. The primary read starts with the mesh crossers to see if a defender gets picked or hung up, then works to the corner route breaking outside, and checks down to the flat as the underneath spot conversion.
Defensive Reads
Pre-snap, check linebacker depth and spacing since tight or stacked backers get hung up easily by the mesh crossers. Watch safety rotation before the snap, a single high safety often signals Cover 3 which this play is built to exploit with the spot and corner combo. Post-snap, key the middle linebacker's reaction to the mesh, if he sits and does not chase, that crosser is your first answer. User the flat defender or nickel corner if you are on defense, since jumping the shallow spot route disrupts the easiest completion in the progression. Man coverage with no help over the top gets picked apart by the mesh rub, so disguise blitzes or bracket the deep vertical route to prevent easy separation.
Usage Tips
Use pre-snap motion if available to identify man versus zone before the snap based on whether the defense shifts a defender across the formation.
Attack Cover 3 by working the spot flat and corner combo to the boundary since the mesh crossers occupy the middle linebacker and force him to widen or trail.
Against man coverage, trust the mesh traffic to create natural picks and take the first open crosser rather than forcing the deep vertical read.
Pair this play with Mtn Y-Corner or Mtn Slot Choice earlier in a series so defenders start jumping the corner route, opening up the mesh crossers underneath on this call.
Best used on second or third down medium distance situations where the mesh and spot combo gives multiple layered conversion options if the first read is covered.
Other Plays in Tight Y Off
 0 1 TrapTrap, Run Play, Power Run
 Cheat Outside ZoneOutside Zone, Motion, Run Play +1
 Cheat RPO Zone Alert BubbleRPO, Motion, Pass Play +3
 Cheat Slash Wheel CrossWheel, Motion, Pass Play +4
 Cheat Spot Y QuickSpot, Motion, Pass Play +6
 Choice Pivot ReturnOption Route, Pivot, Motion +5
 Deep CrossersCrosser, Pass Play, Block and Release +3
 Double Ins Stack OutOut, Pass Play, In +2
 Doubles ShotPass Play, Post, Out +7
 DuoDuo, Run Play, Power Run
 Fake Jet HB SeamPlay Action, Seam, Motion +6
 Flood DriveFlood, Drive, Pass Play +8
 HB Slip ScreenScreen Pass, Hb Screen, Pass Play +2
 Inside ZoneInside Zone, Run Play, Zone Run
- Jet HB TrapRun Play
- Jet Pass Fk ZoneMotion, Run Play
 Jet Touch PassMotion, Run Play
 Mesh SpotSpot, Mesh, Pass Play +7
 Mesh WhipsMesh, Pass Play, Man Beater +5
 Mtn PA SpinnerPlay Action, Motion, Pass Play +4
 Mtn Slot ChoiceOption Route, Motion, Pass Play +4
 Mtn Spinner HB InsideMotion, Dive, Run Play
 Mtn WR Outside ZoneOutside Zone, Motion, Run Play +1
 Mtn Y-CornerCorner, Motion, Pass Play +4
 PA Go Slot CrossPlay Action, Go, Pass Play +5
 PA Jailbreak ScreenPlay Action, Screen Pass, Wr Screen +3
 PA Slot CrossPlay Action, Pass Play, Crosser +4
 Read OptionRead Option, Run Play
 Redzone ScissorsScissors, Pass Play, Cover 2 Beater +5
 RPO Alert BubbleRPO, Pass Play, Run Play
 RPO Alert OutRPO, Out, Pass Play +1
 RPO Peek SlantRPO, Slant, Pass Play +1
 RPO Peek Slant BubbleRPO, Slant, Pass Play +1
- RPO Zone Alert BubbleRPO, Pass Play, Run Play +2
- RPO Zone Alert GlanceRPO, Pass Play, Run Play +2
- RPO Zone Alert OmahaRPO, Pass Play, Run Play +2
- RPO Zone PeekRPO, Pass Play, Run Play +2
 StickStick, Stick Concept, Pass Play +2
 Switch WR DragDrag, Pass Play, Corner +4
 TE CornerCorner, Pass Play, Angle +2
 Wheel SpotWheel, Spot, Pass Play +5
 Zone Fake JetMotion, Run Play