Playbooks

At a Glance
In 34 playbooks
Overview
Shotgun Trey Open is an 11 personnel trips look that puts the tight end off the line as the #3 receiver to the passing strength, with two wide receivers outside him and the X receiver isolated alone on the backside. Because the TE is detached, the offensive line is a pure five man surface. Sets like Trips TE or Bunch keep the tight end attached or compressed, but Trey Open spreads the field horizontally and forces the defense to declare how it will handle a 3x1 distribution before the snap. The running back sits beside the quarterback, so both run fits and pass protection stay flexible.
The personnel alignment creates layered matchup problems. With the TE at #3, defenses in base personnel often leave a linebacker or strong safety responsible for him on vertical releases, seams, and crossers. Nickel defenses that bring a slot corner inside risk a size mismatch on Y Cross, Y Sail, and Y Corner concepts. The isolated X on the backside is a true one on one target. Quick Slants, Curls X Go, Dig N Go, and X Cheat H Post let you punish a single high defense that rotates coverage toward the trips side.
The play list is deep enough to function as a complete offense. It includes Mesh variants (Mesh, Mesh Wheel, Mesh Rewind, H Mtn Mesh Post), Flood concepts (Strong Flood, Y Cross Flood, H Mtn Flood H-Sneak), Stick families (Stick, Air Raid Stick, Jags Stick HB Circle, Stick N Nod), and a real run game with Inside Zone, Power Read, HB Counter, Read Option, Speed Option, and RPO Alert Draw Stick. The 3DRB, Gadget, and SLWR tags reflect a set built around a receiving back, motion and screen trickery, and a dangerous slot receiver working inside leverage.
Strengths
- The 3x1 trips alignment with a detached TE forces a coverage declaration: if the defense rotates to trips, the isolated X gets Quick Slants, Curls X Go, or Dig N Go one on one; if it stays balanced, Strong Flood and Y Cross Flood overload the trips side.
- Mesh, Mesh Wheel, Mesh Rewind, and Clearout Rub Return create natural traffic and rub releases that beat Cover 1 and Cover 0, while the HB wheel and circle options punish linebackers chasing crossers in man.
- Flood and Sail concepts (Y Sail, Y-Sail Go, Strong Flood) stretch Cover 3 and Cover 4 vertically on the outside, and the TE on the sail route regularly finds the hole between the cloud corner and the deep third.
- A legitimate run and RPO menu (Inside Zone, Power Read, HB Counter, Read Option, RPO Alert Draw Stick, RPO Q Stick Draw) keeps defenders honest against light boxes, since trips often pulls a linebacker out of the box.
- Screen depth (HB Angle Screen, HB Slip Screen, HB Cross Screen, WR Screen, WR Mid Screen) gives you built in blitz answers without needing to hot route, fitting the 3DRB and Gadget tags.
Weaknesses
- Only five linemen and a back are available to protect, so overload blitzes from the boundary side and nano blitzes aimed at the isolated backside B gap can collapse the pocket before deep concepts like Four Verticals or Deep Post develop.
- The 3x1 look tips your hand: a user-controlled linebacker or safety sitting in the middle hook can undercut Mesh, Y Cross, and Dig concepts, especially when you lean on crossers to beat man.
- Defenses can bracket or cloud the isolated X with a Cover 2 man or a safety shade, removing your best one on one option and forcing the ball into a crowded trips side.
- Pass protection breaks down when the RB is used on routes (Spacing HB Wheel, Jags Stick HB Circle), and a missed blocking assignment leaves the backside edge free against sim pressure.
- The TE is often slower than a true slot, so press man coverage with a fast nickel can jam him and blow up timing on Y-Drag, Y Stick HB Angle, and Under Y Out.
Usage Tips
Before the snap, check the safety rotation toward trips: two high rolling to the strength means the backside X is isolated, so audible to Quick Slants or Curls X Go; single high without rotation means work the trips side with Strong Flood or Y Cross Flood.
On 3rd and short, lean on Stick, Air Raid Stick, or Stick N Nod, and hot route the RB to a block if you see a linebacker walked up in the A gap showing pressure.
Against heavy Cover 0 or Cover 1 pressure, call Mesh or Clearout Rub Return and hold the ball only for the first rub read; if the blitz is disguised, check to HB Slip Screen or WR Screen at the line.
Use the RPO plays (RPO Alert Draw Stick, RPO Q Stick Draw) on early downs to read the box count: six or fewer defenders in the box with trips drawing a linebacker outside means give the handoff.
In the red zone, GL Rub Under and Corner Strike attack compressed man coverage, and you can motion the TE or slot to change leverage and identify man versus zone before committing.
Plays (85)
 Air Raid StickStick, Stick Concept, Pass Play +5
 ClearoutPass Play, Flood, Go +7
- Clearout Pick ReturnMotion, Block and Release, Drag +5
 Clearout Rub ReturnMotion
 Corner StrikeCorner, Pass Play, Flat +1
- Cross Z PostPost, Crosser, Deep Cross +4
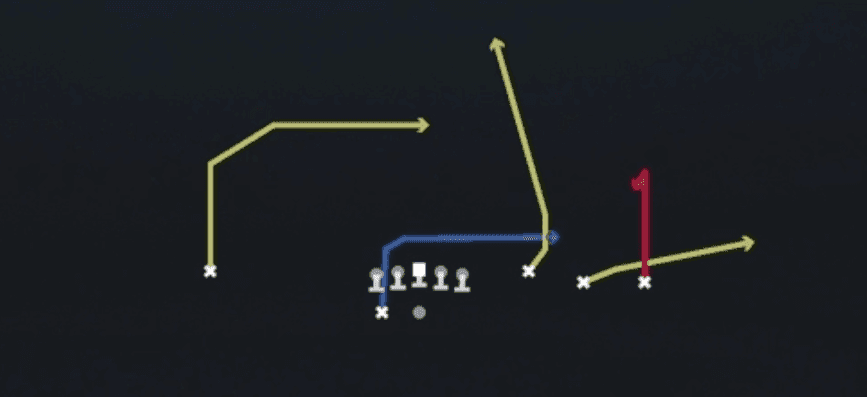 Curl HB BurstCurl, Pass Play, Flat +2
 CurlsCurl, Pass Play, Flat +2
 Curls ComboCurl, Pass Play, Flat +1
 Curls X GoGo, Pass Play, Curl +4
 Dagger Deep CurlCurl, Dagger, Pass Play +6
 Deep PostPost, Pass Play, Comeback +2
 Dig N GoGo, Pass Play, Corner and Go +4
 Double InsIn, Pass Play, Comeback +2
 Drag VerticalsDrag, Four Verts, Pass Play +7
- Four VerticalsDeep Cross, Crosser, Fade +3
 Four VerticalsFour Verts, Pass Play, Cover 2 Beater +7
- GL Rub UnderCorner, Fade, Flat +2
 HB Angle ScreenScreen Pass, Hb Screen, Angle +4
 HB BaseDive, Run Play
 HB CounterCounter, Run Play, Power Run
 HB Cross ScreenScreen Pass, Hb Screen, Pass Play +5
- HB Cross ScreenScreen Pass, Crosser, Deep Cross +3
 HB DrawDraw, Run Play
 HB Off TackleOff Tackle, Run Play
 HB Slip ScreenScreen Pass, Hb Screen, Pass Play +4
- HB Slip ScreenScreen Pass, Flat, Hitch +3
- Hitch Y CornerHitch, Corner, Slant +2
 H Mtn Flood H-SneakFlood, Motion, Pass Play +7
 H Mtn MeshMesh, Motion, Pass Play +5
- H Mtn Mesh PostPost, Option Route, Swing +2
 H Mtn X Shallow CrossShallow Cross, Motion, Pass Play +6
 Inside ZoneInside Zone, Run Play, Zone Run
 Jags Stick HB CircleStick, Stick Concept, Pass Play +4
 Jet New OrleansMotion, Block and Release, Comeback +5
 Jets Deep PostPost, Pass Play, Block and Release +2
 Jets Y-DragDrag, Pass Play, Comeback +4
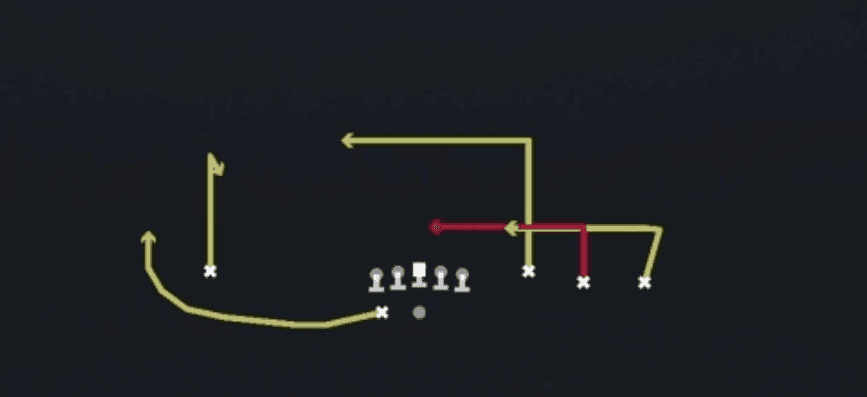 Levels SwitchLevels, Pass Play, Cover 2 Beater +4
 MeshMesh, Pass Play, Man Beater +4
- Mesh DigDig, Option Route, Post +2
 Mesh RewindMesh, Pass Play, Man Beater +5
 Mesh WheelWheel, Mesh, Pass Play +5
- Mesh WheelWheel, Option Route, Post +1
- Mid ZoneRun Play
 OAK UnderPass Play, Flood, Go +8
 PA ReadPlay Action, Pass Play, Deep Cross +5
 PA Slot UnderPlay Action, Pass Play, Comeback +3
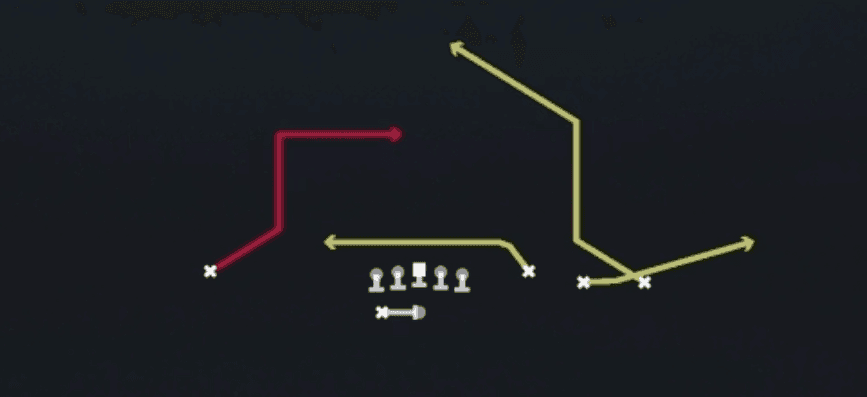 PA WR InPlay Action, Pass Play, Post +4
 Power ReadPower, Run Play, Power Run
 QB ZoneDesigned Qb Run, Run Play
 Quick SlantsSlant, Pass Play, Flat
 Read DigDig, Pass Play, Flat +3
 Read OptionRead Option, Run Play
 RPO Alert Draw StickDraw, RPO, Stick +3
- RPO Q Stick DrawDraw, RPO, Stick +6
 SalemPass Play, Flood, Out +9
- Same Side ZoneRun Play
 ShakesPass Play, Quick Pass, Wheel +6
 Shock HB OptionOption Route, Motion, Pass Play +3
 SlantsSlant, Pass Play, Flat
 Slot DriveDrive, Pass Play, Cover 4 Beater +6
 Sluggo SeamSeam, Sluggo, Pass Play +3
 Spacing HB WheelWheel, Spacing, Pass Play +4
 Speed OptionSpeed Option, Run Play
- StickStick, Flat, Hitch +4
 StickStick, Stick Concept, Pass Play +3
 Stick N NodStick, Stick Concept, Pass Play +3
 Strong FloodFlood, Pass Play, Cover 3 Beater +5
- Switch Z CurlCurl, Hook, Post +3
 Trail ShakeTrail, Pass Play, Drag +4
- Under Y OutOut, Dig, In +4
- Verticals X ShallowShallow Cross, Deep Cross, Crosser +4
 Verts X DragFour Verts, Pass Play, Cover 2 Beater +6
 WR Mid ScreenScreen Pass, Wr Screen, Pass Play +2
 WR ScreenScreen Pass, Wr Screen, Pass Play +2
 X Cheat H PostMotion, Pass Play, Corner +2
 Y CornerCorner, Pass Play, In +2
- Y CrossCrosser, Deep Cross, Fade +4
 Y Cross FloodFlood, Y Cross, Pass Play +7
- Y Cross WheelWheel, Crosser, Deep Cross +4
 Y-DragDrag, Pass Play, Corner +4
 Y SailSail, Pass Play, Cover 2 Beater +5
 Y-Sail GoGo, Sail, Pass Play +5
- Y Stick HB AngleStick, Angle, Stick Concept +4
 Z UnderPass Play, Go, Seam +7









