Playbooks
Bunch

At a Glance
In 17 playbooks
Overview
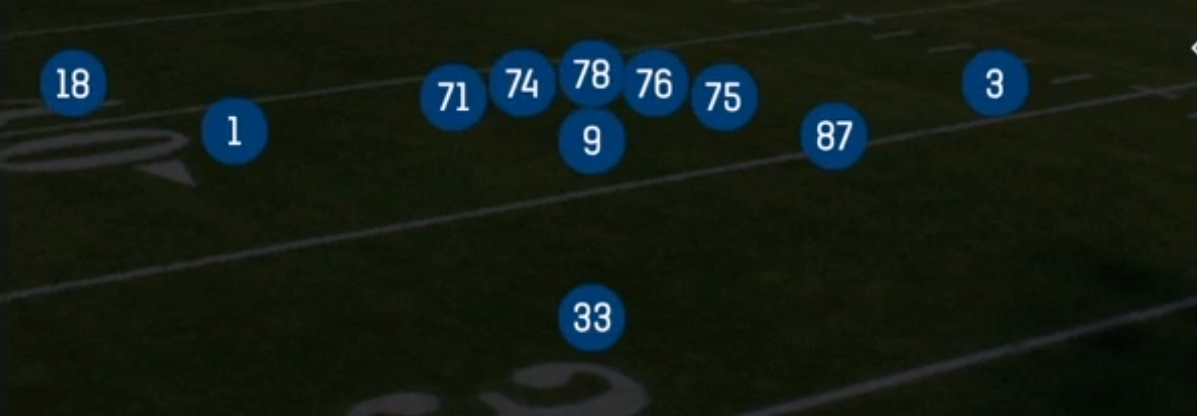
Singleback Bunch takes standard 11 personnel (1 RB, 1 TE, 3 WR) and compresses three eligible receivers into a tight triangle to one side of the formation, leaving a lone split end isolated on the backside. The running back aligns directly behind the quarterback, which keeps the run game balanced and makes play action believable to both sides. Other Singleback sets like Ace, Trey Open, or Doubles spread the receivers across the field. Bunch instead stacks and clusters them, creating natural rub and pick action at the line of scrimmage along with built-in releases that defenders struggle to jam or pass off cleanly.
The bunch alignment is where this set gets its value against coverage. Against man, the point man and the two wings release off each other, so defenders get caught in traffic and the flat and shallow routes open up in concepts like Spacing, Z Spot, Stick, and Z Mesh Goalline. Against zone, the triangle floods one area with three receivers at three levels (flat, curl, corner or seam), which puts the flat defender and the hook defender in constant conflict on Spot Dig, Seattle, and Y Trail. The backside split end sees mostly single coverage, so Clearout SE Opt, Flanker Drive, and Sluggo Seam can isolate your best boundary receiver when the defense rotates its safety toward the bunch.
The run and play action package also stands out. Duo, Inside Zone Split, HB Counter, Counter Y, and HB Ace Power let you punish light boxes when defenses spread out to handle the bunch. Crack Toss, Quick Pitch, End Around, and Pitch WR Reverse attack the edge and use the bunch receivers as crack blockers or motion threats. PA Boot, PA Boot Over, PA Boot Slide, PA Sprint HB Flat, and PA Cross Switch build off those runs with rollouts that give you a high to low read on the move, so this set works as a complete offense and not just a gimmick look.
Strengths
- Built-in rub and pick action from the bunch triangle makes Spacing, Z Spot, Stick, and Z Mesh Goalline elite man beaters, especially against press where defenders collide at the stem.
- Three-level flood concepts like Spot Dig, Seattle, and Y Trail put Cover 3 and Cover 4 flat and hook defenders in conflict, giving you a clean high to low read on nearly every snap.
- The isolated backside split end on Clearout SE Opt, Flanker Drive, and Sluggo Seam punishes defenses that rotate coverage or shift safeties toward the bunch side, creating one on one shots with your best WR.
- A deep and varied run game (Duo, Inside Zone Split, HB Counter, Counter Y, Crack Toss, End Around) keeps defenders honest, and the bunch receivers work as crack and seal blockers on outside runs.
- The play action and boot package (PA Boot, PA Boot Over, PA Boot Slide, PA Sprint HB Flat) moves the pocket away from pressure and flows naturally off the zone and counter looks, with goalline variants that are deadly in the red zone.
Weaknesses
- Compressed splits shrink the field to the bunch side, so a user-controlled defender sitting in the flat or hook zone can read Spacing and Stick concepts and jump the quick throws.
- Bunch-specific coverage adjustments (banjo, bunch spot, or matching zones with Cover 3 Match or Cover 4 Drop) pass off crossing releases cleanly and remove much of the rub advantage against man.
- With only one TE and one RB in the protection, nano blitzes and overload pressures from the backside edge can get home before deeper routes like Sluggo Seam or PA Pin Deep develop.
- The backside split end lives on an island, and a shaded safety or bracket call on that receiver can remove your isolation option and force you into the crowded bunch side.
- The alignment is easy to identify pre snap, so opponents who chart your tendencies can sit on the flat and quick game once they notice you rarely run inside the bunch.
Usage Tips
Read the defender over the point man before the snap: if he is pressed and there is no safety help, hit Spacing, Z Spot, or Z Mesh Goalline for the rub, and if coverage is off and soft, flood it with Spot Dig or Seattle.
On 3rd and short and in the red zone, use Stick, Z Spot Goalline, and Y Flat Goalline, and hot route the backside split end to a slant to give yourself a quick man beater if the defense brings Cover 0 pressure.
When the defense cheats a safety or extra linebacker toward the bunch, audible to Duo, Inside Zone Split, or HB Counter to attack the lightened box, then come back with PA Boot Over or PA Cross Switch off the same look.
Against heavy blitz teams, slide protection toward the pressure side and block the TE or RB with a hot route, then work the quick flat and shallow routes in Spacing or TE Angle so the ball comes out before the nano gets home.
Use Clearout SE Opt, Flanker Drive, or Sluggo Seam as your shot plays once you notice the defense rolling its coverage toward the bunch, and put your best route runner at the split end position through formation subs to maximize the isolation.
Plays (41)
 Clearout SE OptPass Play, Option Route, Go +9
 Counter YCounter, Run Play, Power Run
 Crack TossToss, Run Play
 Dig ReturnDig, Motion, Pass Play +4
 DuoDuo, Run Play, Power Run
 End AroundEnd Around, Trick Play, Run Play
 End Around LeadEnd Around, Trick Play, Run Play
 Flanker DriveDrive, Pass Play, Cover 4 Beater +6
 HB Ace PowerPower, Run Play, Power Run
 HB CounterCounter, Run Play, Power Run
 HB DiveDive, Run Play
 HB DrawDraw, Run Play
 HB SlamDive, Run Play
 HB SlashRun Play, Power Run, Power +1
- HB Slash Fk End ArdRun Play
 HB Slash Fk End ArndEnd Around, Trick Play, Run Play
 HB Zone WkInside Zone, Run Play, Zone Run
 Inside Zone SplitInside Zone, Run Play, Zone Run
 PA BootPlay Action, Pass Play, Corner +4
 PA Boot OverPlay Action, Pass Play, Post +2
 PA Boot SlidePlay Action, Slide, Pass Play +4
- PA Cross SwitchPlay Action, Crosser, Pass Play +3
 PA Draw PassDraw, Play Action, Pass Play +5
 PA End Around SiftEnd Around, Play Action, Trick Play +5
 PA Pin DeepPlay Action, Pass Play, Comeback +4
 PA Sprint HB FlatPlay Action, Flat, Pass Play +4
 Pitch WR ReverseToss, Reverse, Trick Play +1
 Quick PitchToss, Run Play
 SeattlePass Play, Go, Streak +8
- Sluggo SeamSeam, Sluggo, Pass Play +3
 SpacingSpacing, Pass Play, Cover 3 Beater +4
- Spacing SwitchSpacing, Pass Play, Cover 3 Beater +3
 Spot DigDig, Spot, Pass Play +4
 StickStick, Stick Concept, Pass Play +4
 TE AngleAngle, Pass Play, Out +4
 TE HookPass Play, Curl, Out +3
 Y Flat GoallineFlat, Pass Play, Corner +2
 Y TrailTrail, Pass Play, Block and Release +4
 Z Mesh GoallineMesh, Pass Play, Man Beater +3
 Z SpotSpot, Pass Play, Cover 3 Beater +3
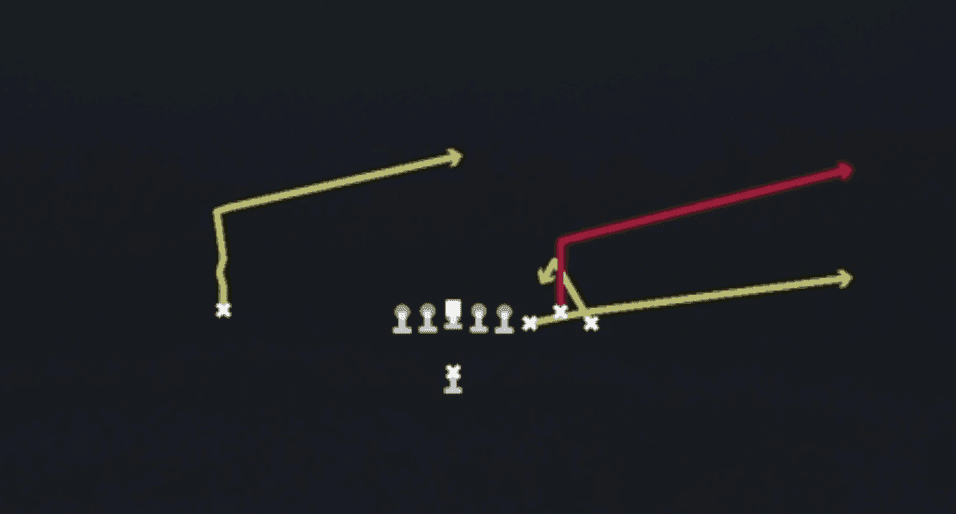 Z Spot GoallineSpot, Pass Play, Cover 3 Beater +2