Playbooks

Quick Reference
In 15 playbooks
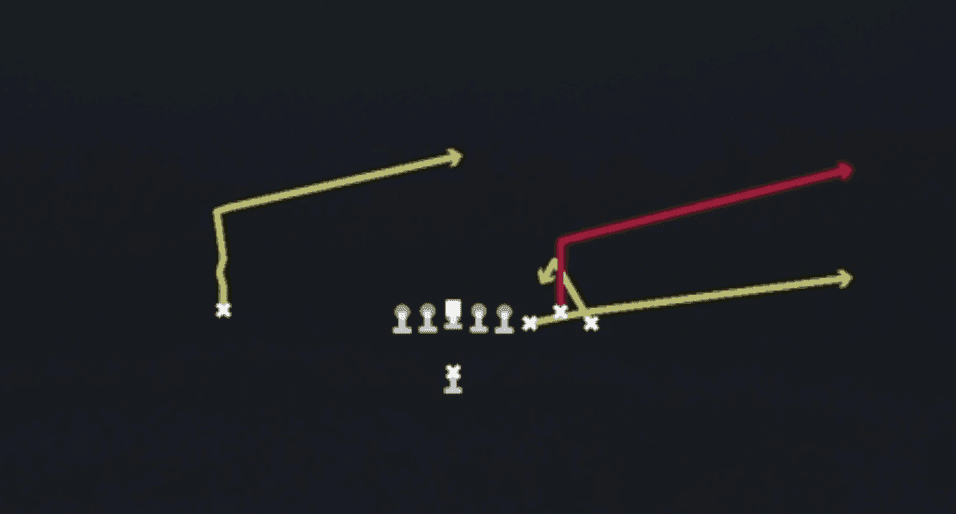
Receiver routes
Depth-chart slots are shown as they line up in the base package for this set.
| Player | Side | Route |
|---|---|---|
| HB1 | Middle | Pass Block |
| WR3 | Right | Smash |
| WR2 | Left | Slant |
| WR1 | Right | Hitch |
| TE1 | Right | Flat |
Read progression
- WR1 right, Hitch
- WR3 right, Smash or WR2 left, Slant or TE1 right, Flat
Breakdown
Spacing out of Singleback Bunch spreads five receivers into a horizontal stretch, with the outside receiver running a deep dig up the sideline, the bunch releasing on a shallow flat route and a quick out, and the inline slot sitting down in a hitch while the TE runs a burst up the seam. The running back stays in to check release before working underneath as a safety valve. This is a classic zone beater built to stretch Cover 3 and Cover 4 defenders horizontally, with the primary read progression starting at the flat route, working to the quick out sitting in the void, and coming back to the hitch or checkdown if the underneath zones are clogged.
Defensive Reads
Pre-snap, check safety depth and corner alignment over the bunch since press coverage or man alignment signals Cover 1 or Cover 2 man, which allows user defenders to jump the shallow routes. Post-snap, watch the flat defender's drop angle, if he sits too long on the flat route the quick out behind him opens up immediately. Identify Cover 3 by the single high safety and three deep defenders sprinting to their zones, this leaves the intermediate hook to curl area vulnerable to the sitting route. Beware of Cover 4 match concepts where the slot corner sinks with the vertical release, this can bracket the hitch and force the quarterback to hold the ball longer. Watch for a robber or lurk defender sitting in the shallow middle since this play's underneath crossing traffic is vulnerable to a spying linebacker jumping the quick out.
Usage Tips
Look for two-high or three-deep shells before the snap since Spacing is designed to exploit the soft spots between underneath zone defenders in Cover 3 and Cover 4.
Take the flat route first if the defense shows Cover 3 with a hard curl-flat drop, then progress to the sitting out route if the corner squats.
Use the RB checkdown as your outlet against pressure or when linebackers sink deep into the flat and out zones.
Pair this call with Spacing Switch or Z Spot from the same set to keep defenders guessing on route combinations while maintaining the same horizontal stretch concept.
Best used on second and medium or third and short since the routes settle quickly and give the quarterback high percentage completions underneath the sticks.
Other Plays in Bunch
 Clearout SE OptPass Play, Option Route, Go +9
 Counter YCounter, Run Play, Power Run
 Crack TossToss, Run Play
 Dig ReturnDig, Motion, Pass Play +4
 DuoDuo, Run Play, Power Run
 End AroundEnd Around, Trick Play, Run Play
 End Around LeadEnd Around, Trick Play, Run Play
 Flanker DriveDrive, Pass Play, Cover 4 Beater +6
 HB Ace PowerPower, Run Play, Power Run
 HB CounterCounter, Run Play, Power Run
 HB DiveDive, Run Play
 HB DrawDraw, Run Play
 HB SlamDive, Run Play
 HB SlashRun Play, Power Run, Power +1
- HB Slash Fk End ArdRun Play
 HB Slash Fk End ArndEnd Around, Trick Play, Run Play
 HB Zone WkInside Zone, Run Play, Zone Run
 Inside Zone SplitInside Zone, Run Play, Zone Run
 PA BootPlay Action, Pass Play, Corner +4
 PA Boot OverPlay Action, Pass Play, Post +2
 PA Boot SlidePlay Action, Slide, Pass Play +4
- PA Cross SwitchPlay Action, Crosser, Pass Play +3
 PA Draw PassDraw, Play Action, Pass Play +5
 PA End Around SiftEnd Around, Play Action, Trick Play +5
 PA Pin DeepPlay Action, Pass Play, Comeback +4
 PA Sprint HB FlatPlay Action, Flat, Pass Play +4
 Pitch WR ReverseToss, Reverse, Trick Play +1
 Quick PitchToss, Run Play
 SeattlePass Play, Go, Streak +8
- Sluggo SeamSeam, Sluggo, Pass Play +3
- Spacing SwitchSpacing, Pass Play, Cover 3 Beater +3
 Spot DigDig, Spot, Pass Play +4
 StickStick, Stick Concept, Pass Play +4
 TE AngleAngle, Pass Play, Out +4
 TE HookPass Play, Curl, Out +3
 Y Flat GoallineFlat, Pass Play, Corner +2
 Y TrailTrail, Pass Play, Block and Release +4
 Z Mesh GoallineMesh, Pass Play, Man Beater +3
 Z SpotSpot, Pass Play, Cover 3 Beater +3
 Z Spot GoallineSpot, Pass Play, Cover 3 Beater +2