Playbooks

Quick Reference
Breakdown
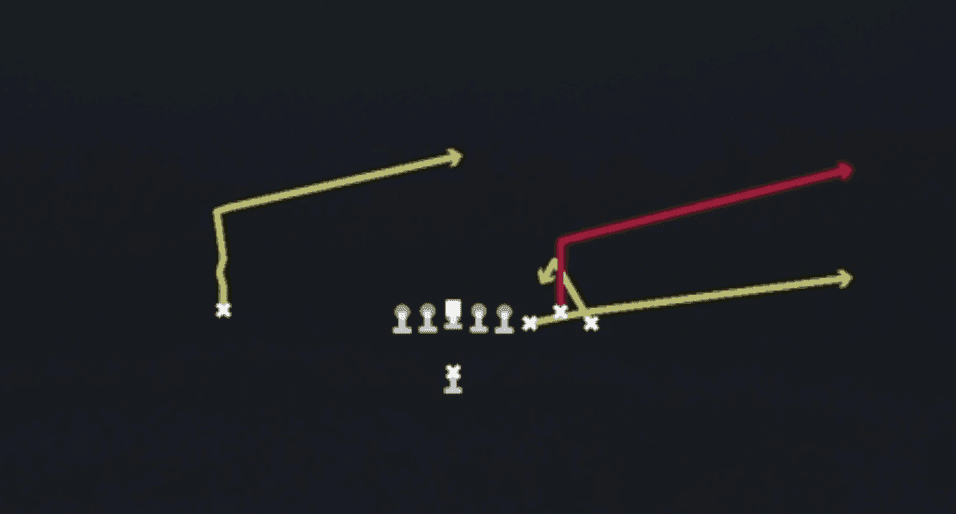
HB Dive out of Singleback Bunch is a straight downhill run play designed to hit the A gap immediately after the snap. The offensive line blocks a standard inside zone scheme, with the fullback or blocking TE (if present) sealing the interior gap while the bunch receivers to the right run off their defenders to clear space. This is a pure run play, not a man or zone beater in the passing sense, and the primary read is the RB attacking the play side A gap first, then bouncing to the backside cutback lane if the initial hole is clogged.
Defensive Reads
Watch linebacker depth pre-snap: linebackers sitting shallow near the line of scrimmage signal run blitz and will jump the A gap immediately. Check safety alignment for an eighth defender in the box, which indicates the defense expects the dive and will crash down hard. Post-snap, key the play side defensive tackle and mike linebacker fill, since a quick double team read there tells you whether to stick with the primary A gap or bounce. This play struggles against interior run blitzes and stacked fronts with a shaded nose tackle, since the A gap gets clogged before the back can build momentum. It beats light boxes and defenses playing off coverage out of Bunch, since those alignments show fewer run defenders committed inside.
Usage Tips
Use HB Dive on early downs or short yardage situations like 3rd and 1 when defenses are geared to stop the pass out of Bunch formations.
Check the box count pre-snap: if the defense has fewer than 6 in the box, this play has a high hit rate versus base personnel.
Pair this play with HB Slam and Inside Zone Split from the same set to keep defenders guessing between quick hitters and stretch runs.
Mix in PA Cross Switch or PA Boot off the same Bunch look so linebackers respect the run fake and widen their run fits.
Avoid calling this against heavy blitz packages with stacked linebackers, since the quick-hitting design leaves little time to read a delayed blitz.
Other Plays in Bunch
 Clearout SE OptPass Play, Option Route, Go +9
 Counter YCounter, Run Play, Power Run
 Crack TossToss, Run Play
 Dig ReturnDig, Motion, Pass Play +4
 DuoDuo, Run Play, Power Run
 End AroundEnd Around, Trick Play, Run Play
 End Around LeadEnd Around, Trick Play, Run Play
 Flanker DriveDrive, Pass Play, Cover 4 Beater +6
 HB Ace PowerPower, Run Play, Power Run
 HB CounterCounter, Run Play, Power Run
 HB DrawDraw, Run Play
 HB SlamDive, Run Play
 HB SlashRun Play, Power Run, Power +1
- HB Slash Fk End ArdRun Play
 HB Slash Fk End ArndEnd Around, Trick Play, Run Play
 HB Zone WkInside Zone, Run Play, Zone Run
 Inside Zone SplitInside Zone, Run Play, Zone Run
 PA BootPlay Action, Pass Play, Corner +4
 PA Boot OverPlay Action, Pass Play, Post +2
 PA Boot SlidePlay Action, Slide, Pass Play +4
- PA Cross SwitchPlay Action, Crosser, Pass Play +3
 PA Draw PassDraw, Play Action, Pass Play +5
 PA End Around SiftEnd Around, Play Action, Trick Play +5
 PA Pin DeepPlay Action, Pass Play, Comeback +4
 PA Sprint HB FlatPlay Action, Flat, Pass Play +4
 Pitch WR ReverseToss, Reverse, Trick Play +1
 Quick PitchToss, Run Play
 SeattlePass Play, Go, Streak +8
- Sluggo SeamSeam, Sluggo, Pass Play +3
 SpacingSpacing, Pass Play, Cover 3 Beater +4
- Spacing SwitchSpacing, Pass Play, Cover 3 Beater +3
 Spot DigDig, Spot, Pass Play +4
 StickStick, Stick Concept, Pass Play +4
 TE AngleAngle, Pass Play, Out +4
 TE HookPass Play, Curl, Out +3
 Y Flat GoallineFlat, Pass Play, Corner +2
 Y TrailTrail, Pass Play, Block and Release +4
 Z Mesh GoallineMesh, Pass Play, Man Beater +3
 Z SpotSpot, Pass Play, Cover 3 Beater +3
 Z Spot GoallineSpot, Pass Play, Cover 3 Beater +2