Playbooks
Ace Overload

At a Glance
In 2 playbooks
Overview
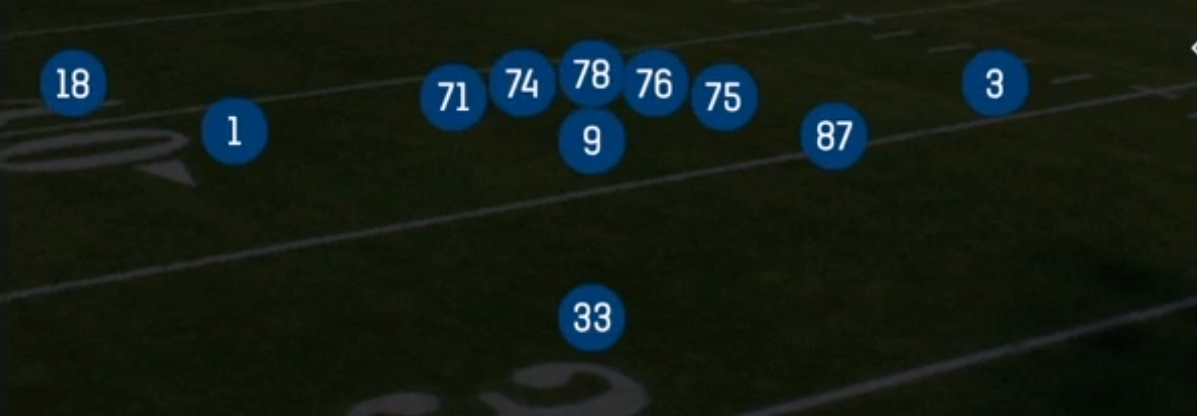
Ace Overload is a run-first, strength-heavy look within the Singleback formation. It uses 11 personnel (1 RB, 1 TE, 3 WR) but condenses the formation by stacking extra bodies to one side of the ball. Standard Singleback sets spread three receivers across the field to create spacing. Ace Overload instead loads the strong side with the tight end and tight-aligned receivers, which creates a numbers advantage at the point of attack and leaves a lone receiver isolated backside. Defenses have to either shift their front and second-level defenders toward the overload or accept being outnumbered on strong-side runs.
The playbook tells you exactly what this set is built for. HB Stretch, HB Smash, 0 1 Trap, HB Belly Weak and HB Misdirection give you outside zone, downhill gap, trap and counter-style action, all from one pre-snap picture. The play-action tree (PA Misdirection, PA Belly Shot, PA TE Seam and PA LT Sneak) is designed to punish linebackers and safeties who trigger on those run fits. Because the run and pass concepts share the same backfield action, the defense cannot key on alignment to diagnose the play.
The matchup advantage comes from forcing the defense to choose. If they rotate a safety down to match the overload, the backside receiver and the TE on PA TE Seam get favorable one-on-one looks with a single-high or vacated middle. If they stay balanced, your strong-side run game gets extra blockers against fewer defenders. The result is a compact, deceptive package that lets 11 personnel play like a heavy set without subbing in a second tight end.
Strengths
- Numbers advantage on the strong side makes HB Stretch and HB Smash consistent chain movers against balanced 4-3 and nickel fronts that do not shift to the overload.
- HB Misdirection and HB Belly Weak attack the weak side after you establish strong-side runs, which punishes defenders who fast-flow or users who cheat their linebacker toward the overload pre-snap.
- 0 1 Trap exploits aggressive defensive tackles and nano pressure up the A gap by letting the interior rusher in and kicking him out, which opens a quick-hitting lane against run commit and pinch calls.
- PA TE Seam is a strong Cover 3 and Cover 1 beater because hard run action pulls the hook defenders and middle linebacker downhill, which leaves the seam open behind them.
- PA Belly Shot and PA Misdirection give you a legitimate deep shot off identical backfield action, so single-high safeties who creep into the box to stop the run get beaten over the top.
Weaknesses
- The run-heavy playbook has limited quick-game options, so this set struggles on 3rd and long, and opponents who know your tendency can sit in dime or quarters without fear.
- The overload tips your strength pre-snap. A defense that shifts linebackers and slants the line toward the heavy side can blow up HB Stretch and HB Smash before they get started.
- Play-action concepts need time to develop. A well-timed edge blitz or nano from the weak side can hit the quarterback during the fake before the deep routes clear.
- A disciplined user-controlled safety or middle linebacker who stays at depth and reads the play kills PA TE Seam and forces checkdowns into traffic.
- The isolated backside receiver is easy to bracket or press. Opponents can roll coverage toward him and take away the only true outside answer on passing downs.
Usage Tips
Open drives with HB Stretch and HB Smash on 1st and 10 to establish the strong-side run, then go to PA Belly Shot or PA Misdirection once you see the safety rotating down into the box.
Read the defensive shift pre-snap: if linebackers slide to the overload, audible to HB Belly Weak or HB Misdirection to hit the vacated backside; if they stay balanced, run strong.
Against run commit or pinch calls that crash the interior, check to 0 1 Trap, and consider a quick slant or flat hot route on the backside receiver as a safety valve on play-action.
When you spot a single-high safety with the middle linebacker playing shallow, go to PA TE Seam and throw it early before the safety can rotate over the top.
Use this set heavily in short yardage, red zone and four-minute offense, but motion into a lighter set or audible out on 3rd and 7 plus, where the limited quick-game tree becomes a liability.
Plays (9)
 0 1 TrapTrap, Run Play, Power Run
 HB Belly WeakRun Play, Power Run, Power +2
 HB MisdirectionMisdirection, Run Play
 HB SmashRun Play
 HB StretchOutside Zone, Run Play, Zone Run
 PA Belly ShotPlay Action, Pass Play, Block and Release +2
 PA LT SneakPlay Action, Pass Play, Block and Release +3
 PA MisdirectionPlay Action, Pass Play, Block and Release +1
 PA TE SeamPlay Action, Seam, Pass Play +3