Playbooks

At a Glance
Overview
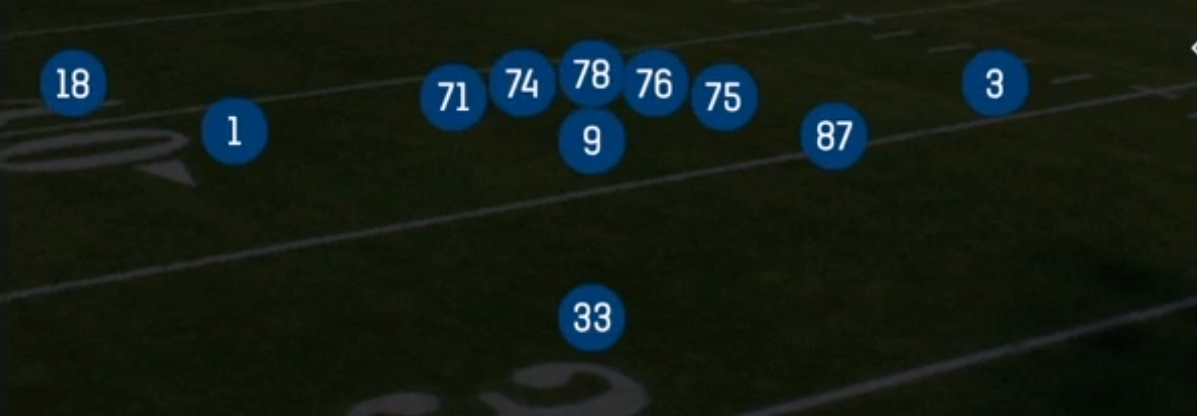
Doubles Flex is a 2x2 look out of Singleback with 11 personnel. The tight end is detached from the line and flexed into the slot on one side, and a wide receiver aligns in the slot on the other. Standard Singleback sets keep the Y attached to the tackle as a sixth blocker. Doubles Flex removes him from the core of the formation, leaving a five man surface up front with the halfback as the only extra blocker in the backfield. The result is a spread passing shape that still carries a tight end on the field, so defenses that match personnel with base or nickel have to make a choice before the snap.
The core advantage is how the flexed Y distorts defensive matchups. Against base personnel, a linebacker or safety has to widen to cover the TE in the slot, which opens inside run lanes for HB Dive, HB Blunt Dive, and HB Draw and creates speed mismatches on routes like TE Post and Y Shallow Cross. Against nickel, a smaller slot corner or big nickel ends up on a physical tight end, and PA Y Glance and Inside Cross become box out throws over the middle. Because the look is balanced 2x2, the defense cannot easily overload one side without tipping its coverage rotation.
The play list gives you a full quick, intermediate, and vertical menu from one alignment. You get quick game man beaters (Slants, Double Slants, Whip Ins, Double Outs), zone beaters and flood concepts (Curl Flats, Z Spot, Flanker Drive, Flanker Dig), crossers (Slot Cross, Y Shallow Cross, Inside Cross), and shot plays (Four Verticals, PA Dbl Posts, PA Deep In). Pairing that with a real run game (HB Power O, HB Stretch, HB Slam) and HB Dive Z Motion lets you stay in the same set and build complementary looks, forcing opponents to defend the whole field on every snap.
Strengths
- The flexed tight end creates a true personnel mismatch: base defenses put a linebacker in space against him, and nickel defenses put a slot corner on a bigger target for PA Y Glance, TE Post, and Inside Cross.
- The balanced 2x2 shape exposes coverage pre-snap, and Four Verticals, Slot Post, and PA Dbl Posts attack single high and two high shells directly, especially Cover 3 seams and Cover 2 middle hole.
- The man beater menu is deep: Slants, Double Slants, Whip Ins, and Slot Cross beat press and off man, while Y Shallow Cross and Inside Cross create natural rubs against Cover 1 and Cover 0.
- Zone beaters like Curl Flats, Z Spot, Flanker Drive, and Flanker Dig flood levels against Cover 3 and Cover 4, and you can hot route the RB to a flat or angle to create an extra high low read.
- The light box from a spread alignment makes HB Draw, HB Dive, and HB Blunt Dive effective against dime and nickel, and HB Dive Z Motion adds motion leverage to move a defender before the snap.
Weaknesses
- Only the halfback stays in as an extra blocker, so Cover 0 pressure and nano blitzes off the edge get home fast on deep developing plays like PA Deep In and PA Dbl Posts.
- With no inline tight end, outside runs like HB Stretch and HB Power O lose an edge blocker, and a defense that sets the edge with a crashing end or a user controlled OLB can blow them up.
- A user controlled robber or hook defender sitting in the middle of the field can jump Y Shallow Cross, Slot Cross, and Inside Cross, since many concepts in the set funnel receivers through the same zone.
- Screen options are thin with just HB Slip Screen, so beating aggressive pass rushers relies heavily on quick game and hot routes rather than a varied screen package.
- Cover 2 man and match coverages with a safety over the top can smother the vertical shots and crossers together, forcing you into underneath checkdowns if the flexed TE cannot win leverage.
Usage Tips
Read the defender aligned over the flexed TE pre-snap: if it is a linebacker, attack with TE Post, PA Y Glance, or Inside Cross; if it is a corner or big nickel, check to HB Dive or HB Draw into the lighter box.
Against Cover 0 or heavy blitz looks on third down, audible to Slants or Double Slants and block the RB, or hot route the TE to a quick slant to get the ball out before the pressure arrives.
Against single high safety looks on early downs, call Four Verticals and read the seams, or use PA Dbl Posts after establishing HB Dive and HB Blunt Dive to hold linebackers and open the post window.
Versus Cover 3 and Cover 4 zone on medium distance, use Curl Flats, Flanker Drive, or Flanker Dig and hot route the RB to a flat or wheel to add a stretch defender underneath coverage.
Use HB Dive Z Motion to identify man or zone: if a defender follows the motion, pivot to man beaters like Whip Ins or Slot Cross on the next snap; if the defense rotates, lean on flood concepts like Z Spot.
Plays (26)
 Curl FlatsFlat, Curl, Pass Play +1
 Double OutsOut, Pass Play, Block and Release +3
 Double SlantsSlant, Pass Play, Flat
 Flanker DigDig, Pass Play, Curl +4
 Flanker DriveDrive, Pass Play, Cover 4 Beater +6
 Four VerticalsFour Verts, Pass Play, Cover 2 Beater +5
 HB Blunt DiveDive, Run Play
 HB DiveDive, Run Play
 HB Dive Z MotionDive, Motion, Run Play
 HB DrawDraw, Run Play
 HB Power OPower, Run Play, Power Run
 HB SlamDive, Run Play
 HB Slip ScreenScreen Pass, Hb Screen, Pass Play +2
 HB StretchOutside Zone, Run Play, Zone Run
 Inside CrossCrosser, Pass Play, Block and Release +3
 PA Dbl PostsPlay Action, Post, Pass Play +4
 PA Deep InPlay Action, Pass Play, Dig +3
 PA HB CurlPlay Action, Pass Play, Comeback +4
 PA Y GlancePlay Action, Pass Play, Stop And Go +2
 SlantsSlant, Pass Play, Flat
 Slot CrossCrosser, Pass Play, Block and Release +3
 Slot PostPost, Pass Play, Drag +4
 TE PostPost, Pass Play, Corner +4
 Whip InsWhip, Pass Play, Dig +2
 Y Shallow CrossShallow Cross, Crosser, Pass Play +5
 Z SpotSpot, Pass Play, Cover 3 Beater +4