Playbooks

At a Glance
In 1 playbook
Overview
Doubles Y-Slot Close is a 2x2 set out of Singleback that uses 11 personnel with the tight end detached into the slot on one side instead of sitting in-line. Both sides of the formation use compressed splits: an outside receiver and an inside receiver to each side, with the Y occupying one of the slot spots and a slot receiver in the other. Standard Singleback Doubles keeps the receivers wider. Other Singleback sets attach the TE to the tackle. Here the tighter splits pull the outside receivers closer to the core of the formation, which opens room to the boundary for breaking routes and creates natural rub and switch angles off the line.
Alignment is what makes this set valuable. With the Y in the slot, the defense has to choose between leaving a nickel corner on a bigger-bodied tight end or bumping a linebacker or safety out over him, which lightens the box. If the defense stays in base personnel to match the TE, the slot WR on the opposite side gets a favorable matchup against a linebacker or strong safety. If it goes nickel, the reduced box count sets up the HB Draw, 0 1 Trap, and HB Zone Wk with only six or fewer defenders to block.
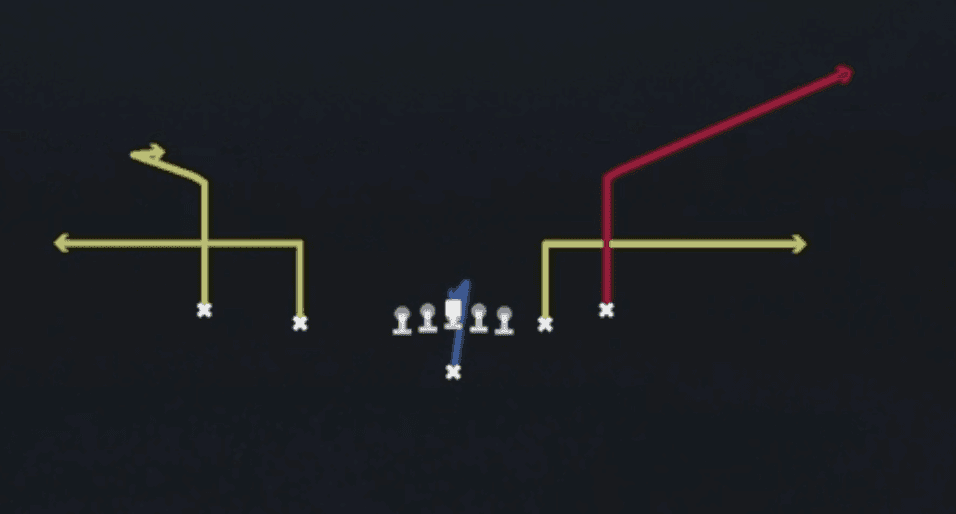
The play list is compact but balanced: three runs that attack light boxes and aggressive pass rushers, plus three passes that stress coverage vertically, outside, and at the sticks. Four Verticals puts pressure on single-high and Cover 2 safeties. Bench Corner Stop attacks the outside third and the flat. Switch X Comeback uses the close splits to cross release paths and beat press man. This mix makes the set a strong fit for a Power HB or a 3DRB who can win on draws and serve as a checkdown valve.
Strengths
- Close splits create natural release crosses on Switch X Comeback, making it a reliable man beater against press and Cover 1 because defenders get caught trailing through the switch.
- The detached Y forces a personnel decision: nickel coverage lightens the box for HB Zone Wk and 0 1 Trap, while base coverage puts a linebacker on the SLWR.
- Four Verticals from compressed splits lets the seams threaten Cover 3 and Cover 2 safeties, and hot routing the Y to a seam or post isolates the middle of the field against single-high looks.
- Bench Corner Stop provides a strong flood and high-low concept against Cover 3 and Cover 4, stretching the flat defender between the corner route and the underneath stop.
- HB Draw and 0 1 Trap punish nano blitzes and wide edge rushers, turning aggressive pass rush angles into big run lanes for a Power HB.
Weaknesses
- With the Y detached, protection has only five linemen and the back, so overload and Cover 0 pressures from the field side can beat protection before Four Verticals or Switch X Comeback develop.
- The small play list, with only three pass concepts, makes tendencies easy to read, and a smart opponent will key the formation and sit in Cover 2 Man or match coverage.
- A user-controlled safety or linebacker sitting in the middle hook can rob seams on Four Verticals and jump the Y on quick hot routes.
- Compressed splits let defenders play inside leverage and bracket inside routes more easily, which makes the outside breaking routes the only clean throws against Cover 4 and quarters matchups.
- If your Y is a blocking tight end with low route running or speed, a nickel corner can erase him, and the formation loses its core matchup advantage.
Usage Tips
Count the box pre-snap: if the defense shows six or fewer in nickel against the detached Y, audible to HB Zone Wk or 0 1 Trap and work the light side.
Against press man or Cover 1, call Switch X Comeback and consider hot routing the back to a slant or wheel so a man-read option breaks away from the blitzing linebacker.
On 3rd and medium against Cover 3, run Bench Corner Stop and read the flat defender: throw the corner if he sits low, and throw the stop if he bails to the sideline.
When you see a nano blitz or a heavy edge rush look on passing downs, check to HB Draw with a 3DRB or Power HB to punish defenders who overcommit up the field.
Use Four Verticals against single-high on 2nd and short or late-game shot plays, and slide protection or block the RB when the opponent shows double A-gap pressure.