Playbooks

At a Glance
In 42 playbooks
Overview
Trips TE is one of the most versatile 11 personnel sets in the Shotgun formation. It stacks three eligible receivers to the strong side, with the tight end aligned inline as the number 3, a slot receiver as the number 2, and the Z outside as the number 1. The X receiver is isolated alone on the backside, and the running back sits next to the quarterback. Unlike Trips, Bunch, or Empty sets, which pull the tight end off the ball, keeping the TE attached gives you a legitimate sixth blocker on run downs while still forcing the defense to declare its trips check before the snap.
That alignment creates two major matchup problems. First, the backside X is left on an island, so if the defense rotates coverage toward the three-man side, your best outside receiver gets single coverage on Slants, Curls X Go, X Spot, and WR Short Post. Second, the inline TE is a mismatch lever: against man he often draws a linebacker or safety, which Switch Y In, TE Corner, TE Swirl, China Y Post, and Flood Y-Delay are built to exploit. Pair this with the SLWR tag and the slot becomes the focal point of RPO Alert Bubble, Slot Quick Flat, and Slot Swing, while the 3DRB tag rewards Texas, Dagger Texas, HB Angle, and Orbit PA HB Wheel.
The set also carries one of the deepest RPO and option menus in the Shotgun book. Inside Zone, Cheat Inside Zone, QB Zone, HB Counter, and QB Strong Power give Power HB and mobile QB builds a real ground game, while Read Option, Speed Option, Read Option Bubble, RPO Zone Alert Bubble, Orbit RPO Zone Alert, and Mtn RPO Read Flat stress the box with post-snap reads. Motion variants (Mtn, Orbit, Shuffle, Reload, Cheat) let the Gadget tag shine by shifting leverage before the snap, so one alignment can produce screens, verticals, flood concepts, and play-action shots without changing personnel.
Strengths
- Isolated backside X receiver: when the defense rolls a safety or checks coverage to the trips side, Slants, Curls X Go, X Spot, and WR Short Post give you a clean one-on-one read with no help over the top.
- Elite flood and high-low zone beaters: Flood, Cheat Flood Divide, Flood Y-Delay, Curl Flat, and Mtn Return Levels put three levels on the trips side and shred Cover 3 and Cover 4 flat defenders, especially when you hot route the TE to a drag to hold the hook defender.
- Inline TE mismatches against man: Switch Y In, TE Corner, TE Swirl, and China Y Post attack linebackers and safeties with option-style breaks, and the TE stays in as a blocker look that sells run for PA Slot Corner and Mtn PA Y Corner.
- Deep RPO and option package: Inside Zone, QB Zone, Read Option, Speed Option, RPO Alert Bubble, and Reload RPO Zone Alert Bubble punish defenses that load the box or cheat a linebacker toward trips, and the attached TE gives your Power HB a true sixth blocker on the strong side.
- Screen game that answers pressure: WR Screen, TE Screen, TE Middle Screen, HB Slip Screen, Orbit Cross Screen, and Shuffle Mtn Fk Screen Wheel give you built-in blitz punishers so you are never forced to eat a sack against Cover 0 or nano pressure.
Weaknesses
- Three-man side is easy to overload with a trips check: savvy opponents who pre-snap shift to a Cover 3 Match or Cover 4 Palms with a user rotating down can bracket the slot and TE, leaving you dependent on the backside X.
- Only five eligible receivers with one attached to the line means edge pressure off the weak side is dangerous; a user sim pressure or nano blitz off the X side can reach the QB before deep concepts like Verticals, PA Boot Shot, and PA Shot Wheel develop.
- User-controlled middle linebackers and safeties sitting in the hook zone can erase the TE option routes and the mesh from Inside Cross and Z Cross, which are core reads in this set.
- Light 11 personnel against heavy boxes: if the defense stays in base or nickel with a spy, the read option game loses its numbers advantage and your RPOs pull into tight throwing windows.
- Motion tells: repeated Mtn, Orbit, and Shuffle calls tip your concept to experienced opponents, who can check to man coverage with a user robbing the flat or swing route after the motion player settles.
Usage Tips
Count the box and the safety rotation pre-snap: if six or fewer defenders are in the box with a light edge, run Inside Zone, Cheat Inside Zone, or QB Zone; if a safety rolls to trips, throw X Spot or Slants to the isolated backside receiver.
On 3rd and medium against man coverage, call Switch Y In or Texas and hot route the backside X on a slant, giving you a quick option route from the TE and a man beater away from the trips pressure.
Against Cover 3 on early downs, lean on Flood, Cheat Flood Divide, or Curl Flat, and read the flat defender: throw the flat if he sinks, throw the corner or curl if he jumps the flat, and slide protection toward the weak side to buy time.
When you see pressure alignment or a Cover 0 look, audible to HB Slip Screen, TE Middle Screen, or WR Screen, or hot route the RB to a block and the TE to a quick out on Slot Quick Flat to beat the blitz before it arrives.
Set up play-action with run tendencies: after two or three Inside Zone or HB Counter calls, hit Reload PA Unders, PA Counter Go, or Orbit PA HB Wheel on 1st and 10 when the opponent crowds the line and begins to trigger linebackers downhill.
Plays (65)
 45 Quick BaseDive, Run Play
 All CurlCurl, All Curls, Pass Play +3
 Cheat Clearout SeamSeam, Motion, Pass Play +4
 Cheat Flood DivideFlood, Motion, Pass Play +6
 Cheat Inside ZoneInside Zone, Motion, Run Play +1
 China Y PostPost, Pass Play, Corner +2
 Curl FlatFlat, Curl, Curl Flat +6
 Curls X GoGo, Pass Play, Curl +1
- Dagger TexasTexas, Angle, Drag +5
- Deep InCorner, Curl, Dig +2
 Deep lnPass Play, In, Dig +7
 Double In SailIn, Sail, Pass Play +4
 Drive PostPost, Drive, Pass Play +6
 FloodFlood, Pass Play, Cover 3 Beater +5
 Flood Y-DelayDelay, Flood, Pass Play +5
 HB AngleAngle, Pass Play, In +3
 HB CounterCounter, Run Play, Power Run
 HB Mid DrawDraw, Run Play
 HB Slip ScreenScreen Pass, Hb Screen, Pass Play +3
 Inside CrossCrosser, Pass Play, Block and Release +3
 Inside ZoneInside Zone, Run Play, Zone Run
 Mtn BenchMotion, Bench, Pass Play +4
- Mtn PA Y CornerCorner, Deep Cross, Crosser +5
 Mtn Return LevelsLevels, Motion, Pass Play +5
- Mtn RPO Read FlatFlat, Pass Play, Run Play
 Mtn Z SpotSpot, Motion, Pass Play +5
 Orbit Cross ScreenScreen Pass, Motion, Pass Play +4
 Orbit PA HB WheelPlay Action, Wheel, Motion +7
- Orbit RPO Zone AlertRPO, Motion, Pass Play +3
- Orbit TE Middle ScreenScreen Pass, Te Screen, Motion +6
 PA Boot ShotPlay Action, Pass Play, Deep Cross +2
 PA Counter GoPlay Action, Go, Pass Play +5
 PA Shot WheelPlay Action, Wheel, Pass Play +3
 PA Slot CornerPlay Action, Corner, Pass Play +3
 QB Strong PowerPower, Qb Power, Designed Qb Run +2
 QB ZoneDesigned Qb Run, Run Play
 Read OptionRead Option, Run Play
 Read Option BubbleRead Option, Run Play
- Read Option DummyRead Option, Run Play
- Reload PA UndersCorner, Flat, In +3
- Reload RPO Zone Alert BubbleBubble Screen, Pass Play, Run Play
- Reload Shock HB ChoiceOption Route, Corner, Stick +2
 RPO Alert BubbleRPO, Pass Play, Run Play
 RPO Alert Mtn ScreenScreen Pass, RPO, Motion +2
- RPO Zone Alert BubbleRPO, Pass Play, Run Play +1
 Shuffle Mtn Fk Screen WheelPlay Action, Screen Pass, Wheel +7
 Shuffle Mtn HB SwingSwing, Motion, Pass Play
 Shuffle Mtn LevelsLevels, Motion, Pass Play +6
 SlantsSlant, Pass Play, Block and Release +3
 Slot Quick FlatFlat, Pass Play, Block and Release +1
 Slot SwingPass Play, Bubble Screen, Post +2
 Speed OptionSpeed Option, Run Play
 Switch Y InIn, Pass Play, Post +3
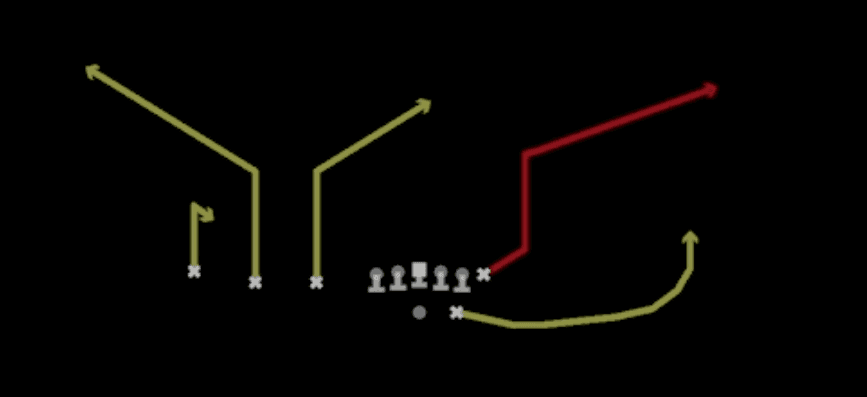 TE CornerCorner, Pass Play, Post +2
 TE Middle ScreenScreen Pass, Te Screen, Pass Play +5
 TE ScreenScreen Pass, Te Screen, Pass Play +3
 TE SwirlPass Play, Go, Seam +7
 Texan Deep InPass Play, In, Dig +11
 TexasTexas, Texas Concept, Pass Play +4
 VerticalsFour Verts, Pass Play, Cover 2 Beater +7
 Verts Y DelayDelay, Four Verts, Pass Play +7
 WR ScreenScreen Pass, Wr Screen, Pass Play +2
 WR Short PostPost, Pass Play, Hitch +1
- X SpotSpot, Pass Play, Cover 3 Beater +4
 Z CrossCrosser, Pass Play, Deep Cross +3









