Playbooks

Quick Reference
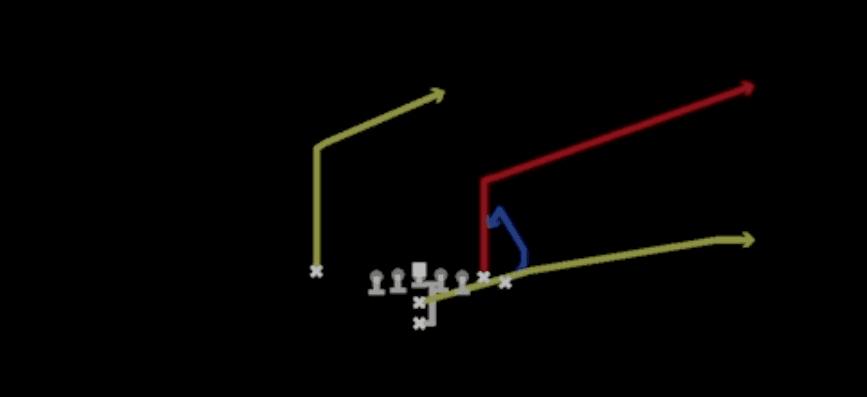
Receiver routes
Depth-chart slots are shown as they line up in the base package for this set.
| Player | Side | Route |
|---|---|---|
| HB1 | Middle | Hitch |
| FB1 | Middle | Flat |
| TE2 | Right | Streak |
| WR1 | Left | Hook |
| TE1 | Right | Out |
Read progression
- TE1 right, Out
- WR1 left, Hook
- TE2 right, Streak
- HB1, Hitch or FB1, FlatCheck-down
Breakdown
PA Clearout out of the I Form Wing set opens with play-action to hold the linebackers, then sends three routes to clear out the coverage for an underneath crosser. The backside receiver runs a deep clearout route up the sideline while the TE on that side runs a corner breaking route, dragging the deep defenders away from the middle of the field. On the play side, the outside receiver runs a vertical seam up the numbers while the wing player runs a shallow drag underneath, crossing the formation as the clearout route to the checkdown. The primary read progression starts with the vertical seam route on the play side, moves to the drag crossing underneath if the seam is capped, and finishes with the checkdown or scramble drill if both are covered.
Defensive Reads
Pre-snap, identify the safety depth and leverage. A two high shell with safeties sitting shallow signals they are ready to jump the play side seam route, so bait the quarterback to the crosser instead. Watch the play side linebacker's initial step after the snap. If he steps up hard on the run fake, the vertical seam and drag combo will have a clean throwing lane behind him. User the deep half defender on the play side as your primary lurk threat, since he is the only defender with a real shot to undercut the seam route before it stretches vertically. Against Cover 3, the corner responsible for the deep third on the backside can be baited by the clearout route, but if he sits and reads the quarterback's eyes he can jump the shallow drag as it crosses his zone. Man coverage with underneath linebackers spying the run fake is the biggest threat here. If a defender stays home instead of biting the play action, he can trail the drag route and cut off the easy completion.
Usage Tips
Use PA Clearout on early downs (1st and 10 or 2nd and short) when you have already established the run game with HB Lead or HB Inside Zone from this set, since the play action freezes linebackers who are keying run fits.
Check the safety alignment pre-snap. Against two high shells, the vertical seam route on the play side has room to work behind the underneath zone defenders before the safety can rotate over.
Against single high looks (Cover 3 or Cover 1), prioritize the shallow drag crossing route since the deep clearout route on the backside should occupy the free safety and open a driving lane underneath.
Hot route the shallow drag to a quicker settle or spot route if you are facing a Cover 2 Man look, since the natural rub from the clearout can get you open faster against man coverage.
Pair this play with HB Lead or Close HB Lead earlier in a series to sell the run fake, then call PA Clearout to punish linebackers who bite on the play action.
Other Plays in Wing
 95 MikeRun Play, Power Run, Designed Qb Run +1
 Close HB LeadIso, Run Play, Power Run
 CurlsPass Play, Flat, Hitch
 FB DiveDive, Run Play
 FB Fake HB TossToss, Run Play
 HB Counter WkCounter, Run Play, Power Run
- HB Inside ZoneInside Zone, Run Play, Zone Run
 HB LeadIso, Run Play, Power Run
 HB Lead DiveDive, Run Play
 HB Power GPower, Run Play, Power Run
 HB Power OPower, Run Play, Power Run
 HB StretchOutside Zone, Run Play, Zone Run
 HB SweepSweep, Run Play
 HB Zone TossToss, Run Play, Inside Zone +1
 Motion Power WeakMotion
 Mtn HB Power OPower, Motion, Run Play +1
 Mtn PA Power OPlay Action, Motion, Pass Play +4
- Mtn PA Sprint HB FlatPlay Action, Flat, Motion +3
 Mtn PowerMotion, Run Play
- Mtn Power WeakMotion, Run Play
 Mtn ZoneMotion, Run Play
 PA Boot FlowPlay Action, Pass Play, Comeback +4
 PA Close CrossPlay Action, Pass Play, Crosser +3
 PA Close PostPlay Action, Post, Pass Play +3
 PA Mtn Power OPlay Action, Motion, Pass Play +4
 PA Power OPlay Action, Pass Play, Corner +4
 PA ScissorsPlay Action, Scissors, Pass Play +5
 PA SpotPlay Action, Spot, Pass Play +5
 PA Sprint HB FlatPlay Action, Flat, Pass Play +4
 PA TE LeakPlay Action, Pass Play, Corner +3
 PA U SlidePlay Action, Slide, Pass Play +5
 PA WagglePlay Action, Pass Play, Block and Release +3
 PA X Burst CrossPlay Action, Pass Play, Crosser +3
 Post ShotPost, Pass Play, Deep Cross +2
- RPO Power O Alert X SmokePower, RPO, Run Play +3
 RPO Stretch Alert X LookieOutside Zone, RPO, Run Play +3
 Strong StretchOutside Zone, Run Play, Zone Run
 TE OptionOption Route, Pass Play, Angle +3
 TE PostPost, Pass Play, Drag +3
 WR CornerCorner, Pass Play, Angle +2
 WR SluggoSluggo, Pass Play, Man Beater +4
 X FadeFade, Pass Play
 X SlantSlant, Pass Play, Flat +2
 Zone WkInside Zone, Run Play, Zone Run