Playbooks

In 13 playbooks
Receiver routes
Depth-chart slots are shown as they line up in the base package for this set.
| Player | Side | Route |
|---|---|---|
| FB1 | Middle | Run Block |
| TE2 | Right | Run Block |
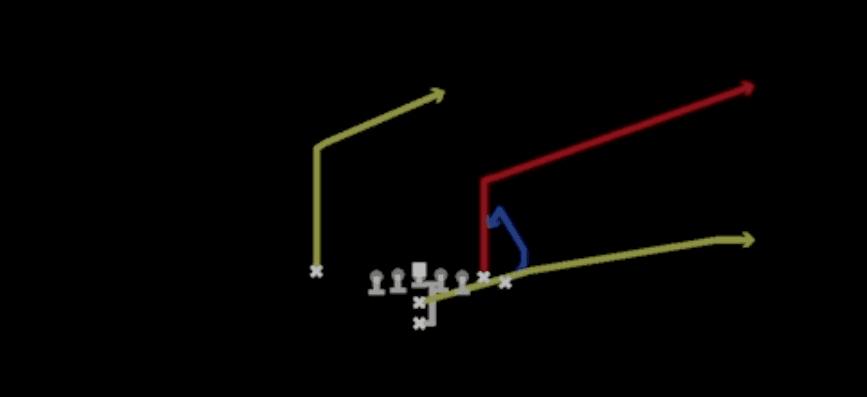
| WR1 | Left | Slant |
| TE1 | Right | Run Block |
Read progression
- WR1 left, Slant
Breakdown
RPO Stretch Alert X Lookie is a run-pass option out of the I Form Wing set that pairs an outside zone stretch to the play side with a quick lookie route from the X receiver. The offensive line and fullback execute zone blocking steps to seal the edge for the HB, while the diagram shows the X running a shallow crossing route underneath as the RPO alert. This is a zone beater on the ground and a light box beater through the air, giving the QB a pre-snap and post-snap key on whether to hand off or pull and throw the quick option route. Primary read progression starts with the HB stretch run, then keys the alert route to the X if the defense crashes down on the run fit.
Defensive Reads
Watch the play side linebacker depth and flow before the snap, if he sits at normal depth or shows blitz intent that is your cue the QB will likely pull and throw. Identify the alley defender or force player, if he crashes hard on run action the lookie route will be wide open behind him. Man coverage on the X with a defender playing tight underneath can shut down the pass option, forcing the offense into the run fit. Zone shells with a linebacker sinking into the shallow crossing lane take away the lookie throw and dare the offense to run into a light box. Look for user-controlled defenders spying the mesh point or jumping the crossing route, since a smart user can bait the QB into a bad pull read and blow up the play in the backfield.
Usage Tips
Check the defensive front pre-snap and count the box, if there are six or fewer defenders in the box favor the outside zone handoff. If the linebackers or safety cheat down toward the run action, pull the ball and hit the X on the lookie route for a quick easy gain. This play works best on early downs like first and second down when defenses are still respecting run tendencies from the I Form Wing personnel. Pair this with straight HB Stretch or Mtn Zone to sell the same zone footwork and keep defenders guessing on the alert key. Use hot routes sparingly since the RPO read already builds in a conflict defender, but consider adjusting the backside receiver if you need an extra outlet against aggressive slot corners.
Other Plays in Wing
 95 MikeRun Play, Power Run, Designed Qb Run +1
 Close HB LeadIso, Run Play, Power Run
 CurlsPass Play, Flat, Hitch
 FB DiveDive, Run Play
 FB Fake HB TossToss, Run Play
 HB Counter WkCounter, Run Play, Power Run
- HB Inside ZoneInside Zone, Run Play, Zone Run
 HB LeadIso, Run Play, Power Run
 HB Lead DiveDive, Run Play
 HB Power GPower, Run Play, Power Run
 HB Power OPower, Run Play, Power Run
 HB StretchOutside Zone, Run Play, Zone Run
 HB SweepSweep, Run Play
 HB Zone TossToss, Run Play, Inside Zone +1
 Motion Power WeakMotion
 Mtn HB Power OPower, Motion, Run Play +1
 Mtn PA Power OPlay Action, Motion, Pass Play +4
- Mtn PA Sprint HB FlatPlay Action, Flat, Motion +3
 Mtn PowerMotion, Run Play
- Mtn Power WeakMotion, Run Play
 Mtn ZoneMotion, Run Play
 PA Boot FlowPlay Action, Pass Play, Comeback +4
 PA ClearoutPlay Action, Pass Play, Flat +4
 PA Close CrossPlay Action, Pass Play, Crosser +3
 PA Close PostPlay Action, Post, Pass Play +3
 PA Mtn Power OPlay Action, Motion, Pass Play +4
 PA Power OPlay Action, Pass Play, Corner +4
 PA ScissorsPlay Action, Scissors, Pass Play +5
 PA SpotPlay Action, Spot, Pass Play +5
 PA Sprint HB FlatPlay Action, Flat, Pass Play +4
 PA TE LeakPlay Action, Pass Play, Corner +3
 PA U SlidePlay Action, Slide, Pass Play +5
 PA WagglePlay Action, Pass Play, Block and Release +3
 PA X Burst CrossPlay Action, Pass Play, Crosser +3
 Post ShotPost, Pass Play, Deep Cross +2
- RPO Power O Alert X SmokePower, RPO, Run Play +3
 Strong StretchOutside Zone, Run Play, Zone Run
 TE OptionOption Route, Pass Play, Angle +3
 TE PostPost, Pass Play, Drag +3
 WR CornerCorner, Pass Play, Angle +2
 WR SluggoSluggo, Pass Play, Man Beater +4
 X FadeFade, Pass Play
 X SlantSlant, Pass Play, Flat +2
 Zone WkInside Zone, Run Play, Zone Run