Playbooks

Bunch Str Offset

Specialists3DRBGadgetPower HBSLWR

Overview

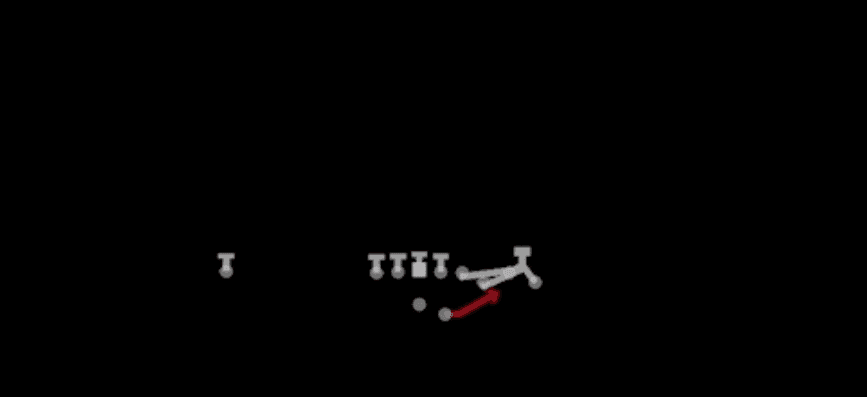
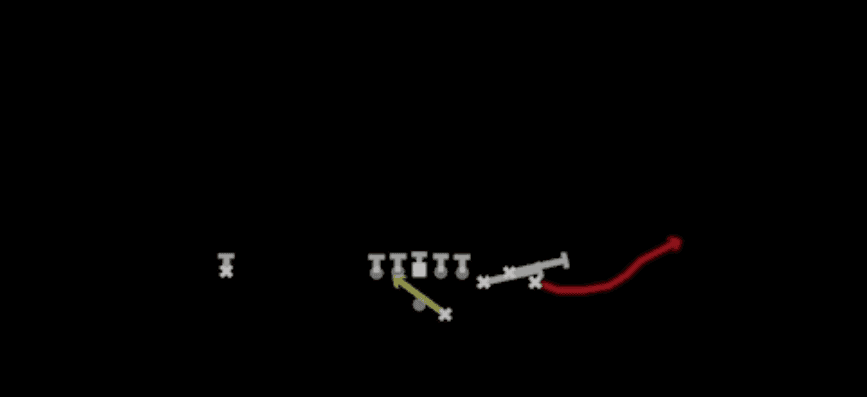
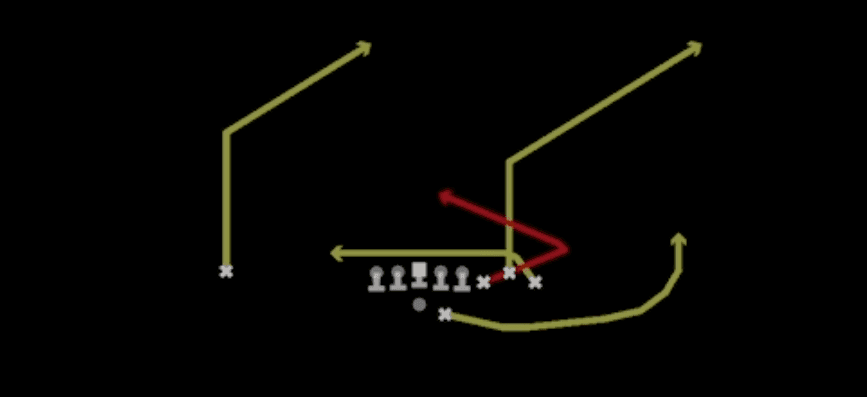
Bunch Str Offset takes the standard Shotgun 11 personnel look and compresses three receivers into a tight cluster to the strong side while offsetting the back to the weak side of the quarterback. That offset alignment is the key differentiator from a straight bunch set: it changes your run fits, opens up toss and pin pull concepts away from the bunch, and gives you a natural boot and play-action direction back toward the receiver cluster. Where a spread out Shotgun set forces the defense to declare coverage across the width of the field, Bunch Str Offset creates a leverage problem in a five yard box, which is where zone match rules break down in Madden.

The personnel is 1 RB, 1 TE, and 3 WR, with the tight end usually working as the point man or inside bunch member. That puts your TE on a linebacker or a nickel defender in tight quarters, and it lets you release your slot receiver clean off the line because the bunch bodies absorb press coverage. Against man, defenders have to navigate traffic before they ever get hands on, which is why the mesh and spot concepts in this set (SFT Diamond Mesh, SFT Diamond Fake Mesh Rail, Mtn Stick, HB Mtn Dig Spot, Lead Swing Spot) generate free releases without a single hot route.

The play list is unusually deep for a compressed set. You get full RPO packages (Return RPO Alert Flat, Return RPO Flat, RPO Duo Alert Post, Mtn RPO Alert Swing, RPO Alert Screen), a real run game with Duo, Inside Zone, Pin Pull Toss, Crack Toss, and Read Option, plus vertical shot plays like Verts Dig, Dagger, Mtn Deep Post, and Mtn Fk Toss Verticals. The QB run element (QB Crack Sweep, HB Mtn QB Sweep, Speed Option Wk) forces the defense to account for the quarterback, and the Gadget and Power HB tags mean you can rotate personnel to isolate a speed back or a bruiser depending on situation.

Strengths

  • Bunch releases beat man coverage without hot routes. Mesh and spot concepts like SFT Diamond Mesh, Mtn Stick, and HB Mtn Dig Spot create natural rubs that leave defenders trailing by two steps, and user defenders cannot easily jump routes through the traffic.
  • The RPO package is one of the deepest in the game. Return RPO Alert Flat, RPO Duo Alert Post, and Mtn RPO Alert Swing let you read the box count pre-snap and pull the ball to a soft flat or a post over a single high safety without ever committing.
  • Compressed alignment stresses zone match rules. Verts Dig, Dagger, and Flood attack the hole between the flat defender and the deep third from a bunch, which is exactly where Cover 3 and Cover 6 defenders hesitate in Madden. Flood in particular puts three levels in one zone.
  • Toss and pin pull to the weak side punish over-rotated fronts. Because the back is offset away from the bunch, Pin Pull Toss, Crack Toss, and Mtn Lead Toss hit into the space the defense vacated to cover three receivers.
  • Quarterback run and gadget looks force extra accounting. QB Crack Sweep, HB Mtn QB Sweep, and Speed Option Wk mean the defense cannot spill everything inside, and the Gadget tag opens up personnel swaps to get a burner on a sweep.

Weaknesses

  • Only one backside receiver means the weak side is easy to isolate. If your opponent shades a corner over that split end with inside help, your quick game shrinks to the bunch side and a user defender can sit on the whole route concept.
  • Compressed formations concede the edge to blitz. With three receivers to one side and a single back, overloaded weak side pressure and nano blitzes off the offset back's side get home before mesh or spot routes clear. You are frequently one blocker short.
  • Bunch spacing gets crowded against tight man press with a user in the middle. A user-controlled linebacker sitting under the cluster can pick off spot, stick, and drag routes because all three receivers occupy the same window.
  • Deep concepts take time to develop. Verts Dig, Dagger, and Mtn Deep Post require five to seven step protection windows that this set does not reliably buy against a good pass rush, especially with no second back to chip.
  • Run tendencies telegraph fast. Duo, Inside Zone, and Mtn HB Base all key off the same offset back alignment, so an opponent who reads the back's side can shift the front and cheat linebackers pre-snap.

Usage Tips

Read the bunch side leverage pre-snap. If the defense stacks defenders directly over the cluster it is almost always man, so go to SFT Diamond Mesh or SFT Diamond X-Cross Trail and let the rubs work. If they play off with a flat defender outside, you have zone and Mtn Stick or Flood puts a receiver in the void.

Use the RPO alerts as your first down staple. Return RPO Alert Flat and Mtn RPO Alert Swing give you a free answer to a loaded box, and pulling the ball to the flat against Cover 3 is a repeatable four to six yards without risk.

Motion the outside bunch receiver across to identify coverage. If a defender travels with him you are in man and you can flip to Mtn Slot Post or Corner Strike. If nobody follows, keep the compressed concept and attack the seam.

Save the shot plays for third and long or after you have established toss. Verts Dig, Dagger, and Mtn Deep Post work best once the defense is squeezing the box against Pin Pull Toss and Read Option. Check your protection and consider blocking the back instead of releasing him on a swing.

Have a screen answer loaded for heavy pressure. HB Slip Screen and RPO Alert Screen turn aggressive edge blitzes into big gains, and the bunch bodies give you natural downfield blockers when your back turns the corner.

Plays (45)

Plays in Bunch Str Offset
PlayDiagramOpen
Corner StrikeCorner, Pass Play
Crack TossToss, Run Play
DaggerDagger, Pass Play, Cover 2 Beater +1
DuoDuo, Run Play, Power Run
Durham
Fk Toss Lead Swing DigToss, Play Action, Dig +2
Fk Toss SlideToss, Play Action, Slide +1
FloodFlood, Pass Play, Cover 3 Beater
HB Mtn Dig SpotDig, Spot, Motion +2
HB Mtn QB SweepSweep, Qb Sweep, Designed Qb Run +2
HB Mtn Trail Dbl PostPost, Double Posts, Motion +4
HB Slip ScreenScreen Pass, Hb Screen, Pass Play
Inside ZoneInside Zone, Run Play, Zone Run
Lead Swing SpotSwing, Spot, Pass Play +1
Mtn Deep PostPost, Motion, Pass Play
Mtn Fk Toss VerticalsToss, Play Action, Four Verts +4
Mtn HB BaseMotion, Dive, Run Play
Mtn Inside ZoneInside Zone, Motion, Run Play +1
Mtn Lead TossToss, Motion, Run Play
Mtn PA Flood Y-DelayPlay Action, Delay, Flood +3
Mtn PA SpinnerPlay Action, Motion, Pass Play
Mtn PA Wheel CrossPlay Action, Wheel, Motion +2
Mtn RPO Alert SwingRPO, Swing, Motion +2
Mtn Slot PostPost, Motion, Pass Play
Mtn Spinner HB InsideMotion, Dive, Run Play
Mtn StickStick, Stick Concept, Motion +1
Mtn WR Outside ZoneOutside Zone, Motion, Run Play +1
Pin Pull TossToss, Pin And Pull, Run Play +1
QB Crack SweepSweep, Qb Sweep, Designed Qb Run +1
Read OptionRead Option, Run Play
Return PA FloodPlay Action, Flood, Motion +2
Return RPO Alert FlatRPO, Flat, Motion +2
Return RPO FlatRPO, Flat, Motion +2
Return SpacingSpacing, Motion, Pass Play +2
RPO Alert ScreenScreen Pass, RPO, Pass Play +1
RPO Duo Alert PostDuo, RPO, Post +3
RZ PA CornerPlay Action, Corner, Pass Play
SeattlePass Play, Play Action, Four Verts +6
SFT Diamond Fake Mesh RailPlay Action, Mesh, Motion +2
SFT Diamond MeshMesh, Motion, Pass Play +1
SFT Diamond X-Cross TrailMotion, Crosser, Trail +1
Slant SpacingSlant, Spacing, Pass Play +2
Speed Option WkSpeed Option, Run Play
Verts DigDig, Four Verts, Pass Play +2
Y TrailTrail, Pass Play

Other Sets in Shotgun

4wr Pack Trips

18 Plays · 1 RB, 0 TE, 4 WR

4WR Trips Strong

18 Plays · 1 RB, 0 TE, 4 WR

5WR Flex Trey

16 Plays · 0 RB, 1 TE, 4 WR

5WR Tight

12 Plays · 0 RB, 0 TE, 5 WR

5WR Trio

24 Plays · 1 RB, 1 TE, 3 WR

5WR Trips

18 Plays · 0 RB, 0 TE, 5 WR

Ace

28 Plays · 1 RB, 2 TE, 2 WR

Ace Offset

15 Plays · 1 RB, 2 TE, 2 WR

Ace Slot

16 Plays · 1 RB, 2 TE, 2 WR

Ace Slot Offset

19 Plays · 1 RB, 2 TE, 2 WR

Box

18 Plays · 1 RB, 0 TE, 4 WR

Box HB Strong

6 Plays · 1 RB, 1 TE, 3 WR

Box Offset Wk

19 Plays · 1 RB, 1 TE, 3 WR

Box Y Off

6 Plays · 1 RB, 1 TE, 3 WR

Bunch

53 Plays · 1 RB, 1 TE, 3 WR

Bunch HB Str

12 Plays · 1 RB, 1 TE, 3 WR

Bunch Offset

31 Plays · 1 RB, 1 TE, 3 WR

Bunch Offset Close

11 Plays · 1 RB, 1 TE, 3 WR

Bunch Open

9 Plays · 1 RB, 0 TE, 4 WR

Bunch Open Offset

18 Plays · 1 RB, 1 TE, 3 WR

Bunch Open TE

13 Plays · 1 RB, 1 TE, 3 WR

Bunch Quads

9 Plays · 1 RB, 1 TE, 3 WR

Bunch Quads Close

6 Plays · 1 RB, 1 TE, 3 WR

Bunch Spread

24 Plays · 1 RB, 1 TE, 3 WR

Bunch Spread Nasty

35 Plays · 1 RB, 1 TE, 3 WR

Bunch Str Nasty

33 Plays · 1 RB, 1 TE, 3 WR

Bunch TE

51 Plays · 1 RB, 1 TE, 3 WR

Bunch TE Str

13 Plays · 1 RB, 1 TE, 3 WR

Bunch TE Wk

18 Plays · 1 RB, 1 TE, 3 WR

Bunch Trio Open

12 Plays · 1 RB, 1 TE, 3 WR

Bunch Wide

26 Plays · 1 RB, 1 TE, 3 WR

Bunch Wide Nasty

23 Plays · 1 RB, 1 TE, 3 WR

Bunch X Nasty

61 Plays · 1 RB, 1 TE, 3 WR

Bunch Y-Flex

32 Plays · 1 RB, 1 TE, 3 WR

Bunch Y-Trips

15 Plays · 1 RB, 1 TE, 3 WR

Cluster

14 Plays · 1 RB, 1 TE, 3 WR

Cluster HB Str

18 Plays · 1 RB, 1 TE, 3 WR

Dbls Flex Y Off Close

21 Plays · 1 RB, 1 TE, 3 WR

Deebo Package

6 Plays · Unknown

Deuce

18 Plays · 1 RB, 2 TE, 2 WR

Deuce Close

47 Plays · 1 RB, 2 TE, 2 WR

Doubles

65 Plays · 1 RB, 1 TE, 3 WR

Doubles Flex

27 Plays · 1 RB, 1 TE, 3 WR

Doubles Flex WK Pats

13 Plays · Unknown

Doubles Flex Wk Swap

12 Plays · 1 RB, 1 TE, 3 WR

Doubles Flex Y Off Close

21 Plays · 1 RB, 1 TE, 3 WR

Doubles HB Wk

46 Plays · 1 RB, 1 TE, 3 WR

Doubles Hip

13 Plays · 1 RB, 1 TE, 3 WR

Doubles Off Close

10 Plays · 1 RB, 1 TE, 3 WR

Doubles Off Close Wk

13 Plays · 1 RB, 1 TE, 3 WR

Doubles Offset

43 Plays · 1 RB, 1 TE, 3 WR

Doubles Offset Wk

42 Plays · 1 RB, 1 TE, 3 WR

Double Stack

13 Plays · 1 RB, 1 TE, 3 WR

Doubles Y-Flex

28 Plays · 1 RB, 1 TE, 3 WR

Doubles Y-Flex Offset

15 Plays · 1 RB, 1 TE, 3 WR

Doubles Y Off

42 Plays · 1 RB, 1 TE, 3 WR

Doubles Y Off Nasty

20 Plays · 1 RB, 1 TE, 3 WR

Doubles Y Off WK

2 Plays · 1 RB, 1 TE, 3 WR

Doubles Z Close

14 Plays · 1 RB, 1 TE, 3 WR

Doubles Z Close Wk

17 Plays · 1 RB, 1 TE, 3 WR

Double Wing

9 Plays · 2 RB, 3 TE, 0 WR

Duo Slot Open

10 Plays · 2 RB, 0 TE, 3 WR

Duo Twins Flex

9 Plays · 2 RB, 1 TE, 2 WR

Empty Ace

12 Plays · 1 RB, 2 TE, 2 WR

Empty Base

33 Plays · 1 RB, 1 TE, 3 WR

Empty Base Flex

35 Plays · 1 RB, 1 TE, 3 WR

Empty Base Trio

17 Plays · 1 RB, 1 TE, 3 WR

Empty Bunch

9 Plays · 1 RB, 1 TE, 3 WR

Empty Bunch Open

17 Plays · 1 RB, 1 TE, 3 WR

Empty Bunch Tight

12 Plays · 1 RB, 1 TE, 3 WR

Empty Bunch Wide

13 Plays · 1 RB, 1 TE, 3 WR

Empty Bunch Y Flex

9 Plays · 1 RB, 1 TE, 3 WR

Empty Chips

9 Plays · 1 RB, 1 TE, 3 WR

Empty Chips Nasty

10 Plays · 1 RB, 1 TE, 3 WR

Empty Chips Quads

9 Plays · 1 RB, 1 TE, 3 WR

Empty Chips Tight

11 Plays · 1 RB, 1 TE, 3 WR

Empty HB Wide

13 Plays · 1 RB, 1 TE, 3 WR

Empty Quads

9 Plays · 0 RB, 1 TE, 4 WR

Empty Sketch Stack

10 Plays · 1 RB, 1 TE, 3 WR

Empty Steeler

12 Plays · 1 RB, 1 TE, 3 WR

Empty Strong Slots

9 Plays · 1 RB, 1 TE, 3 WR

Empty Trey

21 Plays · 1 RB, 1 TE, 3 WR

Empty Trey Flex

12 Plays · Unknown

Empty Trey Stack

15 Plays · 1 RB, 1 TE, 3 WR

Empty Triple Stack

3 Plays · 1 RB, 1 TE, 3 WR

Empty Trips Speed

15 Plays · 1 RB, 1 TE, 3 WR

Empty Y Slot

15 Plays · 1 RB, 1 TE, 3 WR

Flanker Close

14 Plays · 1 RB, 0 TE, 4 WR

Flex Y Off

20 Plays · 1 RB, 1 TE, 3 WR

Flex Y Off Close

16 Plays · 1 RB, 1 TE, 3 WR

Flex Y Off Wk

27 Plays · 1 RB, 1 TE, 3 WR

Gadget Backfield

6 Plays · 3 RB, 1 TE, 1 WR

Gadget Package

6 Plays · 3 RB, 1 TE, 1 WR

Go Go Twins Flex

9 Plays · 2 RB, 1 TE, 2 WR

Heavy Panther

9 Plays · 2 RB, 3 TE, 0 WR

Monster

3 Plays · 1 RB, 1 TE, 3 WR

Normal Flex Snug

17 Plays · 1 RB, 1 TE, 3 WR

Normal Flex Wing

12 Plays · 1 RB, 1 TE, 3 WR

Normal Off Close Wk

21 Plays · 1 RB, 1 TE, 3 WR

Normal Y Off

50 Plays · 1 RB, 1 TE, 3 WR

Normal Y Off Close

49 Plays · 1 RB, 1 TE, 3 WR

Normal Y Off Wk

34 Plays · 1 RB, 1 TE, 3 WR

Open Flex

10 Plays · 1 RB, 1 TE, 3 WR

Slot Left

9 Plays · 1 RB, 1 TE, 3 WR

Slot Right

22 Plays · 1 RB, 1 TE, 3 WR

Slot WR Backfield

7 Plays · Unknown

Split Close

30 Plays · 2 RB, 0 TE, 3 WR

Split Close Pro

15 Plays · 2 RB, 1 TE, 2 WR

Split Cowboy

17 Plays · 1 RB, 1 TE, 3 WR

Split Flanker Close

9 Plays · 2 RB, 0 TE, 3 WR

Split Offset

34 Plays · 2 RB, 0 TE, 3 WR

Split Pro Offset Wk

6 Plays · 2 RB, 1 TE, 2 WR

Split Slot Offset

41 Plays · 2 RB, 0 TE, 3 WR

Split Slot Open

33 Plays · 2 RB, 0 TE, 3 WR

Split Twins

6 Plays · 2 RB, 1 TE, 2 WR

Split Twins Offset

13 Plays · 2 RB, 1 TE, 2 WR

Split Twins Stack

6 Plays · 2 RB, 1 TE, 2 WR

Split Wing Nasty

6 Plays · 2 RB, 2 TE, 1 WR

Split WR Backfield

9 Plays · 1 RB, 1 TE, 3 WR

Split Y-Flex

15 Plays · 2 RB, 1 TE, 2 WR

Split Y Off

19 Plays · 2 RB, 1 TE, 2 WR

Split Y Off Close

10 Plays · 1 RB, 1 TE, 3 WR

Spread

69 Plays · 1 RB, 0 TE, 4 WR

Spread 4wr

1 Play · 1 RB, 1 TE, 3 WR

Spread Dbl Flex

40 Plays · 1 RB, 1 TE, 3 WR

Spread Dbl Flex Wk

22 Plays · 1 RB, 1 TE, 3 WR

Spread Flex

15 Plays · 1 RB, 1 TE, 3 WR

Spread Slots Close

22 Plays · 1 RB, 0 TE, 4 WR

Spread Y-Flex

54 Plays · 1 RB, 1 TE, 3 WR

Spread Y-Flex Wk

40 Plays · 1 RB, 1 TE, 3 WR

Spread Y-Slot

61 Plays · 1 RB, 1 TE, 3 WR

Spread Y-Slot Wk

49 Plays · 1 RB, 1 TE, 3 WR

Stack HB WK

9 Plays · 1 RB, 1 TE, 3 WR

Stack Y-Flex

15 Plays · 1 RB, 1 TE, 3 WR

Stack Y Off

14 Plays · 1 RB, 1 TE, 3 WR

Tackle Over

9 Plays · 1 RB, 1 TE, 3 WR

Tackle Over Trips

10 Plays · 1 RB, 1 TE, 3 WR

Tight

31 Plays · 1 RB, 1 TE, 3 WR

Tight Base Flex

9 Plays · 2 RB, 1 TE, 2 WR

Tight Doubles

18 Plays · 1 RB, 1 TE, 3 WR

Tight Flex

25 Plays · 1 RB, 1 TE, 3 WR

Tight Flex Wk

18 Plays · 1 RB, 1 TE, 3 WR

Tight Offset TE

18 Plays · 1 RB, 1 TE, 3 WR

Tight Open

52 Plays · 1 RB, 1 TE, 3 WR

Tight Slot Flip

9 Plays · 1 RB, 1 TE, 3 WR

Tight Slot Open

10 Plays · 1 RB, 1 TE, 3 WR

Tight Slots

36 Plays · 1 RB, 1 TE, 3 WR

Tight Slots HB Wk

19 Plays · 1 RB, 1 TE, 3 WR

Tight Y Off

42 Plays · 1 RB, 1 TE, 3 WR

Tight Y Off Wk

47 Plays · 1 RB, 1 TE, 3 WR

Trey

12 Plays · 1 RB, 1 TE, 3 WR

Trey 4WR

21 Plays · 1 RB, 0 TE, 4 WR

Trey Offset

24 Plays · 1 RB, 1 TE, 3 WR

Trey Open

68 Plays · 1 RB, 1 TE, 3 WR

Trey Open HB Str

22 Plays · 1 RB, 1 TE, 3 WR

Trey Open Offset

37 Plays · 1 RB, 1 TE, 3 WR

Trey Y-Flex

38 Plays · 1 RB, 1 TE, 3 WR

Trey Y-Flex Str

21 Plays · 1 RB, 1 TE, 3 WR

Trey Y Iso

15 Plays · 1 RB, 1 TE, 3 WR

Trio

30 Plays · 1 RB, 1 TE, 3 WR

Trio HB Wk

30 Plays · 1 RB, 1 TE, 3 WR

Trio Offset

18 Plays · 1 RB, 1 TE, 3 WR

Trio Offset Wk

12 Plays · 1 RB, 1 TE, 3 WR

Trio Rt Open

1 Play · 1 RB, 1 TE, 3 WR

Trio Y-Flex

30 Plays · 1 RB, 1 TE, 3 WR

Trips

39 Plays · 1 RB, 0 TE, 4 WR

Trips HB Wk

53 Plays · 1 RB, 0 TE, 4 WR

Trips Slots Close

27 Plays · 1 RB, 0 TE, 4 WR

Trips TE

59 Plays · 1 RB, 1 TE, 3 WR

Trips TE Flex

23 Plays · 1 RB, 1 TE, 3 WR

Trips TE Offset

22 Plays · 1 RB, 1 TE, 3 WR

Trips TE Offset Wk

14 Plays · 1 RB, 1 TE, 3 WR

Trips X Nasty

22 Plays · 1 RB, 1 TE, 3 WR

Trips X Nasty Offset WK

12 Plays · 1 RB, 1 TE, 3 WR

Trips X Nasty Off Wk

12 Plays · 1 RB, 1 TE, 3 WR

Trips Y-Flex

21 Plays · 1 RB, 1 TE, 3 WR

Trips Y Slot Str

6 Plays · 1 RB, 1 TE, 3 WR

U Off Stack

13 Plays · 1 RB, 2 TE, 2 WR

U Off Trips

22 Plays · 1 RB, 2 TE, 2 WR

U Off Trips Flex

15 Plays · 1 RB, 2 TE, 2 WR

U Off Trips Wk

17 Plays · 1 RB, 2 TE, 2 WR

Wide 5wr

24 Plays · Unknown

Wide Slot Left

16 Plays · Unknown

Wide Slot Right WK

15 Plays · 1 RB, 1 TE, 3 WR

Wide Trips

15 Plays · 1 RB, 0 TE, 4 WR

Wide Y Trips WK

16 Plays · Unknown

Wing

15 Plays · 1 RB, 2 TE, 2 WR

Wing Flex Offset

22 Plays · 1 RB, 2 TE, 2 WR

Wing Flex Offset Wk

24 Plays · 1 RB, 2 TE, 2 WR

Wing HB Wk Close

9 Plays · 1 RB, 2 TE, 2 WR

Wing Pair

16 Plays · 1 RB, 3 TE, 1 WR

Wing Slot Offset

68 Plays · 1 RB, 2 TE, 2 WR

Wing Slot Wk

47 Plays · 1 RB, 2 TE, 2 WR

Wing Stack

21 Plays · 1 RB, 2 TE, 2 WR

Wing Stack Wk

13 Plays · 1 RB, 2 TE, 2 WR

Wing Tight

9 Plays · 1 RB, 3 TE, 1 WR

Wing Tight Flip

12 Plays · 1 RB, 3 TE, 1 WR

Wing Tight Nasty

6 Plays · 1 RB, 3 TE, 1 WR

Wing Tight Z

10 Plays · 1 RB, 3 TE, 1 WR

Wing Trio

15 Plays · 1 RB, 1 TE, 3 WR

Wing Trips Wk Nasty

15 Plays · 1 RB, 1 TE, 3 WR

Y Off Trio Close

25 Plays · 1 RB, 1 TE, 3 WR

Y Off Trio Wk

55 Plays · 1 RB, 1 TE, 3 WR

Y Off Trips

54 Plays · 1 RB, 1 TE, 3 WR

Y Off Trips Close

31 Plays · 1 RB, 1 TE, 3 WR

Y Off Trips Nasty

15 Plays · 1 RB, 1 TE, 3 WR

Y Off Trips Pats

32 Plays · Unknown

Y Off Trips Stack

3 Plays · Unknown

Y Off Trips Wk

60 Plays · 1 RB, 1 TE, 3 WR

Y Trio Offset Wk

23 Plays · 1 RB, 1 TE, 3 WR

Y Trips 1 Slot

1 Play · 1 RB, 1 TE, 3 WR

Y Trips Offset

25 Plays · 1 RB, 1 TE, 3 WR

Y Trips Offset Wk

15 Plays · 1 RB, 1 TE, 3 WR

Y Trips Wk

92 Plays · 1 RB, 1 TE, 3 WR