Playbooks

Receiver routes
Depth-chart slots are shown as they line up in the base package for this set.
| Player | Side | Route |
|---|---|---|
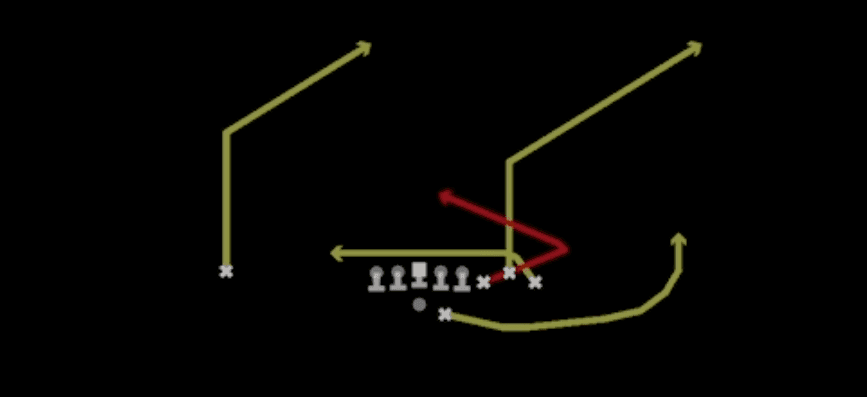
| HB1 | Right | Zig |
| SLWR | Right | Corner |
| WR1 | Left | In |
| WR2 | Right | Hitch |
| TE1 | Right | Flat |
Read progression
- SLWR right, Corner
- TE1 right, Flat
- HB1 right, Zig
- WR1 left, In
- WR2 right, Hitch
Breakdown
HB Mtn Dig Spot runs out of Shotgun Bunch Str Offset with a pre-snap HB motion across the formation, which helps you diagnose man versus zone before the ball is even snapped. Off the bunch, one receiver runs a deep corner/flag route up the sideline, another sits down on a spot route underneath, and a third works a dig across the middle, while the motion back releases into a shallow drag/flat route to the opposite side. The primary read starts with the corner route to hold the deep defenders and the flat defender, then works down to the dig as the main answer against Cover 3 and other zone shells, with the spot route as the built-in checkdown against soft underneath coverage.
Defensive Reads
Pre-snap, check if the defense shifts a linebacker or DB to follow the HB motion, which confirms man coverage and tells you to work the dig route immediately since it will cross into open grass. Identify single high safety looks, this shell is where the dig route sits in the natural Cover 3 hole between the flat defender and the deep third corner. Watch for a hard flat blitz off the edge, since the play design uses the corner route and dig to attack zone but has limited answers if the flat defender crashes unblocked before the drag can develop. Post-snap, track the middle linebacker or hook zone defender's depth, if he sinks too deep on the corner route fake, the dig will have a wide throwing lane. Against Cover 4 or quarters shells, the corner route can get squeezed by a deep quarter defender, so be ready to reset to the spot route as your zone beater checkdown instead of forcing the dig.
Usage Tips
Watch the HB motion pre-snap to bait linebackers or nickel defenders into showing man coverage by following the back across the formation.
Use the corner route as a clock-killer that occupies the deep third defender, then work your eyes to the dig sitting down in the void behind underneath zone drops.
This is a certified Cover 3 beater, so call it when you see a single high safety alignment and off corners playing zone rather than press man.
Pair this play with Mtn Stick or Slant Spacing in your call sheet so defenses cannot key on the motion alone and have to respect quick game as well as the dig shot.
Best used on second and medium or third and medium situations where the dig route has enough field to sit down in front of linebackers without needing a huge YAC gain.
Other Plays in Bunch Str Offset
 Corner StrikeCorner, Pass Play, Drag +3
 Crack TossToss, Run Play
 DaggerDagger, Pass Play, Cover 2 Beater +5
 DuoDuo, Run Play, Power Run
- DurhamIn, Streak, Swing +2
 Fk Toss Lead Swing DigToss, Play Action, Pass Play +4
 Fk Toss SlideToss, Play Action, Slide +6
 FloodFlood, Pass Play, Cover 3 Beater +4
 HB Mtn QB SweepSweep, Qb Sweep, Designed Qb Run +2
- HB Mtn QB ZoneRun Play
 HB Mtn Trail Dbl PostPost, Double Posts, Motion +9
 HB Slip ScreenScreen Pass, Hb Screen, Pass Play +4
 Inside ZoneInside Zone, Run Play, Zone Run
 Lead Swing SpotSwing, Spot, Pass Play +3
 Mtn Deep PostPost, Motion, Pass Play
 Mtn Fk Toss VerticalsToss, Play Action, Four Verts +10
 Mtn HB BaseMotion, Dive, Run Play
 Mtn Inside ZoneInside Zone, Motion, Run Play +1
 Mtn Lead TossToss, Motion, Run Play
 Mtn PA Flood Y-DelayPlay Action, Delay, Flood +9
 Mtn PA SpinnerPlay Action, Motion, Pass Play +4
 Mtn PA Wheel CrossPlay Action, Wheel, Motion +6
 Mtn RPO Alert SwingRPO, Motion, Pass Play +2
- Mtn Slot PostPost, Motion, Pass Play +4
 Mtn Spinner HB InsideMotion, Dive, Run Play
 Mtn StickStick, Stick Concept, Motion +5
 Mtn WR Outside ZoneOutside Zone, Motion, Run Play +1
 Pin Pull TossToss, Pin And Pull, Run Play +1
 QB Crack SweepSweep, Qb Sweep, Designed Qb Run +1
 Read OptionRead Option, Run Play
 Return PA FloodPlay Action, Flood, Motion +6
 Return RPO Alert FlatRPO, Flat, Motion +2
- Return RPO FlatRPO, Flat, Motion +3
 Return SpacingSpacing, Motion, Pass Play +5
 RPO Alert ScreenScreen Pass, RPO, Pass Play +2
 RPO Duo Alert PostDuo, RPO, Run Play +3
 RZ PA CornerPlay Action, Corner, Pass Play +3
 SeattlePass Play, Four Verts, Go +9
 SFT Diamond Fake Mesh RailPlay Action, Mesh, Motion +5
 SFT Diamond MeshMesh, Motion, Pass Play +5
 SFT Diamond X-Cross TrailMotion, Crosser, Trail +5
 Slant SpacingSlant, Spacing, Pass Play +5
 Speed Option WkSpeed Option, Run Play
 Verts DigDig, Four Verts, Pass Play +2
 Y TrailTrail, Pass Play, Angle +5