Playbooks

Breakdown
Nickel Sim 2 is a simulated pressure call out of the Dime 2-3-6 set that shows a Cover 2 shell underneath a five-man rush look. Both deep safeties rotate to the corners at the top of the screen, dropping into the deep half zones, while the underside runs a Cover 2 zone matrix with the corner, hook, and curl/flat defenders sinking to their landmarks. Two defenders on the strong side blitz off the edge and through the interior gap (red arrows) to simulate pressure, so this is a zone defensive play designed to disguise the rush and bait the quarterback into thinking there is heavy pressure coming when it is actually a two deep zone shell underneath.
Defensive Reads
Read the offensive line splits and running back alignment pre-snap, if the back checks release into the flat that is the zone the simulated pressure is designed to take away. Key the quarterback eyes post-snap since sim pressure works best against QBs who lock onto their first read expecting max protection against a full blitz. This shell beats hot routes and quick game concepts because the underneath zone still has numbers even though it looks like pressure pre-snap. It is vulnerable to deep vertical shots on the outside since only two deep defenders are covering the whole field, so watch for four verticals or double moves attacking the corners. If the offense audibles to a screen or check release, get eyes on the running back immediately since the underneath defenders are in zone drops and can be slow to react to bubble or swing screens.
Usage Tips
Use this out of obvious passing downs like third and medium to long when you want to disguise pressure without fully committing extra rushers. Show blitz pre-snap by walking defenders to the line, then bail into the Cover 2 shell to bait quarterbacks who key blitz indicators and throw hot into what they think is a soft underneath zone. Pair this with a true Cover 2 Man or Cover 2 Invert call in the same set so offenses cannot distinguish your shell based on pre-snap look alone. Sub in Cover 2 Sink or Cover 2 Hard Flat on the following snap to keep the same shell disguise while changing the underneath leverage. User the flat or curl defender on the strong side to jump quick game throws since the simulated pressure only rushes five and leaves extra zone defenders to play sticks and flat routes.
Other Plays in 2-3-6
 1 Double SlotCover 1, Man Coverage
 1 Double TECover 1, Double Te, Man Coverage
 1 Double Wr1Cover 1, Double Wr1, Man Coverage
 1 Double Wr2Cover 1, Double Wr2, Man Coverage
- Bracket 9 Switch
 Bracket Switch WillieMan To Man, Man Coverage
- Buck Slant 3Cover 3, Line Slant, Zone Coverage
 Cover 1 HoleCover 1, Cover 1 Hole, Man Coverage
- Cover 1 LB BlitzCover 1, Blitz, LB Blitz +1
- Cover 1 QB ContainCover 1, Contain, Man Coverage
 Cover 1 Robber Show 2Cover 1, Cover 1 Robber, Man Coverage
- Cover 2 Hard FlatCover 2, Zone Coverage
 Cover 2 InvertCover 2, Inverted Coverage, Zone Coverage
 Cover 2 ManCover 2 Man, Man To Man, Man Coverage
- Cover 2 SinkCover 2, Zone Coverage
- Cover 3 BluffCover 3, Zone Coverage
 Cover 3 Buzz MableCover 3, Cover 3 Buzz, Zone Coverage
- Cover 3 Buzz MatchCover 3, Cover 3 Buzz, Cover 3 Match +1
- Cover 3 Buzz Show 2Cover 3, Cover 3 Buzz, Zone Coverage
- Cover 3 Hard FlatCover 3, Zone Coverage
 Cover 3 MatchCover 3, Cover 3 Match, Zone Coverage
 Cover 3 SkyCover 3, Cover 3 Sky, Zone Coverage
 Cover 4 PalmsCover 4, Cover 4 Palms, Zone Coverage
 Cover 4 QuartersCover 4, Quarters, Zone Coverage
- Cover 6
- Cover 6 InvertCover 6, Inverted Coverage, Zone Coverage
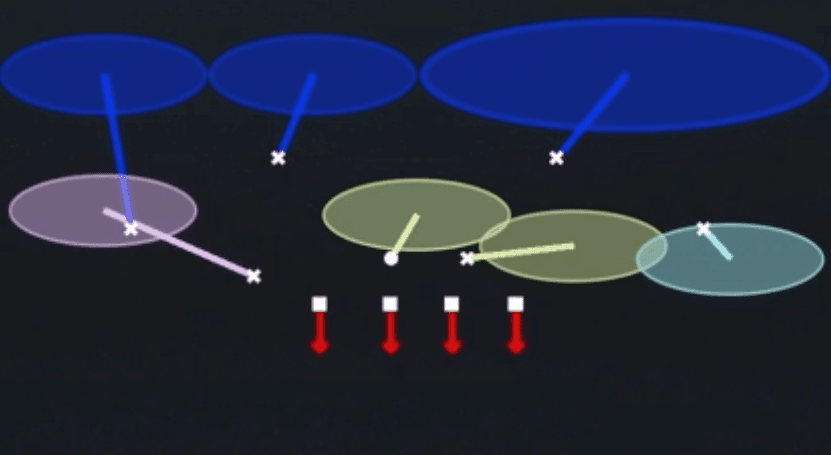 Cover 6 Show 2Cover 6, Zone Coverage
 Cover 6 WillieCover 6, Zone Coverage
- Cover 9 Sammie
 Cover 9 Show 2Cover 9, Zone Coverage
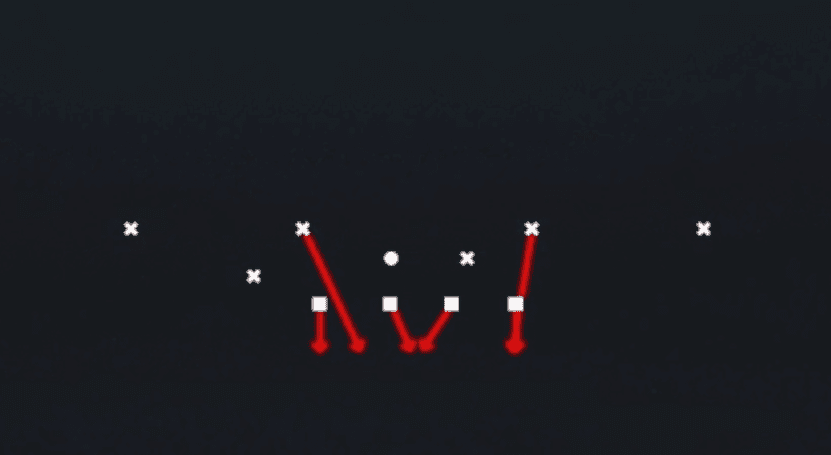 Dbl Safety BlitzBlitz, Safety Blitz
 Double BracketMan To Man, Man Coverage
 Double Bracket SwitchMan To Man, Man Coverage
 Edge Blitz 0Cover 0, Blitz, Edge Blitz +2
 Edge Blitz 3Cover 3, Blitz, Edge Blitz +1
 Field Sim 3Cover 3, Simulated Pressure, Zone Coverage +1
- FS Middle 3Cover 3, Zone Coverage
 FS Will Blitz 0Cover 0, Blitz, LB Blitz +3
- Man Double BuzzMan To Man, Man Coverage
 Nickel 2 TrapCover 2, Trap Coverage, Zone Coverage
 Overload 3 PressCover 3, Overload Blitz, Zone Coverage +1
 Over Storm BraveBlitz
- Pounder
- Press QuartersQuarters, Cover 4, Zone Coverage
- Prowl Slant 3 SeamCover 3, Line Slant, Zone Coverage
- Roll 23 Cloud
- Roll Cover 2 Invert
- Roll Cover 3 Cloud
- Roll King
- Roll Ring
- Silver Shoot PinchBlitz, Pinch
 Sim Pressure 3Cover 3, Simulated Pressure, Zone Coverage +1
- Slant Zone 2Cover 2, Zone, Line Slant +1
- SS Overload 3Cover 3, Overload Blitz, Zone Coverage +1
 Tampa 2Cover 2, Tampa 2, Zone Coverage
- Under Smoke 2Cover 2, Blitz, Safety Blitz +1