Playbooks
Quick Reference
Breakdown
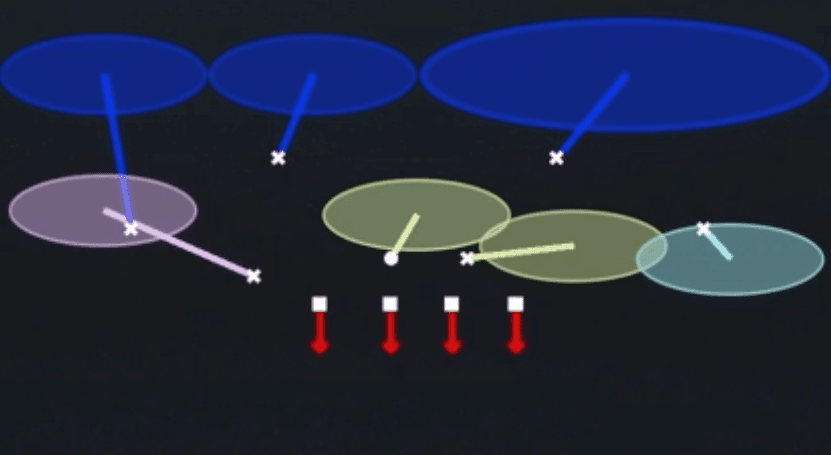
Cover 6 Show 2 is a Dime 2-3-6 zone coverage disguise that shows a two-high safety shell pre-snap before rotating into a split field coverage at the snap. The diagram shows the two outside deep defenders sinking vertically to the numbers while the two underneath defenders on the right work a curl to flat combo, the slot defender on the near right drops into a shallow hook zone, and the far left underneath defender flashes a robber-style drop toward the middle. This is a zone beater disguise designed to bait quarterbacks into thinking two-deep man or Cover 2 is coming, then rotate into quarters or Cover 6 concepts to squeeze intermediate throws, so the primary read for the defense is watching the quarterback's eyes to jump any deep out or seam route thrown into the sunk safety zones.
Defensive Reads
Watch the two outside deep defenders sink hard to the numbers, this signals the defense is rotating away from true Cover 2 man into a split field zone. If the underneath right side defenders both flow into curl and flat zones, offenses running flood concepts to that side will find the flat covered but the curl window tight. Identify if the quarterback stares down one half of the field pre-snap, since Show 2 baits deep outs and corner routes into the sunk safety areas. Look for the slot zone defender on the near right sitting in a shallow hook, which shuts down quick slants and stick routes over the middle. Beware of the left side underneath defender flashing a robber drop late, this defender can undercut in cuts and drag routes if the quarterback does not account for the disguise.
Usage Tips
Show this look on early downs to bait quarterbacks who key pre-snap safety depth into thinking Cover 2 or Cover 4 man is coming.
Use the two-high shell disguise on third and medium situations where offenses are likely to attack outside numbers with deep outs or corner routes.
Mix this play into your call sheet alongside Cover 2 Invert and Cover 2 Sink so quarterbacks cannot distinguish the shell before the snap.
User the underneath robber defender on the left side to jump quick game throws over the middle since that zone drop is disguised well.
Pair this with Cover 6 and Cover 6 Invert in the same personnel package to keep run and pass fits consistent while still varying the shell look.
Other Plays in 2-3-6
 1 Double SlotCover 1, Man Coverage
 1 Double TECover 1, Double Te, Man Coverage
 1 Double Wr1Cover 1, Double Wr1, Man Coverage
 1 Double Wr2Cover 1, Double Wr2, Man Coverage
- Bracket 9 Switch
 Bracket Switch WillieMan To Man, Man Coverage
- Buck Slant 3Cover 3, Line Slant, Zone Coverage
 Cover 1 HoleCover 1, Cover 1 Hole, Man Coverage
- Cover 1 LB BlitzCover 1, Blitz, LB Blitz +1
- Cover 1 QB ContainCover 1, Contain, Man Coverage
 Cover 1 Robber Show 2Cover 1, Cover 1 Robber, Man Coverage
- Cover 2 Hard FlatCover 2, Zone Coverage
 Cover 2 InvertCover 2, Inverted Coverage, Zone Coverage
 Cover 2 ManCover 2 Man, Man To Man, Man Coverage
- Cover 2 SinkCover 2, Zone Coverage
- Cover 3 BluffCover 3, Zone Coverage
 Cover 3 Buzz MableCover 3, Cover 3 Buzz, Zone Coverage
- Cover 3 Buzz MatchCover 3, Cover 3 Buzz, Cover 3 Match +1
- Cover 3 Buzz Show 2Cover 3, Cover 3 Buzz, Zone Coverage
- Cover 3 Hard FlatCover 3, Zone Coverage
 Cover 3 MatchCover 3, Cover 3 Match, Zone Coverage
 Cover 3 SkyCover 3, Cover 3 Sky, Zone Coverage
 Cover 4 PalmsCover 4, Cover 4 Palms, Zone Coverage
 Cover 4 QuartersCover 4, Quarters, Zone Coverage
- Cover 6
- Cover 6 InvertCover 6, Inverted Coverage, Zone Coverage
 Cover 6 WillieCover 6, Zone Coverage
- Cover 9 Sammie
 Cover 9 Show 2Cover 9, Zone Coverage
 Dbl Safety BlitzBlitz, Safety Blitz
 Double BracketMan To Man, Man Coverage
 Double Bracket SwitchMan To Man, Man Coverage
 Edge Blitz 0Cover 0, Blitz, Edge Blitz +2
 Edge Blitz 3Cover 3, Blitz, Edge Blitz +1
 Field Sim 3Cover 3, Simulated Pressure, Zone Coverage +1
- FS Middle 3Cover 3, Zone Coverage
 FS Will Blitz 0Cover 0, Blitz, LB Blitz +3
- Man Double BuzzMan To Man, Man Coverage
 Nickel 2 TrapCover 2, Trap Coverage, Zone Coverage
 Nickel Sim 2Cover 2, DB Blitz, Simulated Pressure +2
 Overload 3 PressCover 3, Overload Blitz, Zone Coverage +1
 Over Storm BraveBlitz
- Pounder
- Press QuartersQuarters, Cover 4, Zone Coverage
- Prowl Slant 3 SeamCover 3, Line Slant, Zone Coverage
- Roll 23 Cloud
- Roll Cover 2 Invert
- Roll Cover 3 Cloud
- Roll King
- Roll Ring
- Silver Shoot PinchBlitz, Pinch
 Sim Pressure 3Cover 3, Simulated Pressure, Zone Coverage +1
- Slant Zone 2Cover 2, Zone, Line Slant +1
- SS Overload 3Cover 3, Overload Blitz, Zone Coverage +1
 Tampa 2Cover 2, Tampa 2, Zone Coverage
- Under Smoke 2Cover 2, Blitz, Safety Blitz +1