Playbooks

Quick Reference
In 21 playbooks
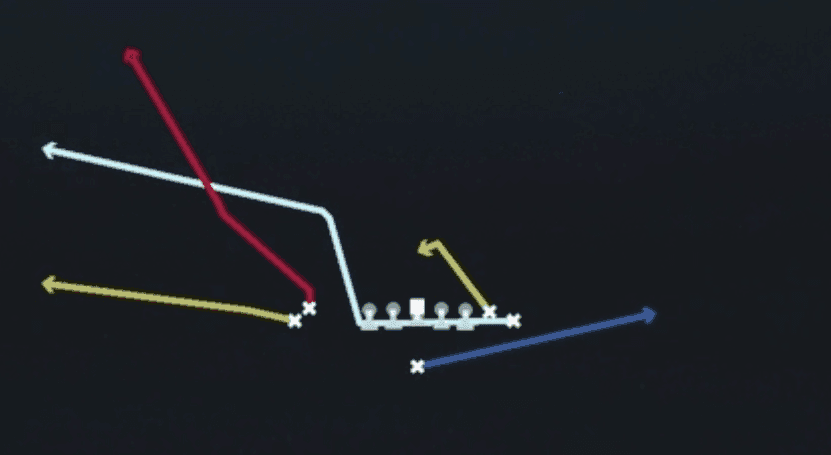
Receiver routes
Depth-chart slots are shown as they line up in the base package for this set.
| Player | Side | Route |
|---|---|---|
| HB1 | Middle | Block and Release Hook |
| TE2 | Right | Flat |
| WR2 | Left | Flat |
| WR1 | Left | Stick Option |
| TE1 | Right | Stick Option |
Read progression
- WR1 left, Stick Option
- WR2 left, Flat
- TE1 right, Stick Option
- TE2 right, Flat
- HB1, Block and Release HookCheck-down
Breakdown
Stick out of Singleback Wing Flex Close (12 personnel) shows a classic Stick concept from a two tight end look. Both outside receivers run vertical stems that break into deep comebacks toward the sideline, the slot tight end runs a quick stick route sitting at the sticks, and the other inline tight end releases up the seam before working back across the middle. The offensive line stays in to protect on a five man slide. This is a proven zone beater against Cover 2 and Cover 3 because the stick and seam routes create a natural high low read on the flat and hook defenders, but it also holds up against man coverage thanks to the immediate separation on the stick route. Primary progression starts with the stick route in the flat, then works to the seam crosser, and finally to either comeback route if the defense sits underneath.
Defensive Reads
Identify the middle linebacker depth at the snap: if he sits shallow and flows toward the stick route immediately, look off the flat and go straight to the seam crosser sitting behind him. Watch for a user controlled defender lurking in the shallow middle zone, since this play is vulnerable to a spy or rat linebacker jumping the stick and seam crossing routes. Against Cover 3, key the flat defender's drop: if he sinks too far to cover the stick route, the comeback route behind him becomes an easy pitch and catch throw. Against man coverage with no safety help over the top, the comeback routes on both sides are the go to answer since the receivers create separation on the break. Beware of a Cover 4 or Cover 6 shell with corners playing outside leverage, since this can bait the quarterback into throwing the comeback route into a jumping defender, so double check corner depth before pulling the trigger.
Usage Tips
Use this on third and short to third and medium since the stick route and seam crosser both settle in underneath zones at the sticks.
Check the pre snap safety alignment: if you see two high safeties sitting deep, expect Cover 2 or Cover 4 and prioritize the stick route into the flat before the corner sinks.
If the defense shows a single high safety, be ready to work the comeback route on the boundary side since Cover 3 corners will often be forced to squat on shorter zones and open a window deep outside.
Hot route the backside comeback into a quick out or slant against aggressive man corners who play tight technique, since the comeback breaks late and can get undercut by a jumped route.
Pair this play with HB Dive or HB Duo from the same set to keep linebackers honest on early downs, then come back to Stick on third down once the defense starts crashing down on run action.
Other Plays in Wing Flex Close
 Drive Y CornerCorner, Drive, Pass Play +6
 Four VerticalsFour Verts, Pass Play, Cover 2 Beater +4
 HB DiveDive, Run Play
- HB DuoRun Play
 HB StretchOutside Zone, Run Play, Zone Run
 HB Toss WeakToss, Run Play
 HB Zone WkInside Zone, Run Play, Zone Run
- Inside Zone SplitInside Zone, Run Play, Zone Run
 Jet SweepSweep, Jet Sweep, Motion +1
 Mtn Corner Y-ChoiceOption Route, Motion, Pass Play +4
- Mtn Drive ShakeBlock and Release, Slant, In +2
 Mtn HB StretchOutside Zone, Motion, Run Play +1
- Mtn HB Stretch LtRun Play
 Mtn HB Stretch WkOutside Zone, Motion, Run Play +1
 Mtn Inside Zone SplitInside Zone, Motion, Run Play +1
 Mtn PA Boot CornerPlay Action, Corner, Motion +4
 Mtn PA Boot Cross Y-CornerPlay Action, Corner, Crosser +5
- Mtn PA Boot Drive CornerCorner, Block and Release, Deep Cross +8
 Mtn Slot OptionOption Route, Motion, Pass Play +3
- PA Boot ScreenScreen Pass, Deep Cross, Crosser +3
 PA Cross CountryPlay Action, Crosser, Pass Play +3
 PA Cross Switch (M20)Play Action, Crosser, Pass Play +2
 PA Jet SweepSweep, Jet Sweep, Play Action +6
 PA Shot PostPlay Action, Post, Pass Play +3
 SmashSmash, Pass Play, Cover 2 Beater +4
 Zone Fake JetMotion, Run Play