Playbooks

Quick Reference
Receiver routes
Depth-chart slots are shown as they line up in the base package for this set.
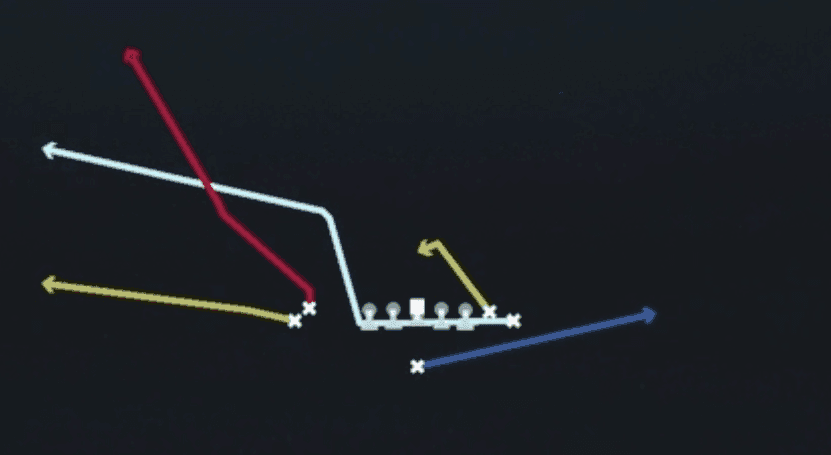
| Player | Side | Route |
|---|---|---|
| HB1 | Middle | Flat |
| TE2 | Right | Run Block |
| WR2 | Left | Deep In |
| WR1 | Left | Deep In |
| TE1 | Right | Run Block |
Read progression
- WR1 left, Deep In
- WR2 left, Deep In
- HB1, FlatCheck-down
Breakdown
PA Cross Switch (M20) is a play-action pass out of Singleback Wing Flex Close with 12 personnel that sells the run fake before working a crossing concept underneath a deep dig. The route diagram shows a deep crosser breaking hard from the left side of the formation up and across the field to the right (red route), while a switch release route works from the right side flat area back across the middle underneath it, and a third route runs a shallow drag to the far left flat with a fourth receiver releasing to the boundary out of the backfield. The blocking picture on the diagram shows the offensive line holding protection to sell the play fake, making this a man beater designed to create natural rub and pick action against man coverage, with the primary read progression starting on the deep crosser (red route) working over the top, then coming down to the underneath switch/drag combination if the crosser is taken away.
Defensive Reads
Man coverage with no safety help over the top is the ideal shell for this concept because the crossing routes create natural separation through traffic and rub off trailing defenders. Watch for a single high safety rotating late, which signals man coverage underneath and tells you the deep crosser has a fast track to open grass. Cover 2 or Cover 4 shells with two deep safeties sitting in the middle of the field can be problematic since a zone linebacker or safety can sink into the crosser's lane and undercut the throw. Identify if the defense is bringing a nano blitz or overload pressure presnap by checking linebacker depth and edge alignment, since the play fake and protection hold can leave you exposed if the offensive line cannot handle extra rushers. Beware of a user controlled linebacker sitting in the shallow drag or lurking in the middle hook zone, as this is the most common way defenders jump the underneath route and either bait a turnover or blow up the easy checkdown option.
Usage Tips
Use this play on second and medium to second and long when the defense is keying run action from your Singleback personnel, since the play fake needs a defense that respects the run to fully open up. Check the safety alignment before the snap. Two high safeties usually mean the crosser will have room to work behind linebackers, while a single high safety tells you to be ready to move to the underneath drag or shallow route quickly. Hot route the shallow drag receiver to a hitch or quick out if you see the defense selling out on the crosser with a linebacker spy or robber technique underneath. Pair this play with HB Dive or Inside Zone Split earlier in a drive to condition the defense to bite on run action, then dial up PA Cross Switch to punish overaggressive linebackers flowing to the fake. Against teams that user the middle linebacker to jump crossing routes, look off the deep crosser with your eyes pre-throw and come back to the switch release working underneath for a safer completion.
Other Plays in Wing Flex Close
 Drive Y CornerCorner, Drive, Pass Play +6
 Four VerticalsFour Verts, Pass Play, Cover 2 Beater +4
 HB DiveDive, Run Play
- HB DuoRun Play
 HB StretchOutside Zone, Run Play, Zone Run
 HB Toss WeakToss, Run Play
 HB Zone WkInside Zone, Run Play, Zone Run
- Inside Zone SplitInside Zone, Run Play, Zone Run
 Jet SweepSweep, Jet Sweep, Motion +1
 Mtn Corner Y-ChoiceOption Route, Motion, Pass Play +4
- Mtn Drive ShakeBlock and Release, Slant, In +2
 Mtn HB StretchOutside Zone, Motion, Run Play +1
- Mtn HB Stretch LtRun Play
 Mtn HB Stretch WkOutside Zone, Motion, Run Play +1
 Mtn Inside Zone SplitInside Zone, Motion, Run Play +1
 Mtn PA Boot CornerPlay Action, Corner, Motion +4
 Mtn PA Boot Cross Y-CornerPlay Action, Corner, Crosser +5
- Mtn PA Boot Drive CornerCorner, Block and Release, Deep Cross +8
 Mtn Slot OptionOption Route, Motion, Pass Play +3
- PA Boot ScreenScreen Pass, Deep Cross, Crosser +3
 PA Cross CountryPlay Action, Crosser, Pass Play +3
 PA Jet SweepSweep, Jet Sweep, Play Action +6
 PA Shot PostPlay Action, Post, Pass Play +3
 SmashSmash, Pass Play, Cover 2 Beater +4
 StickStick, Stick Concept, Pass Play +2
 Zone Fake JetMotion, Run Play