Playbooks
Four Verticals

Quick Reference
In 17 playbooks
Receiver routes
Depth-chart slots are shown as they line up in the base package for this set.
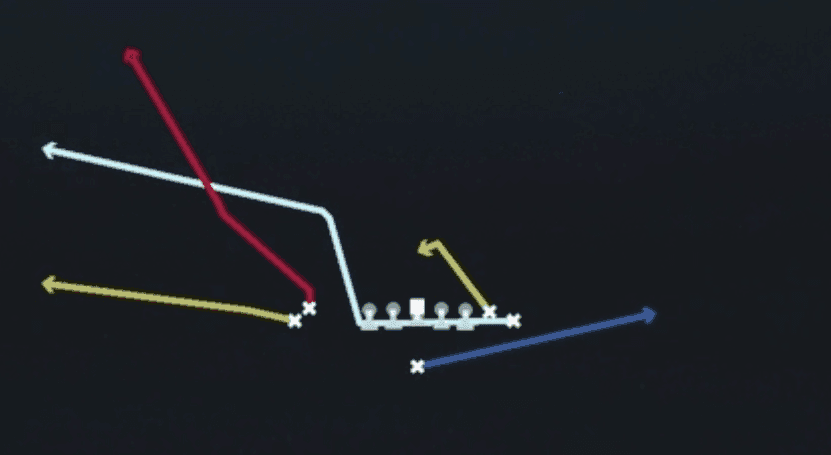
| Player | Side | Route |
|---|---|---|
| HB1 | Middle | Flat |
| TE2 | Right | Wheel |
| WR2 | Left | Wheel |
| WR1 | Left | Streak |
| TE1 | Right | Streak |
Read progression
- WR2 left, Wheel
- TE1 right, Streak
- HB1, Flat
- WR1 left, Streak
- TE2 right, Wheel
Breakdown
Four Verticals from Singleback Wing Flex Close 12 personnel sends four receivers vertically up the seams and numbers while the HB releases into a shallow drag across the middle from the backfield. Both TEs and the WR release straight upfield off the line, stacking the defense vertically to stress two deep safeties or a single high defender, while the back's crossing route gives you a checkdown against underneath pressure. This is a classic Cover 2 and Cover 3 beater built to attack the seams before the safeties can rotate over, with the primary read starting on the safety alignment and progressing from the seam nearest the middle of the field out to the numbers based on which safety commits.
Defensive Reads
Pre snap identify whether the safeties are showing a two high shell or rotated to one high, since two high indicates Cover 2 or Cover 4 while a single deep defender signals Cover 3 or man coverage. Watch the flat defenders and outside linebackers after the snap, if they widen to cover the HB drag it opens throwing lanes up the seams for your vertical routes. Key the free safety's break, in Cover 3 he can only cover one seam so identify which side he leans to and throw off him to the opposite seam for an explosive gain. Beware Cover 4 quarters shells with aggressive corners playing press, since they can jam the outside verticals at the line and clog the seams with underneath linebackers sitting in passing lanes. This concept struggles against disguised zone blitzes where a slot defender drops into the seam late, so if you see pre snap movement from a nickel or slot corner showing blitz then bailing into coverage, be ready to check down to the HB drag immediately.
Usage Tips
Check the safety depth before the snap, if you see two deep safeties sitting at 10 to 12 yards they are likely playing Cover 2 and the seams between the numbers and the hash will be your money throw. Use the HB drag as a built in checkdown against any Cover 0 or man pressure look since the crossing route clears out quickly and gives you a safe completion versus blitz. Hot route the backside TE into a deep out or corner adjustment if you diagnose Cover 3 with a hard flat defender jumping the shallow crosser. Pair this play with Drive Y Corner or Stick earlier in a series to condition the defense into sitting on shorter routes, then hit Four Verticals for the explosive shot once they bite. Best called on first or second down in plus territory or in two minute situations where you need a quick chunk play against a defense that has been playing soft zone.
Other Plays in Wing Flex Close
 Drive Y CornerCorner, Drive, Pass Play +6
 HB DiveDive, Run Play
- HB DuoRun Play
 HB StretchOutside Zone, Run Play, Zone Run
 HB Toss WeakToss, Run Play
 HB Zone WkInside Zone, Run Play, Zone Run
- Inside Zone SplitInside Zone, Run Play, Zone Run
 Jet SweepSweep, Jet Sweep, Motion +1
 Mtn Corner Y-ChoiceOption Route, Motion, Pass Play +4
- Mtn Drive ShakeBlock and Release, Slant, In +2
 Mtn HB StretchOutside Zone, Motion, Run Play +1
- Mtn HB Stretch LtRun Play
 Mtn HB Stretch WkOutside Zone, Motion, Run Play +1
 Mtn Inside Zone SplitInside Zone, Motion, Run Play +1
 Mtn PA Boot CornerPlay Action, Corner, Motion +4
 Mtn PA Boot Cross Y-CornerPlay Action, Corner, Crosser +5
- Mtn PA Boot Drive CornerCorner, Block and Release, Deep Cross +8
 Mtn Slot OptionOption Route, Motion, Pass Play +3
- PA Boot ScreenScreen Pass, Deep Cross, Crosser +3
 PA Cross CountryPlay Action, Crosser, Pass Play +3
 PA Cross Switch (M20)Play Action, Crosser, Pass Play +2
 PA Jet SweepSweep, Jet Sweep, Play Action +6
 PA Shot PostPlay Action, Post, Pass Play +3
 SmashSmash, Pass Play, Cover 2 Beater +4
 StickStick, Stick Concept, Pass Play +2
 Zone Fake JetMotion, Run Play