Playbooks

Quick Reference
In 21 playbooks
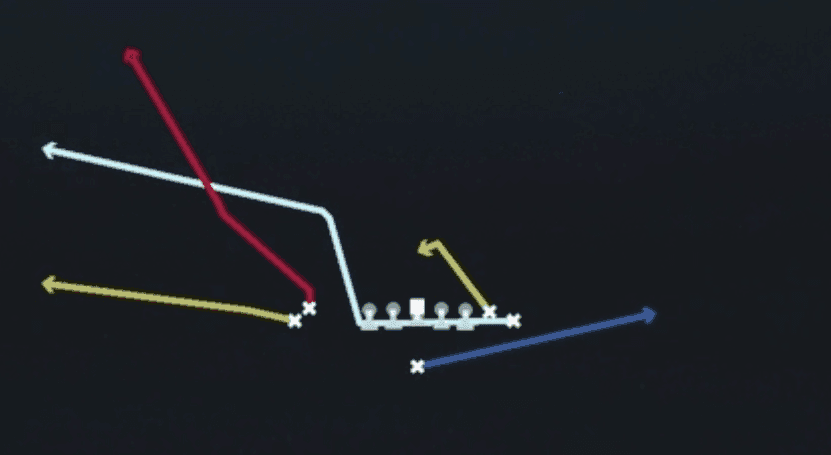
Receiver routes
Depth-chart slots are shown as they line up in the base package for this set.
| Player | Side | Route |
|---|---|---|
| HB1 | Middle | Flat |
| TE2 | Right | Wheel |
| WR2 | Left | Drag |
| WR1 | Left | In |
| TE1 | Right | Corner |
Read progression
- TE1 right, Corner
- TE2 right, Wheel
- WR1 left, In
- WR2 left, Drag
- HB1, FlatCheck-down
Breakdown
Drive Y Corner out of Singleback Wing Flex Close (12 personnel) sends the backside receiver on a deep drag across the field while the inline TE runs a corner route from the slot area, breaking outside behind the underneath drive concept. The two receivers to the play side run a drive combo, one settling in the flat and the other running an in-cut breaking underneath, creating a natural pick and rub for man coverage while stretching zone defenders vertically and horizontally. This is a Cover 4 beater built around the Y-Corner route stressing the deep quarter defender, with the primary read starting on the corner route against Cover 4 or man coverage and working down to the drag and drive combo underneath if the deep shot is not there.
Defensive Reads
Watch for two deep safeties at the snap, this signals Cover 4 and opens the window for the Y-Corner route to sit down or drift outside the flat defender. If a linebacker or safety walks down into the box pre-snap expect man coverage or a blitz, in which case the drag route becomes your friend against the rub created by the drive concept. Track the flat defender post-snap, if he sinks with the corner route the underneath drive routes will have space to work against soft zone coverage. Beware Cover 3 with a deep third defender sitting outside, this can undercut the corner route and force you to check down immediately to the drag or in-cut. User-controlled lurk defenders sitting in the intermediate middle can jump the drag route, so track the mike linebacker's depth before committing to that throw.
Usage Tips
Take a pre-snap look at the safeties before the snap, if you see two deep safeties splitting the field evenly this is your green light to attack the seam with the Y-Corner route against Cover 4.
Use the drag route as your check-down against any blitz look since it clears the shallow zone fast and gives you a hot throw against pressure.
Hot route the flat runner to a flat route or keep it as an outlet if you are seeing Cover 2 sink underneath the corner route.
Pair this play with Four Verticals in your call sheet to keep defenders honest, since both plays attack the same Cover 4 shell but from different angles.
Best used on second and medium or third and long when you need a defense to declare quarters coverage before you take the shot to the corner.
Other Plays in Wing Flex Close
 Four VerticalsFour Verts, Pass Play, Cover 2 Beater +4
 HB DiveDive, Run Play
- HB DuoRun Play
 HB StretchOutside Zone, Run Play, Zone Run
 HB Toss WeakToss, Run Play
 HB Zone WkInside Zone, Run Play, Zone Run
- Inside Zone SplitInside Zone, Run Play, Zone Run
 Jet SweepSweep, Jet Sweep, Motion +1
 Mtn Corner Y-ChoiceOption Route, Motion, Pass Play +4
- Mtn Drive ShakeBlock and Release, Slant, In +2
 Mtn HB StretchOutside Zone, Motion, Run Play +1
- Mtn HB Stretch LtRun Play
 Mtn HB Stretch WkOutside Zone, Motion, Run Play +1
 Mtn Inside Zone SplitInside Zone, Motion, Run Play +1
 Mtn PA Boot CornerPlay Action, Corner, Motion +4
 Mtn PA Boot Cross Y-CornerPlay Action, Corner, Crosser +5
- Mtn PA Boot Drive CornerCorner, Block and Release, Deep Cross +8
 Mtn Slot OptionOption Route, Motion, Pass Play +3
- PA Boot ScreenScreen Pass, Deep Cross, Crosser +3
 PA Cross CountryPlay Action, Crosser, Pass Play +3
 PA Cross Switch (M20)Play Action, Crosser, Pass Play +2
 PA Jet SweepSweep, Jet Sweep, Play Action +6
 PA Shot PostPlay Action, Post, Pass Play +3
 SmashSmash, Pass Play, Cover 2 Beater +4
 StickStick, Stick Concept, Pass Play +2
 Zone Fake JetMotion, Run Play