Playbooks
Mtn Corner Y-Choice
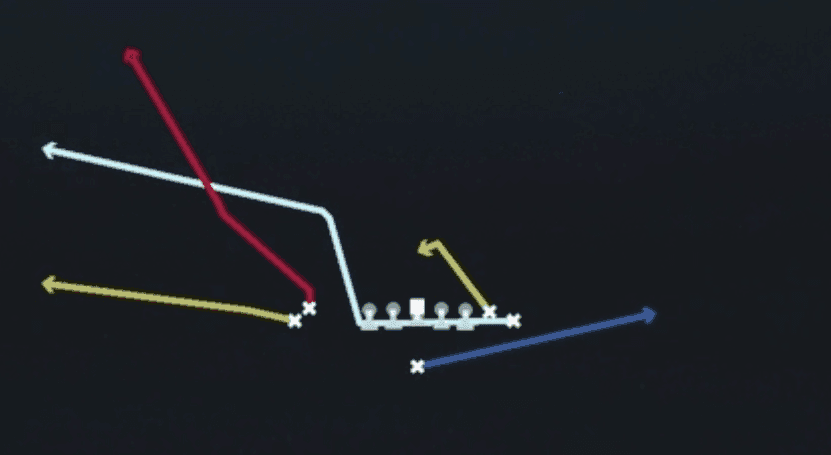
Quick Reference
In 2 playbooks
Receiver routes
Depth-chart slots are shown as they line up in the base package for this set.
| Player | Side | Route |
|---|---|---|
| HB1 | Middle | Block and Release Flat |
| TE2 | Right | Post |
| WR2 | Left | Flat |
| WR1 | Left | Streak |
| TE1 | Right | Juke Route |
Read progression
- TE2 right, Post
- WR1 left, Streak
- WR2 left, Flat
- HB1, Block and Release Flat or TE1 right, Juke Route
Breakdown
Mtn Corner Y-Choice out of Singleback Wing Flex Close (12 personnel) uses pre-snap motion to shift the formation before the snap, sending one receiver in short motion across the backfield. Off the snap the deep threat runs a corner route breaking to the sideline while the Y (tight end) works a choice route sitting down over the middle, giving the quarterback a built-in adjustment against man or zone. Underneath, one receiver runs a deep crossing route from the opposite side and the backfield release runs a shallow drag to the flat, giving you a five level stretch from sideline to sideline. This is a man beater first (corner route wins outside leverage, choice route settles versus off coverage) but the crosser and flat route give you answers versus zone drops too. Primary progression: corner route on the deep out first, come back to the Y-choice sitting in the middle if the corner is taken away, then check down to the flat route versus a soft zone shell.
Defensive Reads
Check the corner pre-snap alignment, if he is playing tight man with no safety help over the top the corner route is live immediately. Watch the linebacker assigned to the crosser, if he sinks into a deep zone drop instead of matching the route horizontally that confirms zone coverage and you should hunt the choice route sitting down. Identify single high versus two high safety shells before the snap, single high means the corner route has one on one leverage while two high means the Y-choice becomes the primary answer. Post snap, look for a user controlled defender flashing down into the shallow drag or flat lane, that lurk threat can jump the checkdown so keep the corner and choice reads live longer. This concept struggles against tight man coverage with a deep half safety shaded to the corner side or against aggressive Cover 3 buzz rotations that get an extra defender into the underneath crossing lane.
Usage Tips
Use the pre-snap motion to identify man versus zone before the snap, if the defender follows across the formation it confirms man coverage and you should lean on the corner route win.
Against single high safety looks, throw the corner route early before the safety can rotate over the top since the sideline is a natural boundary against him.
If you see two deep safeties, work the Y-choice route since he can settle into the soft spot between the underneath zone and the deep half defenders.
Pair this play with Mtn PA Boot Corner or Mtn PA Boot Drive Corner in the same set to sell run action first, then hit this dropback corner concept once the defense starts cheating up on run fits.
Best called on second and medium to third and short so you have the room to progress through all three levels without forcing the corner throw into a tight window.
Other Plays in Wing Flex Close
 Drive Y CornerCorner, Drive, Pass Play +6
 Four VerticalsFour Verts, Pass Play, Cover 2 Beater +4
 HB DiveDive, Run Play
- HB DuoRun Play
 HB StretchOutside Zone, Run Play, Zone Run
 HB Toss WeakToss, Run Play
 HB Zone WkInside Zone, Run Play, Zone Run
- Inside Zone SplitInside Zone, Run Play, Zone Run
 Jet SweepSweep, Jet Sweep, Motion +1
- Mtn Drive ShakeBlock and Release, Slant, In +2
 Mtn HB StretchOutside Zone, Motion, Run Play +1
- Mtn HB Stretch LtRun Play
 Mtn HB Stretch WkOutside Zone, Motion, Run Play +1
 Mtn Inside Zone SplitInside Zone, Motion, Run Play +1
 Mtn PA Boot CornerPlay Action, Corner, Motion +4
 Mtn PA Boot Cross Y-CornerPlay Action, Corner, Crosser +5
- Mtn PA Boot Drive CornerCorner, Block and Release, Deep Cross +8
 Mtn Slot OptionOption Route, Motion, Pass Play +3
- PA Boot ScreenScreen Pass, Deep Cross, Crosser +3
 PA Cross CountryPlay Action, Crosser, Pass Play +3
 PA Cross Switch (M20)Play Action, Crosser, Pass Play +2
 PA Jet SweepSweep, Jet Sweep, Play Action +6
 PA Shot PostPlay Action, Post, Pass Play +3
 SmashSmash, Pass Play, Cover 2 Beater +4
 StickStick, Stick Concept, Pass Play +2
 Zone Fake JetMotion, Run Play