Playbooks
Verticals

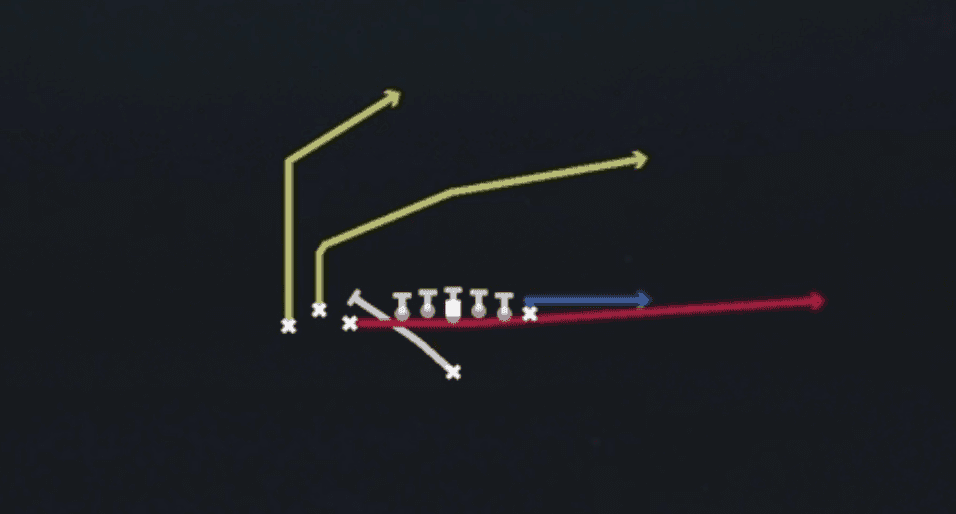
Receiver routes
Depth-chart slots are shown as they line up in the base package for this set.
| Player | Side | Route |
|---|---|---|
| HB1 | Middle | Block and Release Flat |
| WR3 | Left | Streak |
| WR2 | Left | Wheel |
| TE1 | Right | Stick Option |
| WR1 | Left | Deep Cross |
Read progression
- WR2 left, Wheel
- WR1 left, Deep Cross
- WR3 left, Streak
- TE1 right, Stick Option
- HB1, Block and Release FlatCheck-down
Breakdown
Verticals out of Singleback Bunch TE stacks three receivers to one side and sends all three vertical while the backside receiver runs a deep corner route from an isolated split. The HB releases underneath into a flat/check route to the boundary, giving the quarterback a built-in outlet if the four verticals get blanketed downfield. This is a classic Cover 2 and Cover 3 beater: the deep routes stress the safeties and hash defenders while the primary read progression runs from the backside corner route to the seam verticals inside the bunch, working outside to inside based on which vertical clears the underneath zone defenders first.
Defensive Reads
Read the safety depth and width pre-snap, if both safeties sit shallow and wide it signals Cover 2 and the seams will open between the numbers. Watch the middle linebacker's initial drop, a hard sprint to the deep middle third confirms Cover 3 and the backside corner route becomes the priority read. Identify any user-controlled defender lurking in the intermediate zone, since a rover or spy sitting in the middle of the field can jump the inside seam route before it clears the second level. Man coverage shows up when the corners and linebackers turn their hips and run with the bunch receivers at the snap, in which case the HB check route or a hot-routed option out of the backfield becomes the fastest answer. Nano blitz packages that bring extra rushers off the edge will collapse the pocket before verticals develop, so key the defensive line spacing and linebacker alignment before the snap to decide if you need to hot route the HB into a blocker or quick release route.
Usage Tips
Check the safety alignment before the snap, two high safeties tip Cover 2 or Cover 4 and you should target the seams between the corner and safety with the inside verticals.
Single high safety pre-snap usually means Cover 3, so look to attack the deep middle void with the inside seam runner or the backside corner route over the flat defender.
Hot route the HB check route into a wheel or deeper option against man coverage if you see the linebacker walk out to match him, since the flat route gets erased quickly by press man teams.
Pair this play with Cross Drag or Stick from the same set to keep the defense guessing between quick underneath answers and the four verticals shot play, forcing linebackers to hesitate on their zone drops.
Use Verticals on second or third and long when you need to stress deep zone defenders, and avoid it against heavy blitz looks unless you have a hot route ready for the HB check route to pick up extra rushers.
Other Plays in Bunch TE
 Cross DragDrag, Crosser, Pass Play +3
 HB Misdirection LeadMisdirection, Run Play
 HB Pump DrawDraw, Run Play
 Inside ZoneInside Zone, Run Play, Zone Run
 Inside Zone SplitInside Zone, Run Play, Zone Run
 Jet SweepSweep, Jet Sweep, Motion +1
 Mtn DBL SwingSwing, Motion, Pass Play +3
 Mtn Fk SwingPlay Action, Swing, Motion +4
 Mtn HB ScreenScreen Pass, Hb Screen, Motion +6
- Mtn HB Zone WkRun Play
- Mtn Inside ZoneRun Play
- Mtn PA Boot OverCorner, Deep Cross, Crosser +5
- Mtn PA Deep OverDeep Over, Deep Cross, Crosser +6
- Mtn PA Switch ReplaceBlock and Release, In, Wheel +3
 PA BootPlay Action, Pass Play, Block and Release +4
 PA Boot SlidePlay Action, Slide, Pass Play +5
 PA Draw ShotDraw, Play Action, Pass Play +5
 PA Jet Deep OutPlay Action, Out, Motion +5
 PA Jet SweepSweep, Jet Sweep, Play Action +7
 Power Alert BubbleRPO, Bubble Screen, Pass Play +2
- Shift DuoRun Play
- Shift HB SweepRun Play
- Shift PA Duo CrossersCrosser, Deep Cross, Post +3
 SpacingSpacing, Pass Play, Cover 3 Beater +4
 StickStick, Stick Concept, Pass Play +3
 Stretch Alert BubbleOutside Zone, Run Play, Zone Run +2
 Switch SnagSnag, Snag Concept, Pass Play +5
 WR Power Fake JetMotion, Run Play
 Zone Fake JetMotion, Run Play