Playbooks

Breakdown
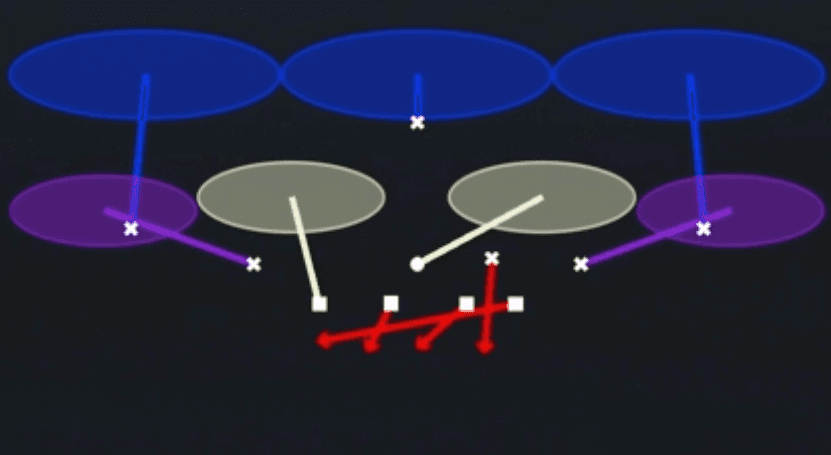
Cover 3 Buzz Match is a zone defense out of Dime personnel (4-1-6) designed to defend both the pass and get extra numbers on the perimeter. The diagram shows three deep defenders pressing vertically into deep thirds, two outside underneath defenders sinking to flat/curl areas with outside breaking drop paths, a single underneath defender working a shallow spot drop over the middle, and one hook defender bending inside toward the throwing strength. Four-man rush is shown up front with no blitz, so this is a base coverage snap, not a blitz or man beater, built to match zone drops to route distribution and squeeze the middle of the field.
Defensive Reads
Pre-snap, check cornerback depth on the outside receivers, if they are playing off with outside leverage they are keying the vertical release into their deep third responsibility shown by the long blue drop paths. Look at the single underneath defender in the middle of the field, his shallow spot drop is designed to squeeze the deep middle throwing lane and take away in-cuts and slants over the ball. This coverage is vulnerable to quick flood concepts to one side, if the offense stacks three receivers into one flat/curl zone you can get outnumbered before the buzz defender rotates over. Post-snap, track the hook defender bending inside toward the strength, if the offense motions a receiver across pre-snap this defender needs to adjust his match rules or a seam route can split the zone. This shell is strong against man beater double moves and comebacks since defenders are reading routes rather than mirroring receivers, but it can get exposed against RPOs if your underneath defenders bite on run action and lose their zone integrity.
Usage Tips
Call this on early downs or third and medium when you expect a balanced pass look and want a zone match shell without exposing man coverage to double moves.
Read the pre-snap safety alignment before the snap: if both safeties are showing deep middle rotation into a single high look, buzz match will convert cleanly into the deep third responsibilities you see in the diagram.
Use the hook defender bending inside as your primary underneath robber against drag routes and shallow crossers, this is your first post-snap key once the ball is snapped.
Pair this play in your call sheet with Cover 3 Cloud and Cover 3 Match to disguise your deep third rotation, alternating shells keeps quarterbacks guessing on which defender buzzes underneath versus rolling deep.
Avoid calling this into heavy trips or bunch formations without shifting your underneath defenders first, since the natural flat/curl spacing shown here can get stressed by extra receivers to one side.
Other Plays in Rush
- Cover 1 ContainCover 1, Contain, Man Coverage
 Cover 1 Contain SpyCover 1, Spy, Contain +1
 Cover 1 Robber PressCover 1, Cover 1 Robber, Press Man +1
 Cover 2 Hard FlatCover 2, Zone Coverage
 Cover 2 ManCover 2 Man, Man To Man, Man Coverage
 Cover 2 RollCover 2, Zone Coverage
 Cover 3 CloudCover 3, Cover 3 Cloud, Zone Coverage
 Cover 4 PalmsCover 4, Cover 4 Palms, Zone Coverage
 Cover 4 QuartersCover 4, Quarters, Zone Coverage
 Cover 6Cover 6, Zone Coverage
 DB BlitzBlitz, DB Blitz
 Dbl Safety BlitzBlitz, Safety Blitz
 Dime Blitz 2Cover 2, Blitz, DB Blitz +1
 Fox Fire Zone PressZone, Blitz, Fire Zone +2
 FS Middle Blitz 3Cover 3, Blitz, Safety Blitz +1
 Mug Blitz Tex 3Cover 3, Blitz, Zone Coverage
 Mug Dt Loop 1Cover 1, Line Stunt, Man Coverage
 Mug Sim PressureSimulated Pressure, Blitz
 SS Overload 3Cover 3, Overload Blitz, Zone Coverage +1
 SS Sim Pressure 3Cover 3, Simulated Pressure, Zone Coverage +1
 Tampa 2Cover 2, Tampa 2, Zone Coverage