Playbooks

Quick Reference
In 28 playbooks
Breakdown
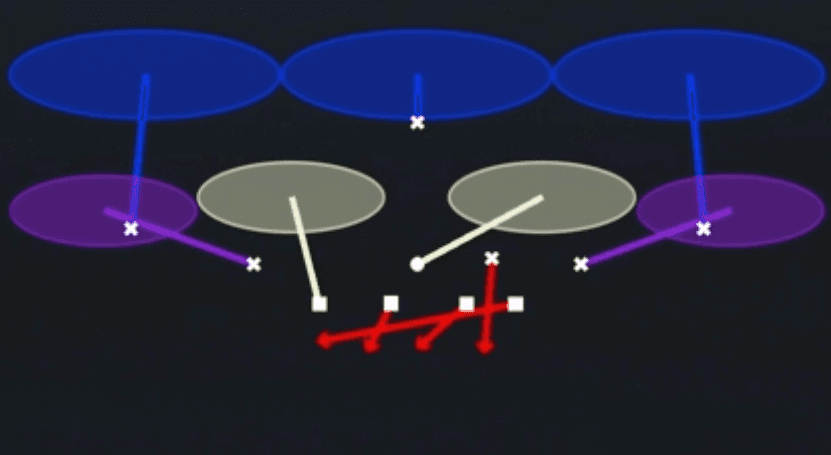
Cover 2 Man is a Dime 4-1-6 pass defense that pairs man coverage underneath with two deep safeties splitting the field, as shown by the two deep blue zones covering the outside thirds while the four defenders at the line press into man technique. The four down linemen rush off the snap with red arrows showing their pass rush lanes, and the single second-level defender sits in the middle as a hole player. This is a man beater killer since it combines man coverage discipline with deep safety help, taking away both the quick game and the deep ball, so the primary read progression for the defense is to jam the receivers at the line, mirror their releases, and trust the two deep safeties to bracket anything that breaks vertical.
Defensive Reads
Pre-snap, check safety depth, if both safeties are aligned deep and outside the numbers this confirms the two deep shell before the ball is even snapped. Watch cornerback alignment at the line, tight press alignment signals the man coverage underneath that this play relies on to force contested catches. Post-snap, key the single second-level defender's drop, he is your only true zone robber and will sit in the throwing lanes for in cuts and crossers. This shell struggles against four verticals since it stresses the deep safeties to cover sideline to sideline, watch for offenses stacking receivers to create natural picks on your man defenders. Look out for running back releases out of the backfield, since man defenders can lose contain if they bite on play fakes, staying disciplined on your assignment is critical against play-action rollouts.
Usage Tips
Call this on third and medium to third and long when you expect the offense to attack with double moves or deep crossers since the two deep safeties erase explosive plays over the top.
Use pre-snap motion to confirm man coverage before the snap, if defenders shift and follow the motion man you know press man is live and can key your route concept selection.
Combine this with Cover 2 Hard Flat and Cover 2 Roll from the same set to disguise your shell, since all three start from similar deep safety alignment but rotate differently after the snap.
User the middle defender to rob crossing routes and in cuts since he is the only true zone defender on the play and can jump underneath route combos.
Avoid calling this against heavy flood concepts to one side since four man coverage defenders can get picked off by natural rub routes, pair it with Dime Blitz 2 in your play-calling sequence to keep the offense guessing between man pressure and this drop back shell.
Other Plays in Rush
- Cover 1 ContainCover 1, Contain, Man Coverage
 Cover 1 Contain SpyCover 1, Spy, Contain +1
 Cover 1 Robber PressCover 1, Cover 1 Robber, Press Man +1
 Cover 2 Hard FlatCover 2, Zone Coverage
 Cover 2 RollCover 2, Zone Coverage
 Cover 3 Buzz MatchCover 3, Cover 3 Buzz, Cover 3 Match +1
 Cover 3 CloudCover 3, Cover 3 Cloud, Zone Coverage
 Cover 4 PalmsCover 4, Cover 4 Palms, Zone Coverage
 Cover 4 QuartersCover 4, Quarters, Zone Coverage
 Cover 6Cover 6, Zone Coverage
 DB BlitzBlitz, DB Blitz
 Dbl Safety BlitzBlitz, Safety Blitz
 Dime Blitz 2Cover 2, Blitz, DB Blitz +1
 Fox Fire Zone PressZone, Blitz, Fire Zone +2
 FS Middle Blitz 3Cover 3, Blitz, Safety Blitz +1
 Mug Blitz Tex 3Cover 3, Blitz, Zone Coverage
 Mug Dt Loop 1Cover 1, Line Stunt, Man Coverage
 Mug Sim PressureSimulated Pressure, Blitz
 SS Overload 3Cover 3, Overload Blitz, Zone Coverage +1
 SS Sim Pressure 3Cover 3, Simulated Pressure, Zone Coverage +1
 Tampa 2Cover 2, Tampa 2, Zone Coverage