Playbooks

Breakdown
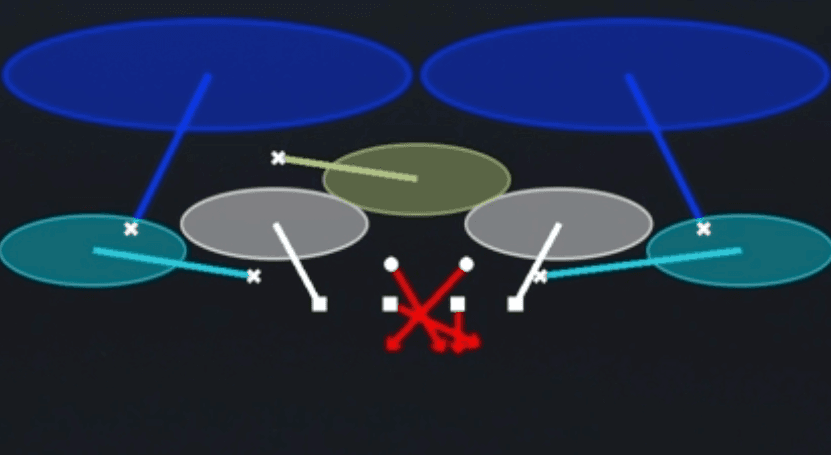
Nickel Sim 2 is a Cover 2 simulated pressure blitz out of the Nickel 2-4-5 personnel package. Pre-snap, both corners bail into deep half zones while the two deep safeties rotate down, with one linebacker dropping into a shallow curl zone and the DB blitz coming off the edge to disguise where the pressure originates. The read progression for the defense starts with identifying the blitzing DB off the slot or edge, then working inside to the underneath zone defenders sinking into the shallow hook and curl areas while the corners keep everything in front from depth.
Defensive Reads
Key the walked up DB at the snap, that is your simulated pressure piece and if he wins his one on one quickly you get a free rusher without sacrificing coverage numbers. Watch the two deep safeties rotate down to shrink the underneath windows, this shell is strong against shallow crossers and drag routes since the hook and curl zones are occupied fast. Both corners bail to deep half landmarks immediately, so anything thrown deep outside the numbers into their zone will get squeezed if you stay disciplined and do not bite on double moves. This coverage struggles against quick slants and hitches thrown before the shallow zone defenders can sink, so if the offense hot routes a receiver into a fast breaking route near the line of scrimmage, expect that window to be open for a tick. Man beating rub routes and pick concepts can exploit the blitzing DB's vacated area, so if you see stacked or bunch alignments pre-snap consider audibling to a different sim pressure call in the set to avoid a blown coverage assignment.
Usage Tips
Call this on early downs when you expect the offense to test a Cover 2 shell with a run or a quick game concept, since the sim pressure disguises the blitzer and can catch a blocking scheme flat footed. Pre-snap, identify which DB is walked up to blitz and user him immediately if you want to control the rush lane instead of letting the CPU logic take the rep. Watch for offenses attacking the deep middle seam since both safeties rotate down, that hole between the hard corners and shallow zone droppers is the biggest vulnerability if a receiver sits down late. Pair this call with Cover 2 Invert or Cover 2 Match in your play-calling sequence so the offense sees a similar shell pre-snap but gets a different rotation and blitz timing, keeping the quarterback guessing on where the extra rusher comes from. Best used on third and short to third and medium where the disguised pressure can force a quick, inaccurate throw before route combos develop.
Other Plays in 2-4
 1 Double SlotCover 1, Man Coverage
 1 Double TECover 1, Double Te, Man Coverage
 1 Double Wr1Cover 1, Double Wr1, Man Coverage
 1 Double Wr2Cover 1, Double Wr2, Man Coverage
- Bracket 9 Switch
 Bracket Switch WillieMan To Man, Man Coverage
 Buck Slant 3Cover 3, Line Slant, Zone Coverage
 Cover 1 ContainCover 1, Contain, Man Coverage
 Cover 1 HoleCover 1, Cover 1 Hole, Man Coverage
- Cover 1 Hole PressCover 1, Cover 1 Hole, Press Man +1
 Cover 1 LB BlitzCover 1, Blitz, LB Blitz +1
 Cover 1 RobberCover 1, Cover 1 Robber, Man Coverage
- Cover 1 Robber PressCover 1, Cover 1 Robber, Press Man +1
- Cover 2 Hard FlatCover 2, Zone Coverage
 Cover 2 InvertCover 2, Inverted Coverage, Zone Coverage
 Cover 2 ManCover 2 Man, Man To Man, Man Coverage
- Cover 2 Match
 Cover 2 RollCover 2, Zone Coverage
 Cover 3 Buzz MableCover 3, Cover 3 Buzz, Zone Coverage
 Cover 3 CloudCover 3, Cover 3 Cloud, Zone Coverage
- Cover 3 Hard FlatCover 3, Zone Coverage
 Cover 3 MatchCover 3, Cover 3 Match, Zone Coverage
 Cover 3 SkyCover 3, Cover 3 Sky, Zone Coverage
 Cover 4 Drop FieldCover 4, Zone Coverage
 Cover 4 PalmsCover 4, Cover 4 Palms, Zone Coverage
 Cover 4 QuartersCover 4, Quarters, Zone Coverage
 Cover 6Cover 6, Zone Coverage
 Cover 6 WillieCover 6, Zone Coverage
- Cover 9 Sammie
 Cover 9 Show 2Cover 9, Zone Coverage
 Cross Sim 2Cover 2, Simulated Pressure, Line Stunt +2
 Dbl Safety BlitzBlitz, Safety Blitz
 Double BracketMan To Man, Man Coverage
 Double Bracket SwitchMan To Man, Man Coverage
 Edge Blitz 0Cover 0, Blitz, Edge Blitz +2
 Edge Blitz 3Cover 3, Blitz, Edge Blitz +1
 Field Sim 3Cover 3, Simulated Pressure, Zone Coverage +1
 FS Will Blitz 0Cover 0, Blitz, LB Blitz +3
 Nickel 2 TrapCover 2, Trap Coverage, Zone Coverage
 Overload 3 SeamCover 3, Overload Blitz, Zone Coverage +1
 Over Storm BraveBlitz
- Pounder
- Roll 23 Cloud
- Roll Cover 2 Invert
- Roll Cover 3 Cloud
- Roll King
- Roll Ring
 Show SS Sim 2Cover 2, Simulated Pressure, Zone Coverage +1
 Silver Shoot PinchBlitz, Pinch
 Sim Pressure 3Cover 3, Simulated Pressure, Zone Coverage +1
 Tampa 2Cover 2, Tampa 2, Zone Coverage