Playbooks
Likely unavailable in the playbook builder
Quick Reference
In 2 playbooks
Receiver routes
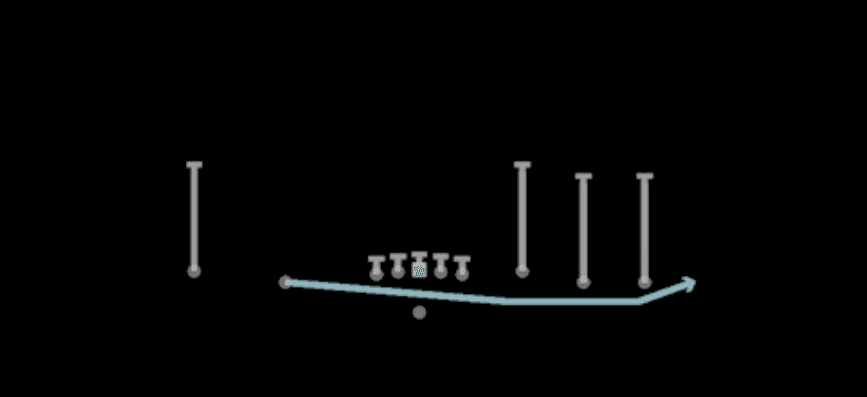
Depth-chart slots are shown as they line up in the base package for this set.
| Player | Side | Route |
|---|---|---|
| WR3 | Right | Flat |
| HB1 | Left | Streak |
| WR1 | Left | Hitch |
| WR2 | Right | Deep Post |
| TE1 | Right | Stick Option |
Read progression
- TE1 right, Stick Option
- WR3 right, Flat
- WR1 left, Hitch
- HB1 left, Streak
- WR2 right, Deep Post
Breakdown
Stick Z Post runs out of Empty Base Shotgun with 11 personnel, blending the classic Stick concept on one side with a Z receiver post breaking over the middle for an explosive shot play. The Stick side gives you a quick, high percentage option against man or zone with a flat, seam, and hitch combo, while the Z post stretches the deep middle and attacks single high safeties or blown coverage. Since this is Empty formation there is no running back protection, so the primary read starts with the Z post if you see one-high or a busted assignment, then works down to the Stick concept underneath if the safety stays deep or the post is blanketed.
Defensive Reads
Pre-snap, identify whether the defense is in one-high or two-high shell, since this dictates whether the Z post or the Stick concept becomes your primary target. Watch the deep safety's leverage at the snap, if he bails hard to the post side immediately, this indicates a disguised Cover 3 or Cover 1 rotation designed to take away the shot play. Key the flat defender on the Stick side, if he sits and jumps the flat route or hitch, look to the seam sitter or work the post if the middle is still open. Against zone blitzes or nano blitzes, since Empty has no running back protection, you must get the ball out fast, so identify pressure early and be ready to check down to the shortest route in the Stick combo. This play struggles against Cover 4 or Cover 2 with a rangy deep half safety who can undercut the post, so if you see two safeties deep at the snap, abandon the post read and distribute to the Stick side immediately.
Usage Tips
Check the safety alignment before the snap, if you see one deep safety in the middle of the field the Z post has a shot to win over the top, especially against Cover 3 or Cover 1 where the safety has to defend the whole width of the field.
If the defense shows two deep safeties, be ready to abort the post read early and work the Stick combo since the post will be capped by a deep half defender.
Use hot routes to convert the backside receiver into a quick out or slant if you are getting no help from your primary routes, this keeps the concept alive against disguised coverages.
This play is best called on second or third and medium situations where the defense has to respect both the quick game and the deep shot, forcing a difficult decision for the safety and underneath defenders.
Pair this with Stick or Y Post from the same set in your play-calling sequence, since the similar formation and route stems make it harder for defenders to jump routes based on formation recognition alone.
Other Plays in Empty Base
 686Pass Play, Corner, Out +7
 986Pass Play, Four Verts, Go +9
- 986switchCorner, Deep Cross, Crosser +4
 Corner StrikeCorner, Pass Play, Flat +1
 Curl FlatsCurl, Pass Play, Flat
 Dig Curl ReadDig, Pass Play, Hitch +3
 Double InIn, Pass Play, Curl +3
- Drag Double SpotDrag, Spot, Pass Play +4
- Drive UnderDrive, Pass Play, Cover 4 Beater +4
 Fk Screen SluggoPlay Action, Screen Pass, Sluggo +4
 Fk Screen VertsPlay Action, Screen Pass, Four Verts +8
 Four VerticalsFour Verts, Pass Play, Cover 2 Beater +4
- Four VerticalsDeep Cross, Crosser, Drag +3
 HitchesHitch, Pass Play
 Inside CrossCrosser, Pass Play, Comeback +3
 Jet Touch PassMotion, Run Play
 MeshMesh, Pass Play, Man Beater +3
 Mtn HB ScreenScreen Pass, Hb Screen, Motion +3
 QB DrawDraw, Qb Draw, Designed Qb Run +1
 ShockMotion, Flat, Hitch +4
 Shock Shake CrossersCrosser, Motion, Pass Play +4
 Slot DriveDrive, Pass Play, Cover 4 Beater +5
- Slot Pick ScreenScreen Pass, Pass Play, Curl +2
 Spot N GoGo, Spot, Pass Play +4
 StickStick, Stick Concept, Pass Play +3
- StickStick, Hitch, Out +3
 Stick N NodStick, Stick Concept, Pass Play +5
 VerticalsFour Verts, Pass Play, Cover 2 Beater +6
 WR Mid ScreenScreen Pass, Wr Screen, Pass Play +1
 WR ScreenScreen Pass, Wr Screen, Pass Play +2
 Y CornerCorner, Pass Play, Flat +2
- Y CrossCrosser, Y Cross, Pass Play +5
 Y Cross FloodFlood, Y Cross, Pass Play +7
 Y PostPost, Pass Play, Curl +2