Playbooks
At a Glance
In 10 playbooks
Overview
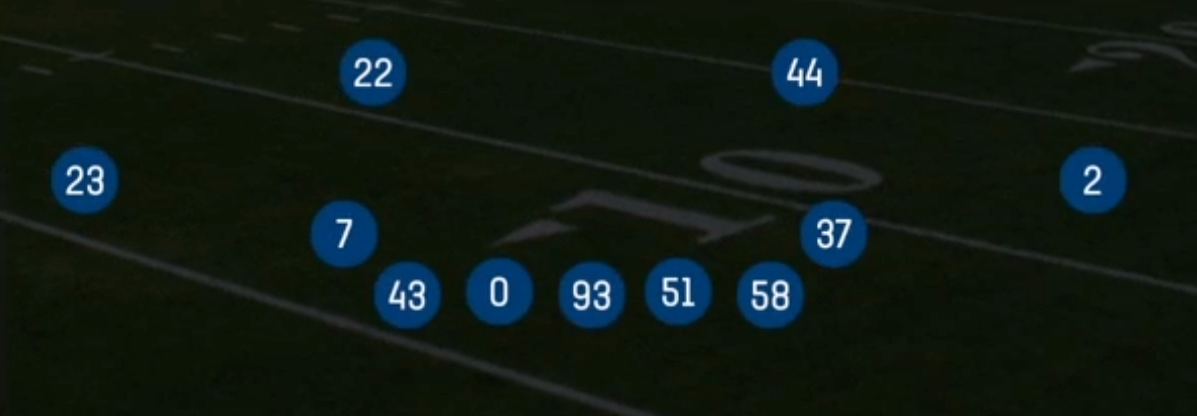
The 3-2 set in the Dollar formation is a pass-first sub package built around Big Dime 3-2-6 personnel: three down linemen anchored by a NT, two linebackers (including a SUBLB), and six defensive backs with a dedicated SLCB covering the slot. Most Dollar looks rely on a four-man front to get pressure. The 3-2 gives up that fourth rusher and adds coverage depth. That lets you drop eight defenders with speed and ball skills on the field, or send disguised pressure from the secondary without leaving obvious holes. The NT lines up head up on the center to clog A gaps. The two ends set wide to contain the edges and keep scramblers in the pocket.
This alignment is built to defend spread sets, empty formations, and 3x1 or 2x2 looks. Offenses in those sets try to isolate a slot receiver on a linebacker or run mesh and drive concepts underneath. With a SLCB and an extra safety, you can match every eligible receiver with a DB and still keep a hook defender or robber in the middle of the field. Calls like Double Bracket and 1 Double Wr1 let you shade help toward the opponent's best target. Cover 3 Match, Cover 3 Match KO, and Cover 4 Palms handle vertical stems and switch releases that normally stress base personnel.
The playbook is deep for the pressure side of the ball. Zero Blitz, DB Fire 2, Corner Blitz 2, SS Zone Blitz, FS Zone Blitz, and Spinner all bring heat from the secondary. Okie Roll 2 and Okie Roll 3 show one look pre-snap and rotate into another after the snap. Coverage variety runs from Tampa 2 and Cover 6 to Cover 3 Buzz Spy. From one personnel group you can play soft zone on third and long, cloud a single receiver in the red zone, or run a fire zone off the edge. Because every alignment looks similar before the snap, offenses have a hard time reading the coverage and checking to the right answer.
Strengths
- Six DBs and a SLCB let you match every slot receiver with a true cover player, which kills slot fade, option route, and linebacker isolation concepts from spread and empty sets
- Double Bracket and 1 Double Wr1 let you erase a WR1 or TE with shaded help, forcing the QB to his second and third reads against Cover 3 Match and Cover 4 Palms rotations
- Simulated pressures like Okie Roll 3, Spinner, and Cover 3 Cloud Show 2 look like the same shell as your true zones, which baits pre-snap audibles and hot routes into the wrong answer
- Zone blitzes like FS Zone Blitz, SS Zone Blitz, and Cross 3 Fire Press bring secondary pressure while keeping three-deep, four-under coverage, so hot slants and quick outs get jumped by dropping defenders
- Match coverages like Cover 3 Match KO and Cover 4 Quarters pattern-match vertical stems and crossers, shutting down four verticals, mesh, and drive concepts that beat spot-drop zones
Weaknesses
- With only three down linemen and a light box, inside zone, power, and counter runs from 11 or 12 personnel can gash the defense, especially if the offense pulls a guard onto your SUBLB
- The three-man rush gives the QB time on non-blitz calls, so patient opponents can hold the ball until deep over, dagger, or sail concepts open behind zone droppers
- Zero Blitz and Cover 1 Robber Press leave no deep help, so a quick back-shoulder, slant flat, or angle route against the SLCB beats you if the pressure does not get home
- Big Dime personnel is weak at the point of attack against tight ends and fullbacks, and heavy formations with jumbo motion can create size mismatches on the edge
- Opponents who identify your blitz tells, such as a safety creeping into the box or the SLCB walked up in press, can check to screens and RB angle routes that punish the vacated areas
Usage Tips
Sub into the 3-2 on third and 6 or longer, or when the offense shows empty, 3x1 trips, or 10 personnel, and keep a four-man front Dollar set ready for short yardage run downs
Open with Cover 3 Match or Cover 4 Palms, then call Okie Roll 3 or Spinner from the same pre-snap look so the offense cannot read your rotation off the safety alignment
User the SUBLB or the middle hook defender against mesh and drive concepts, and shade underneath coverage toward the strong side when the offense runs trips
Against a dominant WR1, call 1 Double Wr1 or Double Bracket and press the other receivers, forcing hot routes to lower-rated targets that your SLCB and safeties can jump
In the red zone, lean on Cover 2 Man LB Blitz, Cover 3 Buzz Spy, and Cover 1 Robber Press to spy mobile QBs and take away slants and quick outs where the field is compressed