Playbooks

Quick Reference
Breakdown
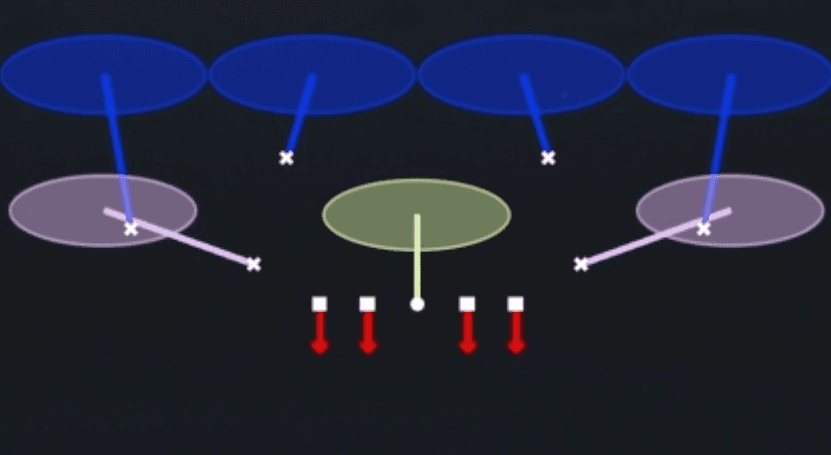
Dime Blitz 2 is a DB blitz out of the 2-3 Single Mug front that brings extra pressure off the edge while dropping into a Cover 2 shell behind it. The diagram shows both cornerbacks bailing into deep half zones with the two deep safety-type defenders sinking underneath on the outside, while the interior five defenders (three blitzers shown by red arrows and two shaded underneath zone droppers) crash downhill from the mugged look. The primary read for the blitzer is a direct line through the A or B gap to the quarterback, with the deep defenders responsible for taking away anything over the top in their respective halves. This is a zone-based pressure package designed to disguise the extra rusher while still protecting the deep middle and sidelines with the two-deep shell.
Defensive Reads
Watch the offensive line pre-snap for slide protection toward the mugged defenders, which tells you the quarterback expects pressure from that side of the diagram. If the offense comes out in an empty or spread formation, expect a hot route or quick game beater aimed at the shaded underneath zones shown between the deep cornerback drops. Post-snap, key the running back or tight end releasing into the flat since the underneath zone droppers shown in the diagram are the first defenders vacated by the blitz. This pressure beats quarterbacks who hold the ball in the pocket, but a mobile quarterback who can escape the initial rush shown by the red arrows can exploit the vacated middle of the field. If the offense calls a hot route to attack the deep half responsibility of the cornerbacks shown bailing into zone, expect a go route or deep out designed to split the two-deep shell.
Usage Tips
Call this on third and medium to third and long when you expect the offense to take a shot down the field, since the Cover 2 shell behind the blitz discourages deep throws while the pressure forces a quick decision.
Pre-snap, identify if the offense is sliding protection toward the mugged defenders shown in the diagram, and if not, user the free blitzer to attack the opposite side for a clean lane.
Disguise this look by mixing it in after calling Cover 2 Man or Tampa 2 from the same 2-3 Single Mug set so the quarterback cannot key on the mugged linebackers pre-snap.
Hot route the shaded underneath zone defenders shown on the diagram into different spots if you see the offense running quick slants or drags into that space repeatedly.
Use this on early downs against run-heavy personnel to blow up designed runs before they develop, since the extra rushers shown crashing downhill also serve as run fits.
Other Plays in 2-3 Single Mug
 1 LB DogCover 1, Blitz, LB Blitz +1
 Blitz Tex 3Cover 3, Blitz, Zone Coverage
 Bracket Switch WillieMan To Man, Man Coverage
 Cov 3 Buzz Show 1Cover 3, Cover 3 Buzz, Zone Coverage
 Cover 1 GamesCover 1, Line Stunt, Man Coverage
 Cover 1 HoleCover 1, Cover 1 Hole, Man Coverage
 Cover 1 Robber PressCover 1, Cover 1 Robber, Press Man +1
 Cover 2 ManCover 2 Man, Man To Man, Man Coverage
- Cover 2 WildCover 2, Zone Coverage
 Cover 4 PalmsCover 4, Cover 4 Palms, Zone Coverage
 DB BlitzBlitz, DB Blitz
 DB Blitz Tex 3Cover 3, Blitz, DB Blitz +1
 Dbl Safety BlitzBlitz, Safety Blitz
 Double BracketMan To Man, Man Coverage
 Tampa 2Cover 2, Tampa 2, Zone Coverage