Playbooks
46
DefenseExample Plays from 46


Overview
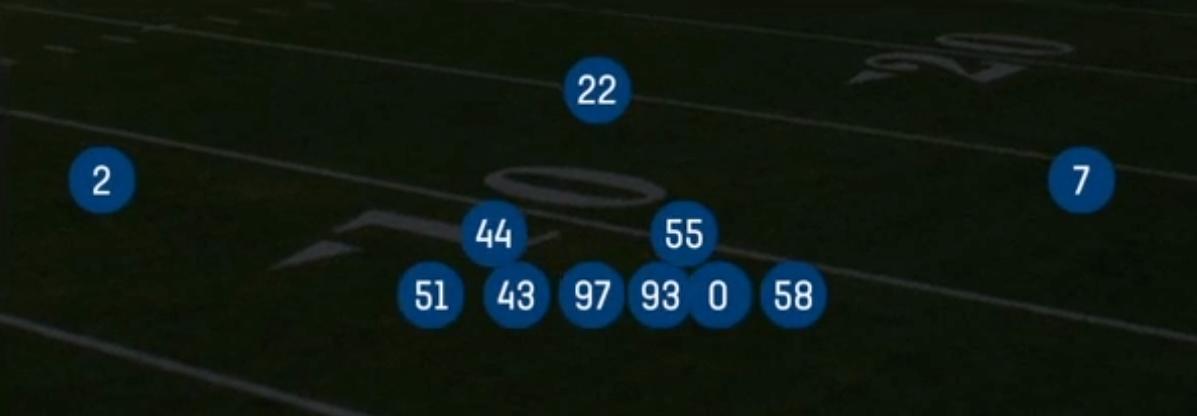
The 46 is a defensive formation built on Base 4-3 personnel, not an offensive set, and it is Madden's most aggressive way to crowd the line of scrimmage. It walks linebackers down toward the edge and rolls a safety into the box, which puts eight defenders near the line and leaves one deep safety. The Bear set is the signature look. Defensive tackles pinch over the guards and a lineman sits over the center, which covers all three interior offensive linemen so guards cannot climb freely to the second level. The Bear Under set shifts the front toward the weak side for different gap responsibilities. The Normal set offers a more conventional 4-3 alignment with the same loaded box philosophy, which lets you disguise pressure without showing the full Bear look.
The core idea is to win at the point of attack by outnumbering the offense's blockers. With eight in the box against a typical two tight end or 21 personnel set, the offense cannot account for every gap, so a defender usually comes free on inside zone, power, and counter. The overloaded edges also create one on one pass rush matchups, since tackles and tight ends are asked to block walked up linebackers in space while interior linemen are tied up by the covered Bear alignment.
The tradeoff is on the back end. The 46 mostly plays single high coverage (Cover 1 and Cover 3 variations) plus blitzes with man or zone behind them, so it forces the offense to beat you with quick, accurate throws before pressure arrives. The formation has 26 plays, so you get enough variety in pressure and coverage to run it as a situational package or as a base look against run heavy opponents who live in heavy personnel.
At a Glance
The 46 fits aggressive 4-3 and attacking run first defensive schemes that prioritize winning at the line of scrimmage and pressuring the quarterback over sitting in soft coverage. It works best for rosters with stout, high block shedding interior linemen, fast pursuit linebackers, and a box safety with strong tackling and hit power, backed by corners who can survive in single high man coverage. Play callers who like to dictate tempo with blitzes and who face power run offenses or play action heavy opponents get the most value, while defenses built around coverage disguise and two high shells will find it too risky as a base look.
Strengths
- Covering both guards and the center in the Bear set clogs inside zone, power, and duo, because interior linemen have no clean path to your linebackers and you keep an extra defender free to fill
- Eight defenders in the box let you win the numbers game against 12, 21, and 22 personnel, which forces run heavy opponents to abandon their identity or throw into obvious pass situations
- Walked up edge defenders create one on one rush matchups against tight ends and running backs in protection, generating fast pressure on play action and max protect looks
- Plenty of blitz options behind a loaded front make it hard for the offense to identify the true rusher pre snap, especially when you show Bear pressure and drop a linebacker into a hook or curl zone
- The Bear, Bear Under, and Normal sets share personnel, so you can rotate fronts without the offense getting a personnel read, and you can add shade or pinch adjustments to change gap responsibilities play to play
Weaknesses
- Single high coverage behind an eight man box is vulnerable to four verticals, post wheel, and seam routes, especially when the offense motions a receiver to get a clean release against your lone deep safety
- Linebackers walked toward the edge struggle in man coverage against slot receivers and pass catching backs, so HB wheels, angle routes, and slot option routes become easy matchup wins for the offense
- Quick game concepts like slants, spacing, and stick get the ball out before pressure lands, which neutralizes your blitz advantage against a patient, accurate passer
- Opponents who audible into Gun Empty or trips spread you out and force your box defenders into space, which exposes the formation's lack of true coverage players
- Outside runs such as toss and stretch can outflank the pinched interior if your edge defenders crash too hard, and a user controlled lurk on the offensive side can read your pressure tendencies quickly
Usage Tips
Deploy the 46 on early downs and short yardage against heavy personnel, then check out to a nickel or dime look when the offense spreads to three or more receivers so your linebackers are not stranded in coverage
Use pinch and slant adjustments in the Bear set to attack specific gaps pre snap, and user the free linebacker or box safety to fill the gap the offense's run scheme leaves open
Mix pressure calls with zone drops that show the same Bear look, since opponents who hot route quick slants to beat your blitz will throw directly into a dropped linebacker or a user controlled hook defender
Against play action rollouts, set your edge defenders to contain so they stay home instead of crashing, and keep your deep safety shaded toward the offense's best vertical threat to limit single high shots
When an offense motions a back or tight end out of the backfield, adjust your man assignments or shift to zone coverage so a walked up linebacker is not isolated on a receiver, and mix Bear Under against strong side run tendencies to change who is unblocked